28 December 2016

Carlsen's Queen Sacrifice

I practice tactics with the computer and so on, in order to keep learning.
Magnus Carlsen*

A few weeks ago, the director of Inland Chess Academy inquired whether the classes for this year's Holiday Chess Camp could be based upon the recent World Championship Match won by Magnus Carlsen over Sergey Karjakin. I embraced the idea, offering two classes on imbalances from games of the championship, a class on the Berlin variation of the Spanish, and one called "Carlsen's Queen Sacrifice."

A Chess.com video inspired me. Sam Copeland's "Magnus Carlsen's World Championship Winning Move" speculated where Carlsen might have seen a sacrifice similar to the one that he played in the final tie-break game to end the match. Copeland identified and walked his viewers through several similar combinations, and then offered the challenge to find more examples. They are easy to find, but Copeland's examples have more elements in common with Carlsen's winning combination than those that I selected for my class.

For my students, I created a worksheet with six positions. My instructions on the worksheet read:

Each of the positions below might appear in a set of chess problems on a computer, in a book, or as part of a worksheet. Train with these to play like Magnus. White to move in 1-4; Black to move in 5-6.

1. White to move
From Fischer -- Kelley, Houston 1964.

2. White to move
From Spassky -- Ciric, Amsterdam 1970

3. White to move
From Hesse -- N.N., Bethlehem 1803

4. White to move
From Fairhurst -- Menchik, Margate 1935

5. Black to move
From Neumann -- Anderssen, Breslau 1864

6. Black to move
From Schulten -- Kieseritzky, Paris 1844

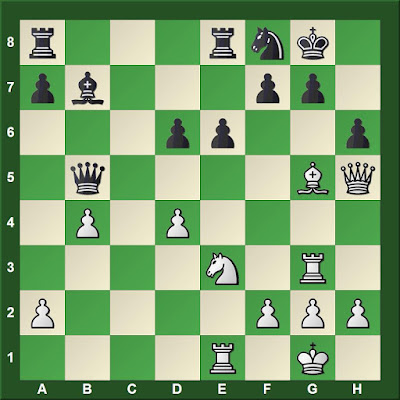
At the start of the class, I had the position below on the demo board. The students tried to find the best moves for both sides, and we ended up following the moves actually played in the game. In this case, the thematic sacrifice did not work and White had a better move.

White to move

The game is Arnous de Riviere -- Morphy, Paris 1858.

The purpose of the class was to suggest in agreement with Sam Copeland that Carlsen was able to play his sacrifice quickly due, in part, to pattern recognition. Seeing the pattern is one thing. Calculation is necessary as well, which was the point of the Morphy game. Practicing calculation skills was a primary focus through this class.

In my concluding remarks, I mentioned several resources for practicing tactics, including Laszlo Polgar, Chess Training in 5334 Positions (1994). This book contains a selection of 600 miniatures in the back of the book organized by sacrifices on six pair of squares, f2/f7, g2/g7, etc. Sacrifices on h3/h6 are one of the six.


*Colin McGourty, "Carlsen and Aronian: A Tandem Interview" Chess24 (27 June 2014), https://chess24.com/en/read/news/carlsen-and-aronian-a-tandem-interview.

23 December 2016

Patterns and Calculation

There has been quite a bit of discussion concerning pattern recognition the past week on Chess.com. An article by a philosophy student,* "Pattern Recognition: Fact or Fiction?", provoked several dozen comments, many challenging the author's analysis. There is also a forum thread that spins off this article, "'Pattern Recognition' DEBUNKED", and another thread on the topic in a closed group for over the board players. The private group's thread started in August and inquires into the practicality of creating a pattern bank. Would it need 10,000 positions? More? I have contributed to all of these threads.

These discussions reveal an absence of a clear and accepted definition of patterns in chess. Are patterns a static arrangement of pieces that crop up with some regularity? Are patterns dynamic relationships, such as all pins constituting either single pattern or perhaps a specific category of patterns? What about typical pawn structures, such as the Caro-Kann structure that also commonly crops up in the Scandinavian Defense (see Panayotis Frendzas' review of Vassilios Kotronias, The Safest Scandinavian)?

These questions linger in the back of my mind, becoming active while reading a chess book, solving tactics problems, or playing. I am currently reading with an aim to reviewing Paul Powell, The Fighting Dragon: How to Defeat the Yugoslav Attack (2016). Powell makes pattern recognition central to his approach to opening study. My last youth lesson before the holidays focused on a simple checkmate combination that occurred in a blitz game and is part of my Knight Award tactics set (see "Pattern Training"). Next week at a chess camp, I am teaching a class on the Qh6+ sacrifice that ended this year's World Chess Championship match. Sam Copeland created a video on the topic for Chess.com. My work begins with his challenge to find more examples of this pattern.

This morning I solved two tactics problems on Chess.com's tactics trainer. The first one had a 2002 rating but took me a mere sixteen seconds. I had seen the same problem a few days ago and spent several minutes calculating before solving it successfully. When I saw it this morning, I recognized it after about ten seconds. Instantly, I knew that I had to attack the queen with my knight. A few seconds were needed to either remember or quickly recalculate the correct square among the two possibilities.

The second problem gave me more difficulty.

White to move

Naturally, I quickly looked at 1.Nxd1, rejecting it in the light of the fork of knight and pawn by 1...Rd4. It was clear that I needed to push my pawns, but experienced a good deal of confusion about how that was possible. Not only did it seem that the rook could stifle the ambitions of either pawn, but also I quickly saw that 2...Rxa8 or 2...Rxd8 would be checkmate. I spent some time calculating lines that begin with 1.Kg8 with the idea to support the d-pawn. These fail.

After about six minutes, I realized the rook was overworked and knew the first move.

Slowly a learned pattern emerged in my memory. Two connected passed pawns on the sixth rank are too much for a rook. But, my pawns are separated. Nonetheless, a solution dawned on me! 1.d7, pushing the pawn that the rook is not behind (as one would do if the pawns were connected). 1...Rd4 2.a7.

The rook cannot stop both pawns! But Black has another resource.

2...Bf3

White to move

Both promotion squares are guarded. Time to calculate further. Earlier, during my confusion, I had looked at Ng4+, seeing that it led nowhere. But, now, this move decoys the bishop from protection of the promotion square.

The decoy theme is certainly a dynamic pattern.

Of course, the king can move out of check, so the bishop will not be distracted so easily. In my calculation, I began to comprehend why the problem composer put a pawn on h4 (I'm assuming the problem is composed).

During my calculations, another pattern revealed itself: interference. 3.Ng4+ is the correct move! 3...Kh5 (3...Kg6 allows 4.Ne5+ forking king and bishop) 4.Nf6+ Kxh4 5.Nd5!

Black to move

If the bishop captures the knight, the rook no longer guards d8. If the rook captures the knight, the bishop no longer guards a8.

This problem could have been solved by pure calculation. That it took me more than ten minutes to solve, suggests that calculation was my best resource. Even so, along the way, patterns that were not instantly clear to me guided me and aided the calculation.

Because the problem took me so long, I gained only one point on my tactics rating. The average solving time is 2:34, but 2/3 of those who attempt the problem fail.


*He identifies himself as a teacher who was trained in philosophy. Readers of Plato understand that Socrates always thought of himself as a student, as a lover of wisdom who pursues knowledge and truth.

20 December 2016

Twelve Blitz Games

A few days ago, I bemoaned my rating woes--the constant, often futile quest to maintain an online blitz rating above 1900. At the same time, I highlighted the need for an attitude adjustment. Chess should be fun (see "Attitude"). Serious chess play means not worrying about rating, but approaching each game as an eager learner. In that post, I offered light, but extensive annotations to an entire game.

After more than a week, I rose back above 1900 last night. I cannot say that I have been free of rating-obsessed frantic blitz since Friday's post. However, self-consciousness of this counter-productive attitude has moderated it. Mostly, I've been trying to enjoy and learn from each game.

In this post, I offer brief highlights of the critical positions in my last twelve blitz games.

On the Black side of an exchange French, Black already has equality.

White to move

My opponent abandoned the game. Perhaps he or she has a life apart from chess.

I had Black again in the next game, This time, my opponent played the Steinitz variation against my French. Happily, I'm reasonably comfortable in the Steinitz after having gone through every single C11 game ever published in Chess Informant.* Alas, I had no better than an equal position.

White to move

31.a4?

Now I am winning. My opponent resigned one move from checkmate ten moves later.

I outplayed my opponent from the White side of a Queen's Gambit Declined. I had eleven seconds remaining in this position.

White to move

Either 70.Qb1 or 70.Qb7 will drive the king to a2 for 73.Qb2#. Instead, feeling the time pressure in a game I cannot lose, I played 70.Qc4? Stalemate.

In the next game, I dropped a pawn in the opening after my French Defense transposed into a Sicilian Alapin. I salvaged the game with a drawing combination.

Black to move

Instead of forcing the repetition and escaping with a draw, I played 18...Nf2? thinking that I had an attack. I lost.

I played a mainline of the Catalan that I usually avoid and found myself down a pawn. When my opponent advanced the extra pawn without adequate protection, I blockaded it and should have been equal.

White to move

I had planned 36.Kd2, but stumbled and played 36.Nb6?

The game continued 36...d2-+ 37.Rc7+ Ke8 38.Nd5

Here Black wins easily with 38...Rxd5 39.exd5 d1Q.

Instead, my opponent played 38...d1Q?

White can force a draw. 39.Nxf6+ Kf8 40.Nh7+ Kg8 41.Nf6+.

My opponent found a way out of the draw and lost.

41...Kh8? 42.Rh7#.

I had the White side of the Philidor Defense in the next game. I traded two minor pieces for a rook, but left my opponent's rook pinned for many moves before finishing the exchange. I was able to gobble a few pawns and should have been looking forward to a long endgame in which I might be better. However, my opponent blundered with 34...Nfd7?

White to move

After 35.Nc7+, my opponent resigned.

My next opponent turned the table quickly on my effort to play the Catalan in the next game and won a rook for a bishop. Queens came off and I netted a pawn, playing on with a bishop pair against a rook and bishop.

Black to move

My opponent went after my kingside pawns. 40...Rh3? 41.Bb6? (41.Be6+ wins the rook) 41...Rxg3?? 42.Be6+ Kb8 43.c7+ Kb7 44.c8Q#.

Another game went badly, and I was down a couple of pieces. However, my pieces found good coordination.

White to move

27.Rf2 probably leads to a draw by repetition, but my opponent played 27.Bf4? It took me  few seconds to see 27...Qg2#.

The next game also went badly and I was down a piece.

White to move

White needs to activate his king and the win should be in hand. Alas, technical wins require some time on the clock and my opponent had none. I won on time.

An insanely complicated game left me in an objectively lost position, but not without resources.

Black to move

My opponent probably wins easily after 43...Be4+, but there was nothing wrong with 43...Ra8. The game continued  44.Rxc7 Rxa4 45.Rd7 Rxc4 46.Rxd6 and here Black needs to step out of the pin with 46...Kg5. Instead, 46...Rd4? was played and after 47.c7, my opponent resigned.

I opted for the London System as White in the last game. Both sides had chances and made errors. We reached this position, which offered me a simple win.

White to move

The finish is instructive as well, as the errors continued.

63.Rg7+ Rxg7 64.fxg7 Kxg7 Kf2?

The king needs to head towards c5. After 65.Kd2 Kf7 66.Kc3 Ke7 67.Kb4 Ke6 68.Kc5 Kd7, white can fail with 69.e6+? Kxe6 70.Kxc6 Ke7 71.Kxd5 Kd7 and Black seizes the opposition to hold a draw. However, 69.Kb6! assures the win, as White will get both Black pawns.

65.Kg6 66.Ke3 Kf5 67.Kd3 Kf4?

67...c5! 68.dxc5 Kxe5 draws.

68.e6 and we played a few more moves, but White's queen makes my victory easy enough that further errors should be inconsequential.


*ECO Code is a trademark of Chess Informant.

17 December 2016

Attitude

I will not worry about winning or losing rating points. I will only concern myself with learning from each game that I play.
Paul Powell, The Fighting Dragon: How to Defeat the Yugoslav Attack (2016), 18.
Before the end of the Seattle Seahawks historic loss to the Green Bay Packers last Sunday, I went online to play a few games of blitz. My play was angry and motivated by the desire to inflict misery upon my opponents. The Seahawks are my team and they suffered their worst loss in half a decade. I like the Packers, too. They are my second favorite team, but I don't like them thrashing my Seahawks.

A few of my angry chess games were successful victories, but others aggravated my misery facing the Seahawks' loss. I went back into the television room to watch the end of the slaughter. I tried turning the sound off, thinking the loss would be less painful without the voices of Troy Aikman and Joe Buck.*

After the football game, I frantically played chess late into the night. My rating suffered. Through the course of the week, I played game after game with more focus on getting my online blitz rating back above 1900 than on learning anything or even enjoying the game. From a rating in the mid-1900s before the Seahawks catastrophe, I managed to drop to the low 1800s several times before climbing back to the 1880s.

The Seattle Seahawks had another game Thursday night. A few terrific plays gave them the points they needed while the defense kept the Los Angeles Rams from scoring more than a field goal. The Seahawks clinched their third division title in the past four years!

I played about an hour of blitz after the game, but efforts to reach 1900 remained futile. I also spent some time reviewing a few of the week's games. Friday morning, I reviewed Thursday night's games and then played a few more.

When the last game began, I saw that my opponent was rated 2023 (my peak of 2005 was achieved last February). Some advice came to mind. Last weekend I started reading Paul Powell, The Fighting Dragon (see epigraph above). I said to myself, "okay, let's see what I can learn." My French Defense transposed quickly into a closed Sicilian, an opening that often gives me difficulty. I offer the game below with some light annotations.

Internet Opponent (2012) -- Stripes,J (1889) [B24]
Live Chess Chess.com, 16.12.2016

1.e4 e6 2.Nc3 c5 3.g3 Nc6 4.Bg2 

My database shows that I have been on the Black side of this position 28 times with eighteen losses and ten wins. The sole over the board game was played twenty years ago. I have played many moves here, most often Nge7 or Be7.

4...b6?!

A new move for me in the position. A better plan for Black is to play Rb8 and then b7-b5. I learned this idea while reviewing several games in the database. My intent with b7-b6 failed to take account of the idea to fight for queenside space and activity, but aimed to oppose White's light-squared bishop with my own. I was attentive to the potential for tactics that could threaten my bishop or rook along the a8-h1 diagonal. I addressed these possibilities through cumbersome means.

4...g6 is preferred by top players. I have played it once.

5.d3 Bb7 6.Nge2

6.f4 g6

6...Nge7 7.Nge2 d5 8.exd5 exd5 9.0–0 d4 and Black won in 34 moves Heimrath,R (2321) -- Chandler,P (2238), Schwaebisch Gmuend 2001.

7.Nf3 Bg7 8.0–0 Nge7 9.g4 h5 and Black won in 52 moves Seirawan,Y (2635) -- Kamsky,G (2686) playchess.com INT 2006.

6...a6

Preparing b6-b5.

6...h6 7.Be3 Nf6 8.h3 Bd6 9.Qd2 Rc8 and drawn in 33 moves Meitner,P -- Heral,J, Vienna 1873.

7.0–0 Qc7 

Protecting the bishop.

8.h3

8.Bf4 e5 9.Be3

8...Nge7 9.Be3 h5

I might castle queenside.

10.Qd2 g6 11.f4 Bg7 

I would like to post a bishop or knight on d4, although my opponent likely will not allow that. There is also a possibility of playing d5 with the support of a rook on d8. Such a thrust in the center is a normal way of meeting White's obvious plan to expand on the kingside.

White to move

12.e5 

My bishop is temporarily immobile. Even so, this move may reveal a faulty plan on White's part. He might consider preparing f4-f5. Here, perhaps, my ninth move may have served to slow his kingside expansion.

12...Nf5

I might like to exchange knight for bishop and then force an exchange of center pawns in order to open the position somewhat. On the other hand, maybe I should castle first.

13.Ne4 d5 

White's knight attacks two important squares.

14.exd6 Nxd6 15.Nxd6+ Qxd6 16.Nc3 Qc7 17.Rae1 0–0 

Was 17...O-O-O worth considering? I did think about it.

18.Kh2 Rad8 19.Ne4 Nd4 20.c3 Nf5 

Still after that bishop.

White to move

21.Bf2 

White's pawns are more mobile.

21...Bxe4

The queen needs a role other than defending a bishop. My strategic errors in the opening have given me a slightly worse position.

22.Bxe4 Nd6 23.Bg2 Qd7 

Intending Nc4.

24.Qe2 b5?

White to move

25.Rd1

White should have lopped off the c5 pawn.

25...Nf5 26.Be4 

The c5 pawn remains en prise.

26...Ne7 27.g4 hxg4 28.hxg4 Qc7 

Finally, I defend the c5 pawn. White has achieved an advantage in space on the kingside, rendering his pieces more mobile and offering more flexibility to probe for weaknesses. The bishop pair also could be put to use. White's rooks and queen have two ranks for maneuvering. Black is strategically lost, it seems to me.

29.Bg3 Qb6 

Obviously, I cannot allow f4-f5 to unleash a discovery on my queen. When I am losing many blitz games in sequence, it often stems from being oblivious to these simple threats. Sometimes single-minded focus on my own attack leads to such blindness. That is not the case here. My pieces are too poorly coordinated to generate threats.

30.Kg2 Nd5 31.Rh1 Bf6

Intending to play Kg7 and contest the h-file with my rooks.

32.g5 

White drives the bishop back. However, this move reduces White's flexibility for attacking with pawns, as did his 12th move.

32...Bg7

White to move

33.Bxd5?

Now, finally, I get some play on the d-file.

33...Rxd5 34.Qg4 Qc6 

Setting up a simple discovery. Two can play this game of checking the opponent's eyesight.

35.Kf2 b4 36.Qh4 Rfd8 

Otherwise 37.Qh7#. Of course, I want both rooks on the d-file anyway.

White to move

37.c4?

White practically concedes the game. White's advantage has dissipated since 33.Bxd5, and now Black gains a decisive advantage. 37.d4 seems much better, offering chances for both sides.

37...Rxd3 38.Rxd3 Rxd3 39.Re1 

At this point, I realized that the game had turned my way. We were both running low on time, however. In blitz, the clock often decides matters after a complex struggle.

Black to move

39...Qf3+ 40.Kg1 Qxg3+ 41.Qxg3 Rxg3+ 42.Kf2 Rd3 43.b3 Bd4+ 44.Ke2 Re3+ 45.Kd2 Rxe1 46.Kxe1 Bc3+ 

46...Be3 is obviously much better. Both players were down to fifteen seconds. I started moving much faster than my opponent with easier premoves. From here to the end of the game, I used less than five seconds, while my opponent used ten.

47.Ke2 Bd4 48.Kf3 Kg7 49.Ke4 Bb2 50.Kd3 Bd4 51.Kc2 f6 52.Kd3 fxg5 53.Ke4 gxf4 54.Kxf4 Kf6 55.Ke4 g5 56.Kf3 e5 57.Kg4 Kg6 58.Kf3 Kf5 59.Ke2 g4 0–1

Although played before 8:00 am, this blitz game was my last for the day.

*It is interesting that Seahawks fans and Packers fans have independently launched protests against these two broadcasters, accusing them of bias against their teams.

15 December 2016

Pattern Training

During the last sessions before the holiday break, I sought to impress upon my young students a benefit that comes from tactics training. Work enough problems and patterns from training start appearing in one's own games.

The beginning students started with the Pawn Award: Checkmates and Tactics worksheet. This worksheet has six positions in which White can deliver checkmate on the move. I was happy that many of them were able to solve most of the problems rather quickly. Even so, one problem continues to prove difficult for beginners. As there is only one move that checks the enemy king, the difficulty beginners have in finding this move perplexes me.

White to move

After completing the six exercises, I showed two more positions to the beginning students. One is problem 10 on the Knight Award: Checkmates and Tactics worksheet. I gave each student a copy of the worksheet and directed their attention to number 10.

White to move

The position comes from Horvath -- Vigus, Haarlem 1998. I did not expect the beginners to solve it. I let them guess for a few minutes, then walked them through the solution. I sought to get them to imagine the sequence of moves in their head as I described them. A few could "see" it.

Then, I directed the students' attention to the demo board, where there was a position from a game that I played earlier this week. I wanted them to see how the solution found by Horvath and my game featured essentially the same pattern.

White to move

My advanced students saw only the second and third diagrams. I expected them to be able to solve the two positions.
10 December 2016

Pigs

Lesson of the Week

For reasons that are not entirely clear, rooks on the seventh rank (or second) are sometimes called pigs or swine. The term "blind swine" or "blind pigs" has been attributed to Dawid Janowsky (1868-1927) and Rudolf Spielmann (1883-1942) by several writers, but the origins remain unknown.* Rooks on the rank occupied by the opponent's pawns can gobble everything. Two pigs, or one pig working with a bishop, can be a decisive pair. Sometimes they can save an otherwise lost game, as Janowsky showed on at least two occasions. Sometimes they can deliver checkmate or gobble enough pieces to produce a decisive material advantage.

My advanced students this week saw three positions. The first is from a game played by Janowsky against Jackson Showalter in 1898 (see Chess Notes 5160).

White to move

The checkmate threat was obvious to my students.

34.Rf1 Re8 35.Rff7 Ra6!

The point of Showalter's move here was less obvious to the young players. The point is that now 36.Rc7+ loses because the king will find shelter from checks on a8. Then, White will be helpless against Black's queenside pawns.

36.Rb7 a3 37.Rhc7+ Kd8 38.Rd7+ and White's rooks force a draw by repetition.

The second position was from one of my own blitz games this week.

White to move

Had my opponent played 35...g5 instead of 35...Nb5, I would have lost the game. Now, however, I have a clear and simple win.

36.Rxg7+ Kh8 37.Rgxf7+ Kg8 38.Rg7+ Kh8 39.Rh7+ Kg8 40.Rcg7#.

I call this checkmate pattern "two pigs" in my "Checklist of Checkmates". Some books call it the blind swine checkmate.

The third position is quite challenging until you have seen it once. The solution is the famous "windmill" that Carlos Torre used to defeat former World Champion Emanuel Lasker in 1925.

White to move

It was my knowledge of this famous combination that guided me in setting up one final desperate attempt in the game above. My opponent, on the other hand, did not recognize the threat.

25.Bf6!

This move is the only one leading to advantage, according to chess engines.

25...Qxh5 26.Rxg7+ Kh8 27.Rxf7+ 

A series of discovered attacks force Black's every move. The rook first clears the seventh rank of all but one pawn, then goes after the queen.

27...Kg8 28.Rg7+ Kh8 29.Rxb7+ Kg8 30.Rg7+ Kh8 31.Rg5+ Kh7 32.Rxh5 Kg6

With this fork, Lasker wins back some of the material.

33.Rh3 Kxf6 34.Rxh6+ Kg5 35.Rh3+ and White went on to win due to his three pawn advantage.


My beginning students received instruction in the elementary checkmate of queen and king against a lone king. I worked with students one at a time. Parents can learn the technique from "Teaching Elementary Checkmates".


*See Edward Winter, Chess Notes 7003, which cites Francis J. Wellmuth, The Golden Treasury of Chess (1943) attributing the term to Janowsky; and Chess Notes 6108, citing attribution to Spielmann in I.A. Horowitz and Geoffrey Mott-Smith, Point Count Chess (1960).

02 December 2016

Lessons from the Championship

My advanced students this week saw several positions from the tie-break games of the World Chess Championship.

White to move

The first position is from the final game. I wanted my students to first understand Black's checkmate threats.

The game concluded 48.Rc8+ Kh7 49.Qh6+ 1-0.

We also looked at 48.Qg3, which wins more slowly and the checkmate sequence that follows had Black played 48...Bf8.

If your opponent threatens checkmate in one move, making certain that all of your moves are check is the only way to conduct a counterattack.

The second position also concerns understanding threats. It is from the third tie-break game.

White to move

The game finished 38.Rxc7 Ra1 0-1.

We looked at Black's several checkmate threats in the final position and also how White could have kept the game alive by playing 38.Rb1. Failure to find this move was a rare defensive oversight by Sergey Karjakin.

Most complex was a series of positions from the second game.

Black to move

The key ideas here require understanding the checkmate patterns that White needs to win and Black's drawing resources. For example, if Black can get rid of White's g-pawn and the dark-squared bishop, he would happily trade everything.

The game continued 61...Re2 62.Bg4

White had better chances to win after 62.Kf7. I mentioned this to the students, but we did not explore it in detail as it is quite complex. It's no surprise that World Champion Magnus Carlsen missed it in a rapid game.

62...Re8 63.Bf5 Kg8 64.Bc2 Re3 65.Bb1 Kh8 66.Kf7 Rb3 67.Be4 Re3 68.Bf5 Rc3 69.g4

An important move shielding the king from harassment from the rear.

69...Rc6 70.Bf8 Rc7+ 71.Kg6 Kg8 72.Bb4 Rb7 73.Bd6 Kh8 74.Bf8 Kg8 75.Ba3 Kh8 76.Be6 Rb6 77.Kf7 Rb7+ 78.Be7

We went through these moves quickly, observing Black's plan of constant harrassment and White's efforts to create checkmate threats.

Black to move

Finally, from this position, Karjakin seized his chance to exchange into an ending where White's bishop operates on the wrong color squares.

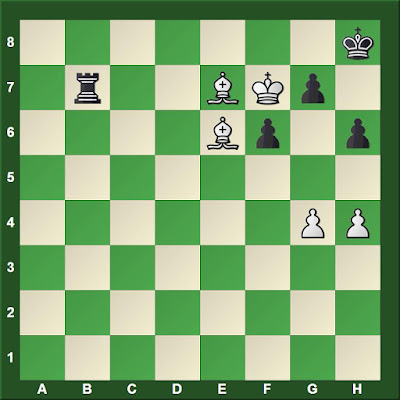
78...h5! 79.gxh5 f5 80.Bxf5 Rxe7 81.Kxe7 Kg8 82.Bd3 Kh8 83.Kf8 g5

White to move

White has two ways to capture Black's pawn, both of which lead to stalemate. Leaving the pawn on the board also draws.

Carlsen captured en passant.

84.hxg6 1/2-1/2.

25 November 2016

Karjakin -- Carlsen 2016: Critical Positions

The World Chess Championship is tied 5-5 after ten games. Today is a rest day. Before the match, many were predicting a victory for the reigning champion, Magnus Carlsen. Some even thought that Carlsen would retain his title in fewer than twelve games, regarding Sergey Karjakin as clearly the inferior player. Karjakin had not been a favorite to win the Candidates tournament either. Nonetheless, Karjakin defended well in difficult positions early in the match. Perhaps Carlsen had a stronger move in a few cases. Karjakin also missed a few better moves. Some of those positions are presented below.

The first game was not particularly eventful. Although Carlsen managed to create weaknesses in Karjakin's pawn structure, the challenger managed to hold the position without too much pain. Looking at the final moves from my position as a class player, however, I did not know at a glance whether swapping the last pair of minor pieces could give either player an advantage in the pawn ending.

Black to move
After 40.Nd4+
The game concluded 40...Kd6 41.Nb5+ Kd7 42.Nd4 Kd6 and a draw was agreed due to repetition assured.

Had Karjakin played 40...Bxd4, would the game be drawn as well? Grandmasters probably understand the resulting pawn position at a glance, but many other chess players could do well to play it out against a friend or computer.

Carlsen's play with Black in game two deprived Karjakin of any real chance for an advantage.

Ruslan Ponomariov, who wrote the annotations to the first two games for ChessBase, thought that Carlsen could have presented Karjakin with a tactical problem to solve with a different move 26, but Karjakin probably would have seen the trick clearly.

Black to move
After 26.b4
Carlsen played 26...Re6 and the game was drawn on move 33. Ponomariov thought that 26...c5 27.Nxb5 cxb4 28.Nd6 Re6 29.Nxc8 Rxa6 might lead to complexities.

In the third game, Carlsen secured an advantage and then pressed hard for a win. The ending generated a lot of interest around the world. Yasser Seirawan was at a dinner in Saint Louis, where he joined Viswanathan Anand, Hikaru Nakamura, Veselin Topalov, and Fabiano Caruana following the game on Caruana's smartphone. Seirawan's annotations for ChessBase presented a drawing opportunity missed by Karjakin from this position.

Black to move
After 70.Nc6
The game was drawn after 70...Kxf5 71.Na5 Rh1 72.Rb7? (72.Rf7+ seems to be winning) 72...Ra1! 73.Rb5+ Kf4! 74.Rxb4+ Kg3 75.Rg4+ Kf2 76.Nc4 h3 77.Rh4 Kg3 78.Rg4+ Kf2.

Seirawan's analysis, presenting the ideas of four other Grandmasters who "out-rated" him, after 70...Rc3!! is worth checking out at the link. Credit Anand for convincing the others that Karjakin could hold.

Chess fans following the game with the aid of engine analysis quickly spotted Carlsen's decisive error as he was pressing for a win in game four. However, Carlsen thought the line he played was winning. It took many more moves before Carlsen's winning ideas had been proven illusions.

Black to move
After 45.Nd1
How many humans could have found 45...Be6 and then had the ability to convert against Karjakin's defensive efforts? Carlsen played 45...f4, gaining a secure passed pawn on the kingside that left him plenty of time to penetrate with his king on the queenside. Many times during the next fifty moves, Karjakin had only one piece that could move without his position collapsing. Sometimes his king had to move. Other times his knight could move, and often only the bishop could. He was very close to zugzwang, but not quite.

Karjakin was slightly better in game five and spent a lot of time in this position, which my advanced students were watching on the demo board at chess club while it was taking place.

Black to move
After 42.hxg4
Karjakin's pawn sacrifice, 42...d4!, brought pressure against the White king. Carlsen returned the sacrifice two moves later and managed a draw.

Gmae six was the least interesting game, except to those who seek to understand the Marshall Gambit and its variants when Black needs a draw against the Spanish. In the annotations for ChessBase, Tiger Hillarp Persson points out Karjakin's method and the computer's method of securing a clear draw from this position as White.

White to move
After 20...Rfe8
For game seven, Karjakin switched to 1.d4 but made no progress. Already at move 15, he needed to secure equality.

White to move
After 15...O-O
16.Ba3 forces material off the board. Karjakin ended up with an ending in which he was a pawn up, but had no chance to fight for a win.

After failing to get an advantage in the two shortest games of the match, and his two consecutive Whites, Karjakin explained, "it is better to play well than to play with White." In game eight, he broke the historic run of draws (the longest in a world championship match sine 1995), winning with the Black pieces.

Both players made errors in the time scramble just before move 40. Carlsen made a bad move in a bad position and then Karjakin missed the strongest continuation. Play went on into another hour.

White to move
After 48.Nd3
It is easy for a computer, and for a human looking at computer evaluations, to understand where White needs to place his queen in such a position. Perhaps the queen is where she belongs and something else should move. For human players, however, it is very difficult to find the right move. World Champion Magnus Carlsen played 49.Qa5? and Karjakin found a way to bring home the full point.

In the ninth game, Sergey Karjakin might have had a chance to put Carlsen away and gain the upper hand in the match.

White to move
After 38...Ne7
Karjakin thought for a long time, finally choosing 39.Bxf7+. Commentators favor 39.Qb3. Neither move has consequences that are clear to human players.

In the tenth game, Karjakin missed a forced draw early in the game and then suffered a long time.

Black to move
After 20.Nd2
How many players can find a draw here without engine assistance?

Karjakin finally cracked after defending a difficult endgame for many hours, allowing Carlsen to even the score.

18 November 2016

Beating the Italian

Last night, I finished with a perfect 3-0 to win my section of the Turkey Quads. I had not played in this event since 2011, and then it started a nice run of wins (see "Eleven Consecutive Wins!"). That run propelled me to my lifetime peak USCF rating of 1982, so this year's success in the Turkey Quads could be a good omen. However, I don't believe in omens. I do believe in training. My approach to chess training has been a little more serious since the Eastern Washington Open, my fourth consecutive tournament that led to a rating drop.

In reply to Todd Bryant's challenge (see comments on "Good Blitz, Bad Blitz"), these annotations were produced without reference to databases and engine analysis, except for limited use of the Chess Openings app on my iPhone during the postgame analysis, confirming that my sixth move was unusual.

van Heemstede Obelt,Walter (1600) -- Stripes,James (1750) [C50]
Turkey Quads Spokane (3), 17.11.2016

1.e4 e5

Everyone in Spokane knows that I play the French, but I don't always.

2.Nf3 Nc6

I considered 2...Nf6 for about five seconds, as I'm playing the Petroff in a correspondence game right now after having won in twenty moves on the White side against the same opponent.

3.Bc4 Bc5

3...Nf6 is too risky for me with the clock running. I believe that Black is objectively fine against the Fried Liver Attack, but that in practical play White has a clear edge.

4.d3 Nf6

I thought that I would castle next move.

I considered 4...h6, but did not seriously calculate 5.Nxe5 Nxe5 6.d4 Bd6

 (6...Bxd4 7.Qxd4 Nxc4 8.Qxg7 Qf6 9.Qg3)

7.dxe5 Bxe5 8.Qh5 Qf6

5.Bg5 h6

I remembered some Paul Morphy games where he delayed castling and threw his pawns and better coordinated pieces at the enemy king.

6.Bh4 Qe7?

This move appears to be unusual, or at least my opponent thought so after the game, and the Chess Openings app on my phone confirmed his hunch.

a) 6...d6 seems simple enough.
b) 6...Nd4? invites 7.Bxf7+ Kf8 (7...Kxf7 8.Nxe5+) 8.Nxe5 with a clear advantage for White.
c) 6...g5 7.Nxg5 frightened me 7...hxg5 8.Bxg5.

7.Nc3

And now I thought for ten minutes, feeling that I had given up a little too much already. How am I going to get a playable game? I decided that I needed to push my kingside pawns and be prepared to castle long. Would an open b-file prove useful to my opponent? I decided that he could not organize forces there fast enough to balance what I hoped to accomplish on the kingside.

Black to move

7...Bb4

7...g5 looks even worse than before 8.Nxg5 hxg5 9.Bxg5 with the idea 10.Nd5.

8.a3 Bxc3+ 9.bxc3 Nd8?!

The knight is headed to f4, but maybe 9...d6 is better.

10.Nd2

10.d4 challenged Black's effort to reposition his knight. 10...d6

(10...exd4 11.cxd4 If my students were shown this position and told it was a Morphy game, they would say that Morphy has White. Black is clearly underdeveloped, as were many of Morphy's opponents.)

11.d5 Bg4 12.Qd3 holds little promise for Black.

10...Ne6 11.0–0

11.Bxe6 Qxe6 12.0–0 g5 13.Bg3 d6 White's pieces are playing; Black's are watching.

Black to move

11...d6

I was thinking that either White's f-pawn of his or h-pawn would move after I drove the bishop back. I wanted to be able to sacrifice my bishop on h3 if he pushed that pawn.

12.Bb3 Nf4 13.Nc4 g5 14.Bg3 h5 15.f3

I did not work out all the details after 15.h3 but thought that 15...Bxh3 was at least worth considering. 16.gxh3 Nxh3+ 17.Kh1

(17.Kh2 h4)

17...h4 18.Bh2 g4 19.Ne3

(19.Rg1 Nxf2+)

19...g3 20.Bg1 g2+ 21.Kxg2 Nf4+ 22.Kh1 Qd7.

15...h4 16.Be1

16.Bf2 g4 17.Be3

(17.Ne3 helps me 17...g3 18.Be1 gxh2+ 19.Kh1 (19.Kxh2 h3 20.g3 Ng2 21.Qe2 Nh5 22.Nxg2 hxg2 23.Kxg2 Bh3+ 24.Kxh3 Nf4+ is obviously not forced at every turn, but serves to reveal that Black can temporarily sacrifice material and earn a return on the investment)

19...h3 20.g3 N6h5 21.gxf4 exf4 also looks good for Black.

16...g4 17.Ne3

Here I again thought for a long time. I observed that I had not yet sacrificed anything and decided to give my opponent something else to think about in addition to my kingside attack.

17...c6

Walter thought for a long time here, and while he was thinking I discovered that my last move sacrificed a pawn. Then, I began looking for ways to get some use from the sacrifice.

I considered 17...g3 but was not convinced that I had anything after 18.h3 Nxh3+ 19.gxh3 Bxh3 looks good for Black, but this position was not clear in my head during the game.

18.fxg4

Black to move

18...h3 19.Rxf4 

This move caught me by surprise, and I think it was a mistake.

I expected 19.g3 Ng2 20.Nxg2 hxg2 21.Kxg2?

(After the game, we looked at 21.Rf2 Nxg4 22.Rxf7 concluding that White was winning)

21...Bxg4 22.Qd2 Bh3+ and Black seems better.

19...exf4 20.Nf5

I'm looking for the trap--White's reason for sacrificing the exchange, and do not see it.

20...Bxf5 21.exf5 0–0–0 22.Bf2

With this move, White's idea becomes clear.

Black to move

22...Rdg8 

I think that I have a clear advantage now.

23.Bd4 Rxg4 24.Qxg4

I saw this possibility, but was happy that if my opponent went for the two rooks for the queen, I would have a smother mate.

24.Bxf6 Rxg2+ 25.Kf1 Qxf6 seemed the alternative.

24...Nxg4 25.Bxh8 Qe3+

Now I discovered to my horror that my own pawn on h3 prevents the smother mate. Clearly, even a win reveals plenty of room for improving my play when I overlook such obvious problems with my plan. Pattern recognition in the absence of concrete analysis is a worthless skill.

26.Kh1

Black to move

hxg2+

I thought that I still had a checkmate by force here, and do, but not the checkmate that I imagined.

26...Nf2+! 27.Kg1 Somehow I missed 27...Nd1+ 28.Kh1 Qe1#.

27.Kxg2 Qf2+ 28.Kh3 Nxh2

28...Qxh2+, which I had planned, loses the knight.

0–1

Walter resigned as checkmate can be delayed, but not prevented. 29.Be6+ fxe6 30.Rg1 Qxg1 31.Kh4 Qg4#.