Showing posts with label removing the guard. Show all posts

07 September 2018

In a Heartbeat

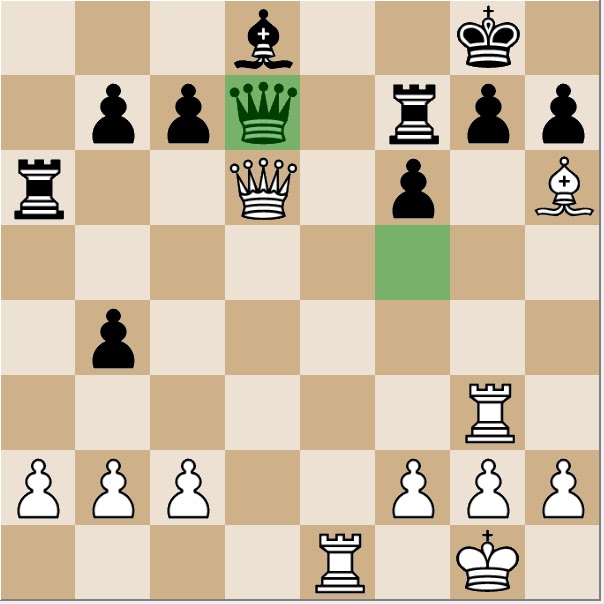
I would play Black's move here in a heartbeat, but it takes longer for me to see the ramifications with clarity. From a blitz game.

Black to move

Aronian,L. -- Anand,V., Zurich 2016.

25 November 2017

Activity

For the past three months, I have been too busy with other matters to create articles for Chess Skills. I have studied no chess. My chess activities have been limited to coaching and a few games of online blitz most days. Things should get back to normal in December.

I had White and the move from this position against a FIDE Master on Thanksgiving morning. It was my third victory against a titled player in one week. The position will be useful for my elementary students.

White to move

21 April 2017

Tactics: Basic and Advanced

Lesson of the Week

Bobby Fischer has been my theme this week. Most of my students have seen various positions derived from his brilliant win against Donald Byrne at the Rosenwald Trophy Tournament in New York, 1956. The whole game is posted at "Byrne -- Fischer, New York 1956". The students in my advanced club did not have difficulty finding the smother checkmate that might have occurred, but struggled to work out the game's finish without moving the pieces.

Black to move
After 18.Bxe6 (not played)
 Black to move
After 36.Kf1
Fischer found a checkmate in six, but there was one in five. Either would be acceptable if my young students could describe the sequence in chess notation without moving the pieces.

Students in my clubs were also presented with the worksheets Essential Tactics 7-10. There was no expectation that they would complete all four, but only the suggestion that they spend fifteen minutes solving exercises before playing chess.

These exercises are extracted from my eBook, Essential Tactics: Building a Foundation for Chess Skill (2017). Originally created four years ago as the worksheets Beginning Tactics 1-18, I have revised them as Essential Tactics 1-25. The same 150 exercises are on the worksheet sets and in the book. However, the first set of worksheets used chess pieces in some of the diagrams that the students found confusing. I switched all to the pieces ChessBase calls Fritz (used in the diagrams in the post). The number of worksheets increased in the revised set because each sheet contains six exercises. In the original series, worksheets 5-18 had nine exercises each.

To my surprise, my top second grader struggled with this exercise.

White to move

A few of the exercises on Essential Tactics 10 get to the core of finding two move combinations.

White to move

White to move

19 April 2017

Byrne -- Fischer, New York 1956

"Game of the Century"
It was quite an experience to watch [Bobby Fischer] during the critical stage of the game. There he sat like a little Buddha, showing his moves with the calm regularity of an automaton.
Hans Kmoch, "Game of the Century," Chess Review (December 1956)
Hans Kmoch, as manager for the Manhattan Chess Club, directed tournaments there. The Third Lessing J. Rosenwald Trophy Tournament took place 7-24 October 1956 at the Manhattan Chess Club and the Marshall Chess Club. Fischer was invited because he had won the U.S. Junior Championship in July, the youngest player ever to do so. The Rosenwald tournament was the first time that he played against the top masters in the United States. His round 8 win against Donald Byrne won the tournament's brilliancy prize and was dubbed the "game of the century" by Kmoch.*

Kmoch wrote that the game, "matches the finest on record in the history of chess prodigies" (Kmoch, Chess Review, rpt. in Bruce Pandolfini, The Best of Chess Life and Review, vol. 1, 1933-1960 [1988], 525).

This game has been annotated many times. For my annotations, I went through the game several times. At several critical positions, I wrote my anticipated variations without moving the pieces. After recording these lines, I checked mine against Garry Kasparov, My Great Predecessors, part IV Fischer (2004). I then checked some of my lines with Stockfish 7.

This game strikes me as a good one for honing a player's calculation skills. It is among my candidates for "best game ever played."


Byrne,Donald -- Fischer,Robert James [D97]
New York Rosenwald New York, 1956

1.Nf3 Nf6 2.c4 g6 3.Nc3 Bg7 4.d4 0–0 5.Bf4 d5 6.Qb3 dxc4 7.Qxc4 c6 8.e4 Nbd7 9.Rd1 Nb6 10.Qc5?! 

10.Qb3 seems better.

10...Bg4 11.Bg5?

11.Be2 seems necessary.

11...Na4!

This move stunned me when I was playing through the game on a chess board last week. On the one hand, it is a simple deflection combined with a threat to remove the guard of the e4 pawn. On the other hand, Black cannot win a pawn, but rather offers an exchange sacrifice. Fischer had to calculate several lines. In all of these, the vulnerability of White's king proved decisive.

White to move

This position was on my board at the dining room table for most of the weekend. I returned to it several times to study and record possible variations.

12.Qa3

Alternatives begin with 12.Nxa4 Nxe4 and then:

a) 13.Bxe7 was the first line I recorded in my notes. 13...Re8 is the computer's second choice (The engine prefers 13...Qc7 14.Bd6 Nxd6) 14.Bxd8 Nxc5+ (Kmoch has this line, but revereses the order of the previous two moves) 15.Be2 Nxa4 16.Bh4 Nxb2 and Black is clearly better.

b) 13.Qxe7 was my second line. 13...Qxe7

My analysis falls short here. The engine prefers 13...Qa5+ 14.b4 Qxa4 15.Qxe4 Rfe8 16.Be7 Bxf3 17.gxf3 Bf8 Garry Kasparov credits Sergei Shipov with this line. Clearly Black is winning.

Continuing my line: 14.Bxe7 Rfe8 15.Be2 (The engine prefers 15.Bd3 ) 15...Rxe7 16.0–0 (The engine prefers 16.h3 ) 16...b5 17.Nc3 Nxc3 18.bxc3 Rxe2 Black is ahead a piece.

c) 13.Qc1 Qa5+ 14.Nc3 Bxf3 15.gxf3 Nxg5 is offered by Kasparov. I did not look at this line.

d) 13.Qb4 Nxg5 14.Nxg5 Bxd1 15.Kxd1 Bxd4–+ Kasparov. Another line that I failed to examine.

My third line continued:

e) 13.Qa3 Nxg5 14.Be2 Nxf3+ (Stockfish prefers 14...Bxf3 15.Bxf3 Qa5+ 16.Nc3 Qxa3 17.bxa3 Nxf3+ 18.gxf3) 15.Bxf3 Bxf3 16.Qxf3 and Black is winning.

12...Nxc3 13.bxc3 Nxe4 14.Bxe7 Qb6

White to move

15.Bc4

What if White accepts the exchange sacrifice?

15.Bxf8 Bxf8 16.Qc1

I also considered 16.Qb3 Qxb3 (Kasparov gives 16...Nxc3, attributing the suggestion to Yuri Averbakh) 17.axb3 Nxc3 18.Rd2 Re8+ 19.Be2 Bb4-+

16...Re8 17.Be2 Nxc3

Analysis diagram after 17...Nxc3
I spent a lot of time trying to find a defense for White here. Instead, I found only lines leading to checkmate or to an overwhelming material advantage for Black.

18.Rd2

(Stockfish prefers 18.Qxc3 Bb4 and there was no doubt in my mind that Black was winning here)

18...Rxe2+ 19.Rxe2 Nxe2 20.Kxe2 Qb5+ 21.Ke1

(21.Kd1 seems best 21...Qd3+ 22.Qd2 Bxf3+ 23.gxf3 Qxf3+ 24.Kc2 Qxh1-+)

21...Bb4+ 22.Kd1

(22.Qd2 Bxd2+ 23.Kxd2 [23.Nxd2 Qe2#])

22...Qd3+ 23.Qd2 Qxd2#

15...Nxc3 16.Bc5

I considered 16.Qxc3 Rfe8 17.0–0 is Stockfish's choice, as it was mine (I did not look at Kasparov's line 17.Bxf7+ Kxf7 18.Ng5+ Kxe7 19.0–0 Bxd1 20.Rxd1) 17...Rxe7 and Black has a clear edge.

16...Rfe8+ 17.Kf1 Be6!!

White to move

18.Bxb6

After the possible 18.Bxe6, I spent a lot of time looking at complex and unclear lines before I saw Fischer's plan: 18...Qb5+ 19.Bc4 Qxc4+ 20.Kg1 Ne2+ 21.Kf1 Ng3+ 22.Kg1 Qf1+ 23.Rxf1 Ne2#.

I also saw 18.Qxc3 Qxc5 19.dxc5 Bxc3 20.Bxe6 Rxe6.

After Fischer's queen sacrifice, the moves seemed rather forcing and I did not look at variations again for many moves.

18...Bxc4+ 19.Kg1 Ne2+ 20.Kf1 Nxd4+ 21.Kg1

I did not examine 21.Rd3 axb6.

21...Ne2+ 22.Kf1 Nc3+ 23.Kg1 axb6 24.Qb4 Ra4 25.Qxb6 Nxd1

White to move

26.h3

I did not examine 26.Qxb7 Bd5 27.Qd7 Re2.

26...Rxa2 27.Kh2 Nxf2 28.Re1 Rxe1 29.Qd8+ Bf8 30.Nxe1 Bd5 31.Nf3 Ne4

Here it seems to me that White is running out of moves. He has not been in the game since capturing Fischer's queen. In fact, he was lost before that. His role is to make the moves that permit the young Fischer to demonstrate his skill.

32.Qb8 b5

Kasparov mentions 32...Kg7.

33.h4 h5 34.Ne5 Kg7 35.Kg1 Bc5+

White to move

36.Kf1

I knew that 36.Kh2 would lose quickly, but my Ra1 is inferior to 36...Nd2!

I saw 37.Qc7 (37.Nf3 Bd6+) 37...Bg1+ 38.Kh1 Nf2#.

36...Ng3+

36...Bc4+? 37.Nxc4.

I found another checkmate as fast as Fischer's: 36...Rf2+ 37.Ke1

37.Kg1 loses faster 37...Rf4+ 38.Kh2 Rxh4#.

37...Bb4+ 38.Kd1 Bb3+ 39.Kc1 Rc2+ 40.Kd1 (40.Kb1 Nc3+ 41.Ka1 Ra2#) 40...Nf2#.

37.Ke1 Bb4+

Kasparov points out a faster checkmate: 37...Re2+ 38.Kd1 Bb3+ 39.Kc1 Ba3+ 40.Kb1 Re1#.

38.Kd1 Bb3+ 39.Kc1 Ne2+ 40.Kb1 Nc3+ 41.Kc1 Rc2# 0–1

After this game, the world noticed Bobby Fischer. Within a few years, he became a leading candidate for a future World Championship match. When he finally reached the summit, he gave up on chess. Of course, there were reasons. He set conditions that were not met wholly.


*For some of the historical details concerning this tournament, I am indebted to John Donaldson, and Eric Tangborn, Bobby Fischer: The Early Years: 1943-1962 (Amazon Digital Services, 2017).


12 February 2017

Patterns and Calculation

If we fail to make an idea work, we need to stop and ascertain the cause of the failure (i.e. answer the question 'why?'), and then attempt to correct our design.
Paata Gaprindashvili, Imagination in Chess (2004), 40.
A chess problem that cropped up in tactics training yesterday immediately reminded me of a game I had seen working through the compositions of Gioachino Greco, but the solution in Greco fails. Noting the failure, I considered why it failed and calculated the remedy. The whole process required about 23 seconds.

This elementary exercise serves to supplement my posts, "Patterns and Calculation" (23 December 2016), "Patterns: Some Evidence" (11 January 2017), and to highlight my endorsement of Paata Gaprindashvili, Imagination in Chess (see "Imagination in Chess").

White to move

The position arose in a correspondence game on Chess.com and was presented to me through the tactic trainer there. That game was a Ponziani in which Black blundered early.

Greco's game arose via a King's Gambit. I present it as it appears in Francis Beale, Royall Game of Chesse Play (1656).

Gambett LIII (Greco) [C37]
1656

1.e4 e5 2.f4 exf4 3.Nf3 g5 4.Bc4 h6 5.h4 f6 6.Ne5 fxe5 7.Qh5+ Ke7 8.Qf7+ Kd6 

White to move

9.Qd5+ Ke7 10.Qxe5# 1–0

The checkmate pattern in both games is the same, except that there is an alternative checkmate in the tactics problem if Black moves the king after White's initial move. The key difference, however, is that Black's knight guards e5 in the tactics problem. Hence, applying Gaprindashvili's advice, White must first lure this knight to e5, then execute the winning queen maneuver.

Instant recognition of patterns can be trained and aids in the development of chess strength. The same pattern often occurs in seemingly dissimilar games. Recognizing the pattern offers a plan, but calculation remains a necessary component to verify that the pattern has application.

13 July 2016

Remove the Defender

This position arose via a French Tarrasch.

Black to move

I played the correct move after 3.7 seconds of thought. My opponent overestimated its potency and abandoned the game after one more move.

It looked to me that Black is simply winning, but Black has some problems and White has some resources.

08 January 2016

Lesson of the Week

Remove the Guard

The students in my beginner's group solved nine problems on a worksheet and one on the demo board. Among the printed problems were two designed to help the young players perceive the solution to this position.

White to move
After the unplayed 10...Qh4??
This position originates in "what if" analysis of Anderssen -- Staunton, London 1851. While playing through historic games with young chess enthusiasts, we look at many moves that were not played. In some cases, we consider a move that a master such as Howard Staunton would have rejected instantly. Staunton would have found the tactical refutation as fast as he would have seen the plan to swap off Adolf Anderssen's strongest attacking piece.

In the game, Staunton played 10...Qc7. Even here, his position has several problems (see "Guioco Siciliano").

Beginning students, however, do not see such tactics instantly. Often, they do not see them at all. Training develops their vision. The solution to these two problems requires the same tactical idea that refutes a move that Staunton rejected.

White to move

White to move

My advanced students wanted a chess ladder to structure competition within the team, so they played the first round of our annual ladder tournament. Time for instruction was limited, but we went through part of the first game from the Anderssen -- Staunton match at the First International Chess Tournament, London 1851. We discussed White's advantage in mobility and piece coordination after Black's tenth move.

Despite the unenviable nature of Black's position, Staunton missed a chance to equalize six move later when Anderssen muffed the move order of his attack. A different tactical idea from the one above leads to equalization. Staunton should have seen it.

Black to move
After 16.g4?

01 July 2015

Solve This

As I am working through Anderssen -- Paulsen, Vienna 1873, which is in GM-RAM: Essential Grandmaster Knowledge, I came across a reference game from a simul conducted by Alexander Alekhine in 1933.

White to move

Alekhine found the winning tactical shot here.

19 April 2014

Remove the Defender

This position arises in the second game of the first issue of Chess Informant in 1966. It is a wild game.

White to move

24 March 2014

Hidden Threats

Taking issue with Emanuel Lasker's assertion that combinations are rare, Yasser Seirawan asserts:
Combinations of some sort can be found in the majority of master games, sometimes in the moves actually played and often in the variations hidden behind those moves.
Yasser Seirawan, with Jeremy Silman, Winning Chess Tactics (2003), 5.
Seirawan's assertion may be illustrated in a position from last year's European Individual Championship. Erwin L'Ami, playing the Black side of a French Tarrasch where queens were exchanged early, stepped his king towards the middle. This move seems to have left a pawn undefended, but it is well protected by a threatened combination.

White to move
After 21...Kf7

Had White taken the h-pawn, Black would have responded with 22...g6. The effort to rescue the trapped bishop with 23.Nf4 leads to a double attack. 23...Kg7 attacks the knight with a discovery while the king threatens the bishop directly. After 24.Nxg6 Rfe8, Black gains the bishop for two pawns and there remains the additional latent threat of Nxd4 followed by Ne2+ forking king and rook.

Hence, White's best choice after 23...Kg7 seems to be 24.Rxc6 Rxc6, and then 25.Nxg6 Rfc8 26.Ne7 Kxh7.

White to move

After the White knight captures one of the rooks, Black will have a bishop and pawn for three pawns--a clear advantage. Wisely, Pawel Jaracz played 22.Rfd1 and the game was eventually drawn after many moves.


01 March 2014

Tactical Success

When I play blitz or rapid chess, I miss a lot. Even slower time controls do not prevent missing things. However, under time pressure, tactical mistakes are the norm. In the positions below, however, I found the correct move.* All come from one day's rapid play online.

Black to move

White to move

Black to move

I was hopelessly lost in the next game, but my opponent made a few errors to give me this nice position.

White to move

Black to move


*"Correct" is defined as playing the move that Stockfish prefers.

27 February 2014

Two Exercises

Lesson of the Week

Knowledge of tactical motifs open a chess player's imagination to the possibilities. Accurate calculation verifies whether such possibilities should be played. These two exercises may prove difficult for scholastic players, but they are almost routine for strong class players. They both stem from play on the Free Internet Chess Server (FICS).

White to move

Black to move

09 January 2014

Lesson of the Week

Students in chess club are presented with a position in which they are to discover the move played. The position is from Spielmann -- Tarrasch, Karlsbad 1923. Spielmann's move was the best possible, and indeed was the only move that does not transfer the advantage to Black's side.

White to move

Wrong answers that were suggested quickly revealed that the White king could be vulnerable in ways that could result in further loss of material. Black already has a material advantage.

A somewhat more complicated position was prepared as a second problem for this week's lesson, but most students did not see it. It is from Rubinstein -- Hromadka, Maehrisch Ostrau 1923.

Find Rubinstein's winning combination.

White to move

Rubinstein won a brilliancy prize for the game. The tournament at Maehrisch Ostrau started less than two weeks after the Karlsbad tournament ended. Despite this brilliant game, Rubinstein underperformed in both events. He did finish ahead of Spielmann at Karlsbad.

28 November 2012

Lesson of the Week

Paul Morphy found the correct move after Johann Jacob Loewenthal blundered. This game is not a strong example of Morphy's play, but reveals that he sometimes groped through the darkness. In the end, however, Black's failure to attend to king safety led to his defeat.

In the Wednesday and Thursday classes, I plan to do as I did in the Tuesday classes. The second diagram will be on the demonstration board. In order to offer a solution, students need a ticket: completion of the nine problems on the worksheet Beginning Tactics 7. These "beginning" problems are growing more challenging. Several problems in Beginning Tactics 7 employ the tactic of removing the guard. There are forks, too, a skewer, and a forced checkmate in two using an X-ray.


Morphy,Paul - Loewenthal,Johann Jacob [C43]
London 1858

1.e4 e5 2.Nf3 Nf6 3.d4 exd4 4.e5 Ne4 5.Bd3 d5 6.Nxd4 c5 7.Ne2 Nc6 8.f3 Ng5 9.f4 Ne6 10.0–0 Qb6 11.Kh1 Be7 12.Nbc3 Nc7 13.b3 Nb4 14.Ng3 Nxd3 15.Qxd3 Qc6 16.f5 g6 17.Bf4 Bxf5 18.Nxf5 gxf5 19.Qxf5 Qg6 20.Bg3 h5 21.Qxg6 fxg6

White to move

22.e6

Morphy offers a pawn that Black should have refused. Advancing the pawn also creates a discovered attack on the knight.

22...Nxe6??

22...0–0–0 would have maintained equality.

23.Rae1 Rf8??

Another Black blunder, and now White has exactly one winning move.

White to move

24.Rxf8+ Nxf8 25.Nxd5 1–0

Had Loewenthal played on, the game might have continued 25...0–0–0 26.Nxe7+ Kd7 27.Rd1+! Kxe7 28.Bh4+ only move Kf7 29.Rxd8 and White is ahead a rook.


Beginning Tactics 7 (sample)

Find the correct move for White in each diagram.


Update 22 March 2017: All of the beginning tactics exercises and solutions can be purchased for viewing on Kindle readers. https://www.amazon.com/dp/B06XKG1VZD

10 November 2012

Finding the Sacrifice

I failed one of the so-called instructive (easy) problems in the Anthology of Chess Combinations, and then managed to fail the problem again less than one week later. At least I did not fail on the first move the second time. What should I notice in the position that would open my eyes to the sacrifices leading to checkmate?

White to move

The first move is a clearance sacrifice, but is really a not so simple exchange of knights.

1.Nb4

Is 1.Nc3 as good?

1...axb4 2.Qxd6

White's second move removes the defender of e8.

2...Qd7

White to move

I failed to find 3.Qd5, which pins the rook. Black's response, 3...Kf8, creates a position where White must begin a series of real sacrifices leading to checkmate. The final position is a common and well-known checkmate pattern, but the sequence of moves leading there remain difficult for me to anticipate from the diagram position.

4.Rxg7 Qxd5

Now, the position contains the decoy motif that I should know from Mayet -- Anderssen 1851.

5.Rg8+ Kxg8 6.Re8+ Rf8 7.Rxf8#.

The entire sequence has White giving up three pieces for a knight to effect checkmate, and employs the tactics of clearance, removing the guard, pin, and decoy. It is problem 32 in the Anthology of Chess Combinations, and has been the most troublesome combination in that set so far.