20 February 2019

X-Ray

How difficult?

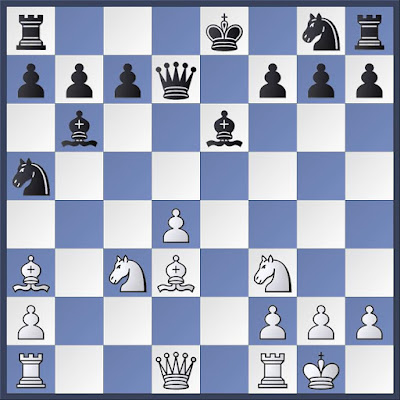
Yesterday morning, I had this position in a blitz game. While looking for tactics exercises for my beginning students after showing them Paul Morphy's Opera Game, I put this position on the demo board. We did not discuss it, as they were busy playing chess and I was working with them on basic manners and sportsmanship.

After club, I put the position on Facebook thinking most followers there would solve it quickly. Although the second person to post offered the strongest move, which I had played in the game, I was surprised at some of the other responses. Is this position more difficult than I thought?

White to move

It seemed to me that it should be easy to remove both knights and then snatch the bishop.

15.e4

The strongest move, according to Stockfish.

I expected 15...Nb4 16.Bxf6 gxf6 17.Qxd7 and a clear advantage for White, probably decisive.

Black could have made things interesting with 15...h6, when the strange looking 16.Bh4 is the engine's choice. The computer likes 16...g5 17.Qd2

Black to move
Analysis position
I would have been stunned by 15...h6, realizing that my advantage was not to be gained as easily as initially anticipated, and played 16.Bxf6 Nxf6 17.e5 Nd5 and then would have considered 18.Bxd5.

Looking through this game this morning, I found that I used a mere two seconds on the position in the first diagram. My recollection of the game was that I had used more time than that. It turns out that I had spent twelve seconds on this position the previous move. I planned 15.e4 before exchanging my knight for my opponent's bishop.

White to move

14.Nxb6 Qxb6

Now, the position is the first diagram is reached. My opponent had played 13...Bd7, placing the bishop on a vulnerable square. Superficially, this error is a simple developing move that prepares to bring the bishop to a better square while connecting the rooks.

After my 15.e4, my opponent thought for thirteen seconds. As it was a three minute blitz game, that's a relatively long think.

15...Bc6

This move surprised me, but my reply was simple and easy.

16.exd5 Nxd5

White to move

17.Qg4

Again, I played the strongest move with fantasies of getting an easy checkmate or otherwise exploiting a pin along the g-file. Nonetheless, I spent fifteen seconds on this move.

17...f6 18.Bxd5

How did I miss 18.Qxe6+? Checkmate fantasies.

We played another fifteen moves before my opponent resigned.

13 February 2019

Greek Gift?

As far as I have been able to determine, the so-called Greek Gift (a Bxh7 sacrifice) earned its name because some chess writer confused the Italian chess player Gioachino Greco (c.1600-c.1634) with the artist Doménikos Theotokópoulos (1541-1614). The latter was Greek, but lived in Spain where he was generally known as El Greco (the Greek). In any case, the name stuck. The thematic sacrifice is present in several games recorded by G. Greco.

But, Greco is from a part of Italy, Calabria, where a large number of people are ethnically Greek. Italy was not a unified nation before 1871, except under the Romans. Calabria at the time of Greco's birth was ruled by the Kingdom of Aragon, which had a hand in uniting Spain in the fifteenth century. Some historical works speculate that Greco's parents were Greek, although the sourcing for Greco's early life appear non-existent. He was a young man in the 1620s is about all that is known. The place of his birth is known from manuscripts believed to be in his own hand: Celico, a village near Cosenza.

Is the sacrifice sound in this position?

White to move

06 February 2019

Beating Your Dad at Chess

Game of the Week

My exercise set for the Knight Award has this position.

White to move

It is the exercise that my students find most difficult among the dozen in that set. The position arose in a game Paul Morphy played against his father when he was twelve years old.

An earlier position from this game appears as the third position in Thomas Engqvist, 300 Most Important Chess Positions (2018).

White to move

In the game, Paul Morphy's father, Alonzo, made several errors. Maybe he was not a very strong chess player. Maybe he sought to help build his son's confidence. Young Paul's moves are not in every case the first choice of today's engines, but his overall play demonstrates that already at the age of twelve, he understood the importance of rapid mobilization of his pieces and was not afraid to sacrifice material to exploit a vulnerable king.

Morphy,Paul C -- Morphy,Alonzo [C51]
New Orleans, 1849

1.e4 e5 2.Nf3 Nc6 3.Bc4 Bc5 4.b4 Bxb4 5.c3 Bc5 6.d4 exd4 7.cxd4

7.0–0 became a common reply in the 1860s. Both moves score well for White.

7...Bb6

7...Bb4+ is possible

8.0–0

Black to move

8...Na5

The elder Morphy neglects development, but as his son is usually credited with discovering the importance of development, our judgement should not be too harsh.

8...d6 would have been better.

9.Bd3 d5

Opening the e-file cannot be good for Black. The king's vulnerability will create the conditions for young Paul to show the skills that would become his signature.

9...Ne7;
9...d6

10.exd5 Qxd5

Father seems determined to help his son.

10...Ne7 11.Ba3 0–0 12.Qc2

11.Ba3 Be6 12.Nc3 Qd7

See Engqvist's position above.

13.d5!

Morphy understood that material does not matter when Black's king is vulnerable.

13... Bxd5

13...0–0–0 14.Qc2 (14.dxe6 Qxd3 15.exf7 Nf6 16.Be7)

14.Nxd5

My main line while looking at the position in Engqvist's book was 14.Bb5 c6 15.Re1+ Be6. I had not yet recognized the game as the source for my exercise.

14...Qxd5

White to move

15.Bb5+

Engines like 15.Re1+ Kd8 16.Be4 Qd7 (16...Nf6 avoids checkmate) 17.Qxd7+ Kxd7 18.Rad1+ Kc8 19.Bf5+ Kb8 20.Re8#

15...Qxb5 16.Re1+ Ne7 17.Rb1

Much better is 17.Rxe7+ Kf8 18.Ne5.

17...Qa6

This move offers White a forced checkmate.

17...Qd7 18.Rxe7+ Qxe7 19.Bxe7 Kxe7 White still has a decisive edge, but has much work remaining after his relatively weak move 17.

White to move

18.Rxe7+ Kf8 19.Qd5

There is a faster checkmate, but it is hard to fault Morphy for pursuing a checkmate in two that can be delayed through spite checks.

19.Rxf7+ Kxf7 20.Qd7+ Kf6 21.Be7+ Kg6 22.Qe6+ Kh5 23.g4#

19...Qc4

See my position for the Knight Award at the top of this post.

19...Bxf2+ delays the end with spite checks.

20.Rxf7+ Kg8 21.Rf8# 1–0

I beat my dad when I played him at age fifteen, but my play lacked the sort of combinations that Morphy displayed. No record was made of the game (see "My First Chess Book").

05 February 2019

A New Book and a Morphy Game

Initial Impressions Towards a Review

My copy of Thomas Engqvist, 300 Most Important Chess Positions (2018) arrived last Friday less than an hour before a lesson with one of my students. I took the book with me. Inasmuch as the first lesson each month is devoted to the endgame, we worked through the first several endings (positions 151-155) in Engqvist's book after finishing the materials I had prepared for the session. We also looked at position 194, which caught my eye while flipping through the book because I had seen a similar problem last week.

After the lesson with my student, I read the front matter and looked at position number 1 in the book. This position is from Morphy -- Stanley, 1857, which I have been studying the past few days.

White to move

The correct move in this exercise is a matter of judgement. Many strong players have played the "wrong" move. Engqvist mentions Adolf Anderssen, but he could have noted that Morphy also played it several times in the two years after the game where he played the "correct" move. Morphy's "discovery" (14), however, has been the overwhelming choice of masters in this somewhat infrequent position (512 games in my database with a 63% score for White).

I can count on my fingers the number of books in my chess library that offer exercises where the correct answer is debatable. I think that is a testament to the value of this book. At first glance, 300 Most Important Chess Positions offers prospects for developing positional understanding.

Charles H. Stanley was one of four players to defeat Paul Morphy without odds in New York in 1857. Morphy, however, may have had the Black pieces more than his share in their games. Among the extant games between these two players, this game is the only one when Morphy had White.

Morphy,Paul -- Stanley,Charles Henry [C51]
New York, 1857

1.e4 e5 2.Nf3 Nc6 3.Bc4 Bc5 4.b4 Bxb4 5.c3 Ba5 6.d4 exd4

6...d6 is hot

7.0–0

7.Qb3 Qf6 8.0–0 Bb6 9.e5 is another possibility.

7...d6

Black could try 7...Nge7 8.Ng5 Ne5 9.Nxf7 Nxf7 10.Bxf7+ Kxf7 11.Qh5+ g6 12.Qxa5.

8.cxd4 Bb6

See diagram above.

9.Nc3

Engqvist offers the diagram. Under the diagram, he offers the moves leading to the position and Morphy's move. He highlights Morphy's importance historically in a few sentences, then mentions center control and time as White's temporary advantages in this position.
It's more important to develop pieces instead of making useless short-term attacking or defensive moves. In other words one should avoid unproductive one-move threats and instead concentrate on long-term gains.
Engqvist, 14
One-move threats are certainly how I cultivate losing streaks in online blitz at least once every week.

9.d5 White has scored well. This move has been played by De Labourdonnais, Anderssen, Morphy, and others with good results. Engqvist calls this move "superficial" (14).

I think that this first position has instructive value. Engqvist says that he uses it with his students, and I think it is worthy of addition to my stock of lessons as well. Although the alternative to his "correct" move is playable, the lesson is clear. I could have stopped here and moved on to the next position, but I found Morphy's game interesting.

9...Nf6

Was this move the decisive error?

9...Na5 seems best. Engqvist suggests that he lets his students play the game out from the position before 9.Nc3. Students can try Anderssen's approach, and they can avoid Stanley's reply.

10.e5

My database shows eight games with this move and eight wins for White. Stockfish 10 says White has a clear advantage.

10.Bg5 h6 11.Bxf6 Qxf6 12.e5 dxe5 13.Nxe5 Nxe5 14.dxe5 Qh4 was won by Black in 67 moves, De Labourdonnais,L -- McDonnell,A London 1834.

10...dxe5 11.Ba3 Bxd4

11...Nxd4 12.Nxe5 Be6 gives Black a slight edge, according to Hiarcs 12, but Stockfish 10 sees it as a decisive advantage for White.

12.Qb3

Black to move

This position is reminiscent of several of Greco's games.

12...Be6

And now +6 in favor of White.

After 12...Qd7 Fritz 11 considers the position equal, but Stockfish 10 has White with a winning advantage.

13.Bxe6 fxe6 14.Qxe6+ Ne7 15.Nxd4 exd4 16.Rfe1

Black to move

16...Nfg8

16...dxc3 17.Rad1 (17.Qxe7+? Qxe7 18.Rxe7+ Kd8 19.Rd1+ Kc8 White may have compensation for the pawns) 17...Nd7 (17...Nfd5 18.Rxd5) 18.Bxe7 Qc8 19.Bd6+ Kd8 20.Qe7#.

17.Nd5 Qd7 18.Bxe7

18.Qxd7+ Kxd7 19.Nxe7 Nxe7 20.Rxe7+ is given as better by Géza Maróczy in his book on Morphy. I do not have this book, but the annotations appear in David Levy and Kevin O'Connell, Oxford Encyclopedia of Chess Games, vol. 1 1485-1866 (1981).

18...Qxe6 19.Rxe6 Kd7 20.Rae1 Re8 21.R6e4 c6

White to move

22.Rxd4 cxd5 23.Rxd5+ Kc6 24.Rd6+ Kc7 25.Rc1+ Kb8 26.Bh4! Nh6

White to move

27.Bg3 Ka8

27...Nf5 28.Rd8#

28.h3 Nf5 29.Rd7 g6 30.Rcc7 Nxg3 31.fxg3 Rb8

The rook ending is instructive.

White to move

32.Rxh7 Rxh7 33.Rxh7 a5 34.h4 Rg8

34...b5 35.h5 g5 (35...gxh5 36.Rxh5 a4 37.g4 b4 38.Ra5+ Kb7 39.Rxa4) 36.Rg7 b4 37.Rxg5 a4 38.Ra5+ Kb7 39.Rxa4

35.g4 b5 36.h5 a4 37.h6 b4 38.Rg7 Rh8 39.h7 b3

White to move

40.Rg8+ Kb7 41.Rxh8 b2 42.Rb8+ Kxb8 43.h8Q+ 1–0

Although Morphy had a clear advantage after Black's ninth move, his play through the whole game offers useful instruction in how to use the initiative to bring home the full point.