Showing posts with label Golombek (Harry). Show all posts

19 December 2021

Notes on Berger

David Hooper states that Johann Berger, Theorie und Praxis der Endspiele (1890) is "the first comprehensive book in modern times devoted wholly to the practical endgame" (Golombek's Encyclopedia of Chess [1977], 101). In 2009, Google digitized a copy from Harvard Library, making it readily accessible to those interested in the history of the theory of the endgame. Although Hooper states Berger's text, "would not today be regarded as adequate for practical use", I am finding much that is instructive and interesting as I have been reading through it this morning.

Berger makes a point in the first pages to distinguish endgame theory from studies. The endgame, he asserts, "comprises only the battle of a few chess pieces against correspondingly low defensive forces" (2). Compositions leading to checkmate, stalemate, or a draw must be distinguished from endgame theory because, "the chess pieces have a completely different meaning and are used differently than in actual endgames" (2). He presents some illustrations of studies that are not endgames, beginning with a composition by Bernhard Horwitz.

White to move
Horwitz 1884 
White checkmates in six moves. Berger points out that the play of the pieces resembles the middlegame, and also that White's rook is superfluous. In the endgame, "the best possible use of the power of each individual piece should be expressed" (3), Berger opines. He offers:

White to move
1.Kc4 c1Q

Or 1...Ka1 2.Qd2 (to avoid an underpromotion threat)

2.Kb3 and checkmate in a few moves.

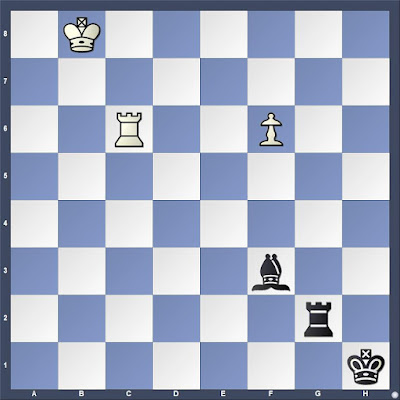
Berger's eighth example highlights two ways that a theoretical draw of rook vs. bishop is reached from the following position.

White to move
1.f7 Bd5 2.f8Q Rg8

Or 

1.Rc1+ Kh2 2.f7 Bd5 3.f8Q Rg8

Following this clarification of endgame theory as distinct from studies, Berger shows elementary checkmates--queen, rook, two rooks, two bishops, and then no less than five positions from which checkmate by bishop and knight can be executed.

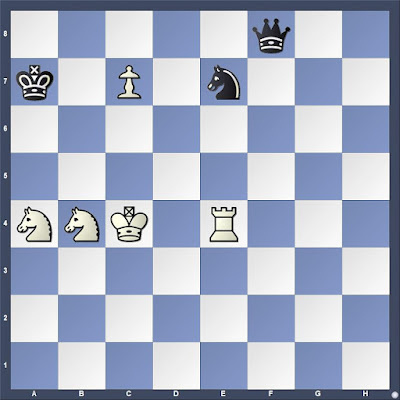
Then he turns to the knight. Two knights, as we know, can only stalemate. What about three knights? Berger presents a composition of his that was published in Osterreichische Lesehalle (1889).

White to move
When I played this position against the computer, it opted for a line given by Berger as a variation. I was able to coordinate my pieces and win easily.

1.Rxe7 Qd4+

1...Qxe7 leads to 2.c8N+ winning the queen and leading to checkmate. Berger finds a mate 15 moves from the diagram.


22 June 2021

Is Less More?

Capablanca was strangely poor at explaining and annotating his own games. Possibly this was because he assumed immediate comprehension on the part of the reader of moves that really demanded considerable explanation.
Harry Golombek, Capablanca's 100 Best Games of Chess (1947)
In My Chess Career (1920), José Raúl Capablanca annotated two of his games from his match with Juan Corzo. Harry Golombek begins Capablanca's 100 Best Games of Chess with the same two games. There is no question that Golombek's annotations are more extensive, but are they more useful?

Let's examine the annotations to the first of these.

Corzo y Prinzipe,Juan -- Capablanca,Jose Raul [C25]
Havana match Havana (8), 06.12.1901
[Golombek and others]

1.e4 e5 2.Nc3 Nc6 3.f4 exf4 4.Nf3 g5 5.h4 g4 6.Ng5

Black to move

At this point, Golombek inserts his first note identifying the Hamppe-Allgaier Gambit, noting, "it is not sound" (21). He describes Corzo's strategy as an effort to take advantage of Capablanca's lack of book knowledge. This insight merely repeats what Capablanca wrote in My Chess Career: "Corzo knew my complete lack of book knowledge, consequently he tried repeatedly to play gambits of this sort where it would be difficult for me to find the proper answer" (7).

Golombek goes on to state that Capablanca, "does diverge from the book of the time--but only to find a better continuation for Black" (22).

6...h6 7.Nxf7 Kxf7 8.d4

Black to move
8...d5

Golombek  gives the line 8...d6 9.Bxf4 Bg7 10.Bc4+ with an attack, and the reader is left wondering if 8...d5 was Capablanca's improvement. A glance at a modern database does not resolve the question. ChessBase Mega 2020 lists seven games preceding this one that reached the position after 8.d4. One was game 6 of this match. The other six have three games with 8...d5, two with 8...f3, and one with 8...d6. Five of these games were won by White. In the exception, Taubenhaus -- Lipschuetz, New York 1889, 8...f3 was played.

Of course, Golombek had no databases with which to work. Nor are the databases particularly complete as shall be shown below.

Capablanca is more helpful: "Afterwards Corzo told me that the book recommended 8...d6" (7). The "book" would have been Handbuch des Schachspiels, 7th edition, published in 1891 under the editorial direction of Emil Schallopp.

Handbuch (1891), 8...d6 underlined

There are no games in PowerBook 2020 with 8...d5, but there are eight games with 8...d6. 

9.exd5

9.Bxf4 Bb4 is good for Black (Golombek). Encyclopedia of Chess Openings, 3rd ed. gives this line continuing 10.Be2 Bxc3+ 11.bxc3 Nf6 with a better game for Black.

9...Qe7+

White to move

Capablanca offers a comment here that reveals how, even at the age of 13, he prepared for games through the course of the match with Corzo. He notes they had played this variation previously, but omits the detail that it had been only one week earlier in the sixth game of the match.

10.Kf2

10.Be2 was played in game six.
The game ended in a draw, but I should have won. Corzo analyzed the position and told someone that he should have played 10.Kf2. When I heard this I analyzed the situation myself and decided to play it again, as I thought that Black should win with the continuation which I put into practice in the game.
Capablanca, My Chess Career (8).
Capablanca offers no further comments on the game.

10...g3+ 11.Kg1

Golombek offers a diagram here, notes the vulnerability of the White king, and lauds Capablanca's return of the sacrificed piece. "White is continually harassed by mating threats" (22).

11...Nxd4! 12.Qxd4

12.Bxf4 Qf6 (Golombek).

12...Qc5 13.Ne2

Black to move

13...Qb6!

Golombek states, "An original and pleasing touch and much more powerful than the humdrum 13...Qxd4+ 14.Nxd4 Bc5 15.c3 Now Black's threat of Bc5 forces White to exchange queens thereby allowing Black to bring the queen's rook into the game at once" (22).

The ChessBase DVD Master Class 04 José Raúl Capablanca (2015) notes that Isaak and Vladimir Linder, José Raúl Capablanca: 3rd World Chess Champion (2010) gives 13...Bg4 14.Be3! fxe3 15.Qxg4. A correspondence game in the nineteenth century continued with 13...Bg4 14.Be3 Qxd4 15.Bxd4 Bxe2 16.Bxe2 Bg7 (Deutsche Wochenschach 46 [17 November 1889], 402, points out that 16...Nf6 is better here. Miguel A. Sánchez, José Raúl Capablanca: A Chess Biography (2015), 80, points out the game in Deutsche Wochenschach, and also shows that White is still better after 16...Nf6. This game may be in ChessBase's Correspondence database, but it does not appear in Mega 2020. I did find it in the online version.

Deutsche Wochenschach

Sánchez is the only annotator, it seems to me, who does justice to Capablanca's comments about how he prepared for this game, asking whether he might have known about the game published twelve years earlier. It would not seem likely that a thirteen year-old player with no book knowledge would be reading a German magazine that was published near the time of his first birthday.

14.Qxb6 axb6 15.Nd4 Bc5 16.c3 Ra4

Golombek points the threat of Rxd4 wins another pawn.

White to move

17.Be2 Bxd4+ 18.cxd4 Rxd4 19.b3

"White has been relying upon this maneuver to pull the game round to his favour by exploiting the risky position of Black's queen rook. It soon becomes apparent that Black has seen further into the position than White." (Golombek, 22) 

19...Nf6 20.Bb2 Rd2

Does Golombek offer much value pointing out 20...Rxd5? 21.Bc4+-?

21.Bh5+

Black to move

21...Nxh5!

"Hoping for 21...Kg7 22.Bc3 Rc2 23.Be5 with distinct counter-chances but Black now finishes off the game in the best style" (Golombek, 22).

22.Bxh8 f3! 23.gxf3

23.Bc3 f2+ 24.Kf1 Bf5 25.Bxd2 Bd3# (Golombek)

23...Nf4 24.Be5

Golombek points out another checkmate threat: 24.Re1 Rg2+ 25.Kf1 Rf2+ 26.Kg1 Bh3-+ 27.Bc3 Rf1+ 28.Rxf1 Ne2#.

Black to move

24...Rg2+ 25.Kf1 Rf2+ 26.Ke1 Nd3+ 0-1

Golombek is certainly more thorough in pointing out some tactical threats, but Capablanca's very brief annotation offers the important story of this game. Golombek might have done more to explain why he thinks Capablanca's divergence from the book line was an improvement.

15 January 2016

Read Critically

The Art of the Middle Game (1964) by Paul Keres and Alexander Kotov is an often recommended classic. I have the old Penguin paperback edition with an introduction by Harry Golombek, who also translated the book. This book is worthy of detailed study. I have started it on several occasions, but have yet to progress far.

Going through Kotov's "Strategy and Tactics of Attack on the King" (30-79), I get hung up on the first game fragment. One move played (9...R-Kt2; 22...Rb7 in the game score below) clearly loses material. Kotov does not consider alternatives. His book shows why the position after this move is lost for Black. But Black might have played a different move here or on the previous move.

Concerning attacks on opposite wings, Kotov offers a story that might be remembered when chess enthusiasts debate the relative merits of blitz (see "Improving through Blitz").
When I stayed behind at school with my school friends after lessons, and managed to play up to a hundred games in a single afternoon, the strategy was simple enough: I castled on the opposite side in the middle of violent (and mutual) king attacks. Whoever got his attack in first, won. The result was that I acquired an unfailing mastery of those positions where castling takes place on opposite sides, and from that time on I knew how to find my way about them.
Kotov, 32
As he begins to elucidate the principles of attacks on opposite wings, Kotov notes that "an offensive with pawns must be calculated with the same careful deliberation that one uses in assessing a combination" (32). Alas, Alexander Konstantinopolsky's calculations could have been refuted, even though his opponent did not do so.

Alexander Konstantinopolsky - Frank [E60]
Leningrad corr USSR, 1935

Kotov's analysis begins with the position after White's 14.O-O-O

Black to move

Kotov writes:
At the first glance it seems as though Black should arrive at a pawn attack first on the grounds of the advanced White pawns on c4 and b3 and also because he has 'good' pawns. But instead the isolated and scattered White pawns on the King's wing take over the task of destroying the enemy position." (33-34)*
14...a4 15.f4 axb3 16.axb3 b5 17.cxb5 Be6 18.h5

Although White's b- and c-pawns only appear to offer Black prospects for attack, Kotov suggests that Black's g-pawn is an essential target.

18...Bxb3 19.Rdg1 Ra7 20.f5! 
Black has not obtained anything concrete. The pawn on b5 is still alive and kicking; it stands adequately guarded and meanwhile Black's king's position collapses completely. Kotov, 34
20...Qa8
White to move

21.Bd3

A lesson that Kotov does not elucidate to my satisfaction in this example is the role of piece play. This move looked essential to me because the shattered pawn shield is less consequential due to the the defense of critical squares by White's minor pieces. Testing my belief that 21.Bd3 was necessary, I looked at some alternatives and then checked my analysis with Stockfish.

As it happens, my effort to refute alternative moves here revealed the refutation of White's next move. This refutation is absent from Kotov's text.

a) 21.fxg6 Ne4

a1) I considered 21...Ra1+? and saw 22.Bxa1?? loses for White 22...Qxa1+ 23.Nb1 Ne4 24.gxh7+ Kh8 25.Qd4 (25.Qb4 Bb2#; 25.h6 Bb2+) 25...Bxd4 26.exd4–+.

However, after 21...Ra1+, 22.Nb1± gives White the edge.

22.gxf7+ (22.gxh7+) 22...Rxf7 23.Qd4 Nxc3 24.Qxc3 Qxh1! and Black is better.

b) 21.hxg6 was judged by the engine as the only move offering White equality.

21...c5
Now White gets the opportunity of spreading confusion in the enemy camp. But other continuations too are of little help to Black. Kotov, 35
Confusion did indeed reign. Perhaps Kotov's choice of this word offers a clue that he understood the unplayed refutation of White's calculated attack.

21...Ra1+!! was not prevented by White's seemingly essential 21...Bd3.

22.Bxa1 is best (22.Nb1 Ne4-+) 22...Qxa1+ 23.Bb1 Nd5 24.Qb2 Qxb2+ 25.Kxb2 Bc4 and the pin on the knight leaves Black with more pieces.

22.b6! (Kotov)

Black to move

22...Rb7?

This move bothers me every time I go through Kotov's discussion. It should be clear than it loses a rook as well as abandoning the attack. If a rook must be lost, why not sacrifice one for play against the enemy king? After all, the other rook defends the pesky b-pawn's promotion square.

22...Ra1+!! is the correct move for much the same reasons offered in my analysis of the previous move.

23.Ne4 Nxe4 24.Bxe4 Qa4 25.Bxb7
White has already won a rook and Black's attack has still hardly got into motion. It is interesting to note that White defers for so long on the final capture on g6 and that the mere threat of exchanging forces Black to lose a piece. A beautiful illustration of the precept 'the threat is stronger than the execution.' Kotov, 35

25...Qc4+ 26.Kb1 Rb8 27.hxg6 hxg6 28.Bxg7 "and White soon won." Kotov 1–0


*My copy of the book is in descriptive notation. I have converted the notation in quotations to algebraic.

09 January 2015

Opening Considerations

Szen -- Anderssen 1851

The 59 illustrative games in GM-RAM: Essential Grandmaster Knowledge (2000) are presented as the source for the 120 essential middlegame positions that an aspiring player should strive to know. However, Rashid Ziyatdinov also suggests in his book that the aspiring player should memorize these games.

This process of learning these games by rote drives the student into study of the openings employed in each game. To memorize the game and not gain some understanding of all phases from the first move to the last would seem senseless. Moreover, some of the middlegame positions occur fairly early in the game.*

GM-RAM Position 143
Position 143 is a case in point. It arises after White's ninth move in the fourth match game between József Szén and Adolf Anderssen in the 1851 London Tournament.

In understanding this position, opening principles come to the fore.

In terms of one classic formulation of the opening phase, the diagram position nears the end of the opening. White has castled, has all of his minor pieces posted to central squares, and his queen has stepped forward to connect the rooks. Black lags behind in terms of this classic definition. One minor piece remains immobile and the rooks are not connected.

It may be surprising, then, that from this position with Black, Anderssen chose to start an attack: 9...f5! After the ensuing 10.exf5 Rxf5, the absence of White's e-pawn made 11...d5 a serious threat. White suddenly faced some serious problems. It is hard to find an improvement to Szen's unfortunate retreat of his knight to its starting square as preparation to redevelop it on d2.

Black seized the initiative. Ten moves later, Anderssen missed a forced checkmate in ten moves.** Nonetheless, he launched a decisive assault of tremendous instructive value and won the game. Something went horribly wrong for White in the first nine moves. Where did Szén err?

Szén,József -- Anderssen,Adolf [B30]
International Tournament, London 1851 (2.4)

1.e4 c5 2.Nf3 Nc6 3.Nc3 e6

This position is found in the Encyclopedia of Chess Openings under B40, so the B30 classification by ChessBase might be inaccurate. Four possible moves for White are then given in ECO: 4.Be2, 4.g3, 4.d4, and 4.Bb5. Szén played none of these.

4.Bc4?!

This move should probably be considered dubious even though control of d5 is a strategic aim. The most popular moves 4.d4 and 4.Bb5 aim at control of d4. 4.Bc4 is more popular than 4.Be2 in the ChessBase database, but it scores worse. White's scoring percentage is poor enough to recommend against 4.Be2, but it is far worse after Bc4. The number of games reaching the position after 4.Bc4 is more than twice the number of times that 4,Bc4 was played. The difference suggests that move order variations account for this bishop's presence on c4 most of the time.

The only game in Chess Informant that reached this position had the move order 1.e4 c5 2.Nf3 Nc6 3.Bc4 e6 4.Nc3, CI 93/(122).

4...a6 5.a4

5.d4 is worth considering. 5...b5 6.Be2 when White's fourth move cost a tempo, but little else.

5...Nge7

The comparison of Staunton's play as Black against Anderssen to Anderssen's play as Black deserves analysis. Anderssen's placement of this knight resembles Staunton's. But, Anderssen's queen does not go wandering on pawn grubbing expeditions.

6.Qe2

6.d4 should be considered. If there is anything wrong with Black's slow deployment, White needs to act with vigor to demonstrate the point.

6...Ng6

Why not harass White with 6...Nd4! 7.Nxd4 cxd4 8.Nb1 Nc6?

7.d3 Be7 8.Be3 O-O 9.O-O

We have reached the diagram position.

My first impulse as Black might be to solve the problem of the light-squared bishop with 9...b6 and 10...Bb7. Anderssen, however, chose to strike.

9...f5!

Did Szén have a better way to meet this thrust? Did Black have an advantage that compelled him to attack? How can we best characterize the errors in White's opening play? Lethargy? Misplaced pieces?

The c4 square often proves an active square for the bishop in symmetrical king's pawn openings. The bishop also goes there frequently in open Sicilians. However, White chose a closed Sicilian, delaying the d4 thrust. It seems, perhaps, that in such positions, the bishop is better placed elsewhere.

Nonetheless, I often see such bishop placement in my own games--at least in online blitz. I usually thrust forward my d- or b-pawn and drive the bishop back to a2 or b3. Later in the game, this bishop bites back.

Anderssen's f-pawn thrust offers another way of looking at similar positions.


*Ziyatdinov's recommended references offer another indication that opening study walks hand in hand with comprehending essential middlegame positions. For example, he lists Paul Keres, and Alexander Kotov, The Art of the Middle Game. The English edition of this book contains an additional chapter by Harry Golombek, who also translated the book into English. Surely, Ziyatdinov would expect me to read Golombek's section as well. Golombek stresses that the middlegame plan, "must arise naturally and logically out of the opening" (17).

**I posted the other middlegame position from this game last month (see "Mate in Ten").