20 December 2021

More Notes on Berger

Johann Berger, Theorie und Praxis der Endspiele (1890) systematically examines practical chess endings in a manner that ushered in the modern theory of the endgame. The book's availability has been enhanced by Google Books.

During my reading yesterday, some underpromotion exercises captured my interest. Berger credits Carl Ferdinand von Jaenisch as the composer. I played them out against Stockfish on my iPad and found the second one required some calculation to get the knight to its proper posting.

White to move
1.Rxg5+ Rxg5 2.fxg5 h2 3.g6 Kh3 4.g7 h4

White to move
White must underpromote to a bishop or knight to avoid stalemate. In this instance, a bishop is the better choice, but a knight can win.

Berger's second exercise from Jaenisch differs in the placement of two pawns.

White to move
1.Rxg5+ Rxg5 2.fxg5 h2 3.g6 Kh3 4.g7 h4

Now, while a bishop does not stalemate, it also cannot win. White must play 5.g8N.

5...Kg4

White to move
Berger's solution continues with 6.Nf6+. I played 6.Ne7, and the tablebases favor 6.Kxh2.

Preceding these studies, Berger offers a brief explanation of the square of the pawn. Following these, is a section on the opposition with several illustrative positions, culminating in this important one from Giambattista Lolli, published in 1763.

White/Black to move
White to move wins; Black to move draws. For some reason, I found the draw hard to believe, but I've practiced the position against students many times since learning it more than ten years ago. Winning with White to move is one one of my requirements for the Bishop Award in my Scholastic Chess Awards.

19 December 2021

Notes on Berger

David Hooper states that Johann Berger, Theorie und Praxis der Endspiele (1890) is "the first comprehensive book in modern times devoted wholly to the practical endgame" (Golombek's Encyclopedia of Chess [1977], 101). In 2009, Google digitized a copy from Harvard Library, making it readily accessible to those interested in the history of the theory of the endgame. Although Hooper states Berger's text, "would not today be regarded as adequate for practical use", I am finding much that is instructive and interesting as I have been reading through it this morning.

Berger makes a point in the first pages to distinguish endgame theory from studies. The endgame, he asserts, "comprises only the battle of a few chess pieces against correspondingly low defensive forces" (2). Compositions leading to checkmate, stalemate, or a draw must be distinguished from endgame theory because, "the chess pieces have a completely different meaning and are used differently than in actual endgames" (2). He presents some illustrations of studies that are not endgames, beginning with a composition by Bernhard Horwitz.

White to move
Horwitz 1884 
White checkmates in six moves. Berger points out that the play of the pieces resembles the middlegame, and also that White's rook is superfluous. In the endgame, "the best possible use of the power of each individual piece should be expressed" (3), Berger opines. He offers:

White to move
1.Kc4 c1Q

Or 1...Ka1 2.Qd2 (to avoid an underpromotion threat)

2.Kb3 and checkmate in a few moves.

Berger's eighth example highlights two ways that a theoretical draw of rook vs. bishop is reached from the following position.

White to move
1.f7 Bd5 2.f8Q Rg8

Or 

1.Rc1+ Kh2 2.f7 Bd5 3.f8Q Rg8

Following this clarification of endgame theory as distinct from studies, Berger shows elementary checkmates--queen, rook, two rooks, two bishops, and then no less than five positions from which checkmate by bishop and knight can be executed.

Then he turns to the knight. Two knights, as we know, can only stalemate. What about three knights? Berger presents a composition of his that was published in Osterreichische Lesehalle (1889).

White to move
When I played this position against the computer, it opted for a line given by Berger as a variation. I was able to coordinate my pieces and win easily.

1.Rxe7 Qd4+

1...Qxe7 leads to 2.c8N+ winning the queen and leading to checkmate. Berger finds a mate 15 moves from the diagram.


17 December 2021

Seeking Understanding

Five years ago, I posted "Two Endgame Compositions", giving only the solution to the second. This week I was asked to provide the solution to the first, an 1888 composition by Johann Berger that was first published in Columbia Chess Chronicle. The past two mornings, I have been studying the solution with an aim to understand every move. Although the maneuvers appear complex, they are based on some simple ideas.
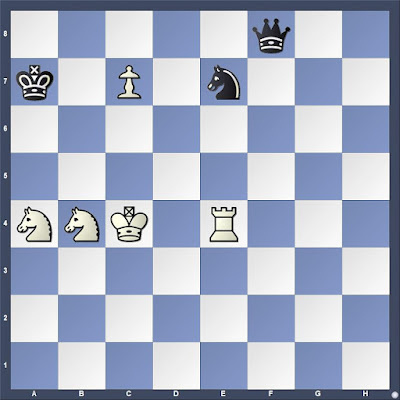
White to move
J. Berger, 1888
1.Qb8

The only winning move, according to the tablebases. It forces the light-squared bishop to move because of the checkmate threat Qh2#.

1...Bc4

Threatens Be6+, followed by Bf2+ (or Bh2+).

Other moves lose more quickly.

1...Be2 2.Qf4 (see at move 4 below)
1...Bd3 2.Qf4
1...Bb5 2.Qxb5 Ba7 3.Qd5
1...Ba6 2.Qg8 Bb7 3.Qh7 Bc8+ (3...Bf2 4.Qxb7) 4.Kg3+

2.Qe5

Prevents the check while keeping the dark-squared bishop immobile.

2.Qd6 is one move slower. This move is presented as a "cook" in Harold van der Heijden's Endgame Study Database with a line leading to underpromotion of Black's pawn. It is an instructive alternative.

2...Ba6

Threatens Bc8+

2...Bd3 3.Qg5 threatens Qxg2#. 3...Be4 4.Qh4 Bf5+ (4...Bf2 5.Qxe4) 5.Kg3+
2...Be2 3.Qxe2
2...Bb5 3.Qxb5

3.Qc7

Prevents the check while keeping alive the Qh2 threat.

3.Qe1 is one move slower according to tablebases.

3...Bd3

3...Bb5 allows 4.Qg7
(4.Qc1 Is given ! in Genrikh Moiseyevich Kasparian, 888 Miniature Studies [2010]. Pins the dark-squared bishop so a check can be met by Kg3 and then Qh6+ 4...Bf1 5.Qf4 Ba6 6.Qg4; 4.Qb7)
4...Bc6 5.Qh6 Bd7+ (5...Bf2 6.Qxc6; 5...Be3 6.Qxc6) 6.Kg3+
3...Be2 is second best 4.Qg7 Bf3 5.Qa1 Be2 6.Kg3

4.Qf4

Threatening to move to g4 where checks along the c8-h3 diagonal are blocked and Qxg2 is threatened. This move forces the light-squared bishop onto the a8-h1 diagonal.
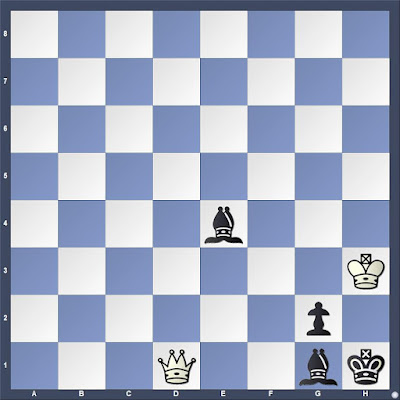
Black to move

4...Bb5 5.Qg4

Shields the king from check and threatens Qxg2#

5...Bc6

Defends g2

6.Qd1

Pins the dark-squared bishop and prepares Kg3

6...Be4

White to move

7.Kg3

Threatens Qh5+. The complex battle between White's queen and Black's light-squared bishop has concluded. Now, White threatens checks on the h-file, which Black can delay briefly.

7...Bg6

Guards h5

8.Qc1

Threatens Qh6+

8...Bh5

Prevents the check

9.Qa1

Forces the bishop off the h-file.

Black to move

The rest is easy.

9...Be2 10.Qh8+ Bh5 11.Qxh5+ Bh2+ 12.Qxh2#

05 December 2021

Knowledge

When does a player refuse a draw offer in a dead drawn position? If time is a factor, such a refusal could make sense. Often a draw offer is refused because a player does not know the position is a draw, or suspects that the opponent does not have the requisite knowledge to hold the position.

I had Black in this position this morning.

White to move
49.b7??

After this error, the game is a dead draw. White should have played 49.g4, or started moving the king towards the b-pawn. I offered a draw after a dozen moves, having reached this position.

White to move
Instead of accepting the draw, my opponent played another 20+ moves, eventually setting a trap with 84.Rh8?? (White's king was on e4). I could take the pawn, stepping into a skewer. Or, I could take the free rook. After I took the rook, White resigned.

I have played similar endgames before in all sorts of time controls (see one example at "Winning" [2016]). I am guided in the knowledge that my king must remain on the seventh rank and the g- or h-file. With the pawn on g6, the king cannot move. I recall reading about this technique in a book that included a discussion of the resulting skewer tactic if the defending king strays.

However, looking through my endgame books, I could not find the remembered passage. Even so several books contain examples that are close enough that an attentive reader can easily derive the relevant knowledge.

The Books


Nikolay Minev, A Practical Guide to Rook Endgames (2004) shows a stalemate trap when the stronger side has a useful f-pawn, but prematurely sets up the skewer (21-22). From Khiut -- Alalin, USSR 1952.

White to move
1.Kf4 Kf7 2.Rh8??

White sets up the skewer.

2...Rxa7 3.Rh7+ Kf6 4.Rxa7 stalemate.

Yuri Averbakh, Chess Endings: Essential Knowledge (1996) shows an interesting drawing idea from Johann Berger (67).

White to move
1.Kf7

Black cannot get to the seventh rank fast enough, but can avoid checks using the Black king as a shield.

1...Kf5 2.Ke7 Ke5 3.Kd7 Kd5 4.Kc7 Kc5 5.Kb7 Rb1+ forcing Black's king back to the c-file.

Although it was fixed in my memory that I learned the technique employed this morning from Averbakh, it is not in Chess Endings: Essential Knowledge. I did find the idea expressed clearly in Edmar Mednis, Practical Rook Endings (1982), but I've known the technique far longer than I've owned this book. Mednis explains, "the stronger side wants to avoid the following two potential problems: immobilizing his Rook and depriving his King of shelter" (22). Both problems exist in the illustrative diagram. My opponent created the first with 49.b7. Pushing the g-pawn forward introduced the second, but there was no way to dislodge my rook from the c-file.

White to move
In his illustrative diagram, Mednis explains both Black's need to keep the king on g7 or h7, and the rook remains on the c-file, leaving only to check White's king when it gets near its pawn.

Two books that I have had for several years and have spent some time reading explain the ideas, too. One of the critically important blue diagrams in Dvoretsky's Endgame Manual (2003) shows the winning idea missed in Minev's example when the stronger side has an f-pawn (152).

White to move
White wins with 1.f6+ because taking the pawn leads to 2.Rf6+ followed by a8Q, while moving in front allows White to set up the skewer with 2.Rh8. Dvoretsky points out that a pawn on the g- or h-file, however, does not present problems for Black. Although Dvoretsky's description of the skewer does not match my recollection, it may be the book from which I learned this idea.

Jeremy Silman, Silman's Complete Endgame Course (2007) offers three pages of analysis with three diagrams with the white pawn on a7, and three more pages and diagrams with the pawn on a6. These are in the endgames for Class A. I recall that I read about that far within days of buying the book when it first came out. His "A key tactical idea" underneath the diagram below comes close to what I recall studying. Black attempted a "queenside trek" (230).

Black to move
So, I may have learned the idea from Dvoretsky, and certainly encountered it in Silman. It may also be in some other endgame books on my shelf. The simple idea appears in many books. My opponent either lacked this knowledge, or suspected that I did. In the end, he set up a skewer threat that was shocking enough I could have fallen for it on impulse. However, I took a few seconds to assess and grabbed the free rook.