Showing posts with label Lucena position. Show all posts

20 February 2025

Playing Drawn Endgames

Do you play out a position that is technically drawn? Twelve years ago, here on Chess Skills, I inquired about an endgame that I was watching live. Levon Aronian made Fabiano Caruana play 36 moves in a dead drawn rook and bishop vs. rook ending. Some research showed that Aronian had won such endings in previous games. When time is short and one side faces no dangers, it makes sense to press and force the opponent to prove their skills in maintaining equality.

Thomas Engqvist makes this point in 300 Most Important Chess Positions (2018) with several examples. First is Duras,O. -- Nimzowitsch,A., San Sebastian 1912.

Black to move
Engqvist writes:
Nimzowitsch tried to make his opponent tired and careless by doing nothing. As a matter of fact there is nothing Black can do. By playing in this "innocent" manner Nimzowitsch managed to fool his opponent. (230-231)
After 24 moves of seemingly pointless shuffling, the players reached this position.

Black to move
Duras erred with 57.Rg5. Nimzowitsch seized the moment with 57...f5 and Duras resigned ten moves later.

Engqvist adds Flohr,S. -- Vidmar,M., Nottingham 1936, where he notes, "In practice it's not easy to defend these kinds of endings and even famous masters and grandmasters make mistakes that eventually lead to a loss" (238). Vidmar resigned 16 moves after his critical error.

Then, in Chigorin,M. -- Tarrasch,S., Budapest 1896, Tarrasch offered a draw in this position.

White to move
"Chigorin correctly declined since White cannot lose anyway", Engqvist observes (240).

After 30.Kf4 Kf8 31.f3 Kg8 32.Ra7 Kf8 33.g4 hxg4 34.fxg4

Black to move
34...Ra1??

34...Kg8 was necessary. Engines need considerable search depth to perceive the error here, but Chigorin appeared to understand the moment.

35.Kf5 Rf1+ 36.Kg6 Rf4 37.g5 fxg5 38.hxg5

In this position, I recognized that White will be able to reach a Lucena position, although that took another ten moves.

My own insistence on playing on when there is the sliver of a chance of eventual victory developed as a consequence of reading Jacob Aagaard, Excelling at Technical Chess (2004) almost twenty years ago. Yesterday, I faced an opponent in online play who pressed when he had a slight edge in a technically drawn ending. I erred. He missed his chance. And then, he took the game almost to stalemate, even offering me opportunities to fall apart in an elementary pawn ending.

White to move

Stripes,J. -- Johnson,F. [A04]
Live Chess Chess.com, 19.02.2025

28.Ra1!= Rxa1 29.Rxa1 Ra8 30.Ke3?!

An inaccuracy

30.Ra6 Rb8 31.Rxa7 Rxb3 32.Rxe7 Rc3 33.Re8+ Kg7 34.Rd8 Rxc4 35.Rxd6=

30...Kf8 31.Ra6 c5

31...Rb8 32.Ra3 a5 33.Kf4 would be more difficult for White.

White to move

32.d5?

32.dxc5 dxc5 33.Kd3=

32...Ke8

32...f5 should win.

33.Kd3 Kd7 34.Kc3

34.g4 is White's best chance. It seems that both of us missed the strength of f7-f5.

34...e6?

34...f5!

I have survived my first error and the game is again drawn with best play.

35.e4 f5 36.dxe6+ Kxe6 37.exf5+ gxf5

White to move

38.Kd3??

38.b4= cxb4+ 39.Kxb4 Rb8+ 40.Kc3 Rg8! 41.c5! Rxg3+ 42.Kd2 Ke5 43.cxd6 Rg7 44.Ke3 Rd7 45.Kf3
38.h5!=

38...h5-+ 39.Ke3 Ke5 40.Ra5

Black to move

40... a6??

Spoils the win.

40...Rb8-+ 41.Ra3 a5
40...Rg8-+

41.b4!=

The rest of the game was played well by both sides and a draw was the appropriate result. I never had winning chances, but there were opportunities for me to go wrong, so my opponent pressed.

41...Rc8 42.bxc5 Rxc5 43.Rxa6 Rxc4 44.Ra5+ d5

White to move

45.Ra8 Rc3+ 46.Kf2 d4 47.Re8+ Kd5 48.Rf8 Ke4

White to move

49.Re8+ Kd5 50.Rf8 Ke5 51.Re8+ Kf6 52.Rh8 Kg6 53.Rg8+ Kf7 54.Rg5 Kf6 55.Rxh5 Rc2+ 56.Kf3 d3 57.Rh6+ Ke5 58.Rh8 d2 59.Rd8 Rc3+

White to move

60.Ke2 Rxg3 61.Rxd2


61.Kxd2 f4 62.Re8+ Kf5 63.Ke2=

61...Rg2+ 62.Ke1 Rxd2 63.Kxd2

And now, in a drawn pawn ending, my opponent goes to remove my pawn, and then makes me show that I know where to place my king.

63...Kf4 64.Ke2 Kg4 65.h5 Kxh5 66.Kf3 Kg5 67.Kg3 f4+ 68.Kf3 Kf5 69.Kf2 Ke5 70.Kf3 Kf5 71.Kf2 Ke4 72.Ke2 f3+ 73.Kf2 Kf4 74.Kf1 Ke3 75.Ke1 Ke4 76.Kf2 Kf4 77.Kf1 Kg4 78.Kf2 Kf4 Game drawn by repetition ½-½

Having lost all four prior encounters against Atlanta coach and chess expert Frank Johnson, I'm very happy with the draw. My work on rook endings with Engqvist's book and Jesus de la Villa, 100 Endgames You Must Know, 4th. ed. (2015) made a difference in navigating difficulties, but did not prevent all errors.


16 December 2024

Doing it Right

I had White and the move from this position a couple of days ago. As a couple of my students and I have been working on rook endings, I spent some time in post game analysis. I thought that I played the ending well.


32.Rxc8

32.Ree1 was worth considering, but I was aiming to simplify, trusting that I could prevail with minimal risk in a rook ending with a one pawn advantage.

32...Rxc8 33.Bxd4

33.Rg4 g6 34.Bxd4 Bxd4 35.Rxd4 was not even considered.

33...Bxd4 34.Rxd4

Black to move

34...Rc7?

This error gives me winning chances.

34...a5 35.Re4 Kf7 36.Re5 Rc1+ 37.Kg2 Ra1 38.Rxb5 Rxa2 more than likely leads to a draw.

35.Kg2 Kf7 36.Rd6 Ke7 37.Ra6 h6?!

37...Rd7 38.d4 keeps White's advantage minimal.

38.Kf3+-
Black to move

38...g5 39.Ke4 Rd7 40.d4 Kf6 41.g4!

Black to move
Black's options are limited. My rook is more active and my king is threatening to advance.

41...Rc7

41...b4 42.h3 Kf7 was a better option for Black.

42.d5 Re7

42...Rc2 43.Rxe6+ Kg7 44.Re7+ Kf6 45.Rxa7 Rxf2 46.Ra6+ Ke7 47.Rxh6 Rf4+ 48.Ke5 Rxg4+-

White to move
This position might serve as a training exercise.

43.Kd4

I considered 43.Rxe6+ Rxe6+ 44.dxe6 Kxe6 45.f4+- but did not correctly evaluate the pawn ending. That would have simplified the game.

43...Kf7 44.d6 Rb7 45.Ke5 b4

Better would have been 45...Ke8 46.Kxe6 Kd8

46.Rc6?

My first error in the ending.

46.Ra5+- and the rest is easy. 46...Ke8 47.Kxe6

46...Rb5+ 47.Ke4

Much of my advantage has slipped away.

Black to move
47... Ke8?

47...Rd5 48.f4 a5

48.Rc7+-

Aron Nimzowitsch assures me that this should be winning.

48...Rd5 49.Rxa7

49.Re7+ Kd8 50.Rxe6 Ra5 51.Rxh6 Rxa2 52.f4+-

49...Rxd6 50.Ke5

I was happy with this fork as I believed that the penetration of my king would be decisive even if several of my pawns came off the board.

Black to move

50...Rd2 51.Kxe6 Re2+

ChessBase auto analysis gives this move a question mark, but a greater depth of analysis by the engines concurs with Black's decision.

51...Kf8, recommended in the auto analysis is about the same. 52.f3 Rf2 53.Kf6 Rxf3+ 54.Kg6 Rh3 is not substantially different than what occurred in the game. 

52.Kf6 Rxf2+ 53.Kg6! Rxh2 54.Rb7 Rxa2

White to move

55.Rxb4??

I spoiled the win. Either 55.Kxh6 or 55.Rb8+ with 56.Kxh6 to follow would keep the win in hand. As often occurs with these online ten minute games, when I think that I played well, post game analysis with the help of my silicon friends reveals that I threw the game away with a terrible error.

55...Rg2??

My opponent returned the favor, and once again I am winning.

55...Rh2=

56.Kxh6 Kd7 57.Kxg5 Kc6

White to move

58.Rd4!

Cutting off the Black king from the side of the board where my king and pawn are ready to advance together assures me of reaching a Lucena Position.

58...Kc5 59.Rd8 Rg3 60.Kf5 Rxb3 61.g5 Rf3+ 62.Ke6 Re3+ 63.Kf6 Rf3+ 64.Kg7 Kc6 65.g6 Kc7 66.Rd1 Rh3 67.Kg8 Kc6 68.g7 Kc7

The Lucena position has been reached.

White to move

69.Rd5 Kc6 70.Rg5 Kd7 71.Kf7 Rf3+ 72.Kg6 and Black resigned.

14 May 2023

Short Side

After playing a rook and pawn ending for 43 moves and keeping things level, my opponent erred.

Black to move
The king must go to the short side; that is Kg8. The rook can shift to the long side at the right moment to enable checking White's king from a distance. With such play, Black holds a draw.

63... Ke8?? 64. f5 Ra1 65. Rb8+ Kd7 66. Kf7 Rf1 67. f6 Rf2

White to move

68. Rb7+

68. Kg7 is a faster win Rg2+ 69. Kf8 Rf2 70. f7 Rg2 71. Rb4

68... Kd8 69. Rb4 Rd2

Black understands that White would like to drive the Black king another file from the pawn. But White has other means available. Means that I failed to employ.

70. Kg7

70. Kf8 is faster.

70... Rg2+ 71. Kf8 Rd2 72. f7 Rd1

White to move

73. Re4

Better would have been 73. Rf4 or 73. Rg4.

73... Rd2 74. Re8+

74. Kg7 Rg2+ 75. Kf6 Rf2+ 76. Ke6 Rf3 77. Re5

74... Kd7 75. Re7+

75. Kg7 Rg2+ 76. Kh6

75... Kd8 76. Re6 Rg2 77. Rd6+ Kc7

White to move

78. Rd4

My other small inaccuracies added a move or two each to eventual checkmate. Here when I played the second best move, eight moves were added to to road towards checkmate.

78. Ke7! Rf2 79. Re6 Rf1 80. f8=Q Rxf8 81. Kxf8

78... Re2 79. Kg7 Rg2+ 80. Kf6 Rf2+ 81. Ke6 Re2+ 82. Kf5 Rf2+ 83. Rf4 {Black resigned} 1-0

Remember always: king on the short side, rook on the long side.

09 April 2018

Finishing

During Inland Chess Academy's Spring Break Chess Camp last week, I presented four sessions. My topics were weakness, patterns, coordination, and finishing. The following is an outline of the fourth, finishing. Click on the links for some of my previous posts that expound upon some of these techniques.

Finishing


To score well consistently in chess competition, you need to have the skill to convert an advantage into a win. Often, also, you need to hold a draw when you have a slight disadvantage.

To develop this skill, learn (in approximately this sequence):

Checkmate with heavy pieces—two rooks or rook and queen
Checkmate with one heavy piece
Winning and drawing positions and techniques when one side has a single pawn (opposition and outflanking)

Black to move
Black draws with best play
Winning techniques when one player has a pawn majority on one flank and an equal number of pawns on the other flank
Use of opposition and outflanking to secure the win or hold the draw when both sides have the same number of pawns
Some stalemate ideas when kings and pawns are all that remain
Checkmate with two bishops
Holding the draw with Philidor’s idea in rook and pawn against rook
Winning from the so-called Lucena position (building a bridge)
Queen versus advanced pawn—winning techniques and positions, drawn positions and techniques
Tactical tricks in rook endings (and the corresponding drawing ideas)
Checkmate with knight and bishop*
Queen versus rook—elementary winning positions and ideas

Of course, these skills are only a beginning, but they are a very important beginning. These skills are called fundamental because they are the foundation upon which you can build lasting skill. Without this foundation, your success in the opening and middle game will often crumble in disappointment.


*Jeremy Silman does not agree that this skill is necessary

18 January 2017

Blowing the Ending

This morning on Chess.com, I beat NM Farzad Abdi in a three minute game. However, I completely blew the ending and won only because my opponent ran out of time in a dead drawn pawn ending.

Black to move

I played 55...Ra3+ and swapped rooks, which produced a pawn ending where my opponent easily seized the opposition and a dead draw. However, at this point I had 46 seconds remaining to his 11 seconds. I played against his clock and prevailed.

I was happy to get another blitz win against a titled player, but then spent a fair bit of time playing positions from earlier in the game against Stockfish 7. I learned that at three minute time controls, and even with a little more time to think, this ending is not a simple win.

55...Kf7 keeps winning chances alive.

A few moves earlier, I had an easier win.

Black to move

My 52...Rf2+, played after 4.6 seconds thought, did little to secure the win.

52...g5 advances the second pawn without allowing White's king to interfere.

A few moves earlier, I looked at and rejected the strongest move, using a mere 1.4 seconds. At the time, I had 1:03 to my opponent's 0:25.

Black to move

I played 48...h3.

Better was 48...g6+ 49.Ke4 h3 and then the feared checks lead only to 50.Ra7+ Kg8 51.Ra8+ Kg7 52.Ra7+ Kh6

Analysis Diagram
After 52...Kh6
Threatening the h-pawn with 53.Ra3 does not help White because Black has 53...Rg4+ 54.Ke5 Rh4 and with the rook behind the h-pawn, White's rook must take up a passive position on h1. Alternately, White can play 54.Kf3 and Black can exchange the rook for a new queen with 54...h2!

Going back earlier in the game, I had this position and the move.

Black to move

Play proceeded 38...Ke6 Ra7, and I thought that 39...g5 would be an error in the light of 40.Ra6+ Kxe5 41.Rxh6. My assessment was incorrect. White's king is too far away. White will be forced to give up the rook for the pawn.

After playing several other positions against the computer with mixed results, I found this one remarkably simple.

Analysis Diagram
After 41...Rxh6
41...g4 42.Rg6 Kf4 43.Rf6 Kg3 44.Kb3 Kg2 45.Kc4 g3 46.Kd3 Re8 47.Rg6 Kf2 48.Rf6+ Kg1 49.Rg6 g2 50.Rh6

Analysis Diagram
After 50.Rh6
And having reached a textbook Lucena, I built a bridge.

50...Re5 51.Rh7 Kf2 52.Rf7+ Kg3 53.Rc7 Rg5 54.Rc1 Kh2 55.Ke4 g1Q 56.Rxg1 Kxg1 and mate in fifteen.

It was nice to get the win, even from a dead drawn position. It is more important to learn how to win such positions more easily. My opponent misplayed the opening to give me an easy and comfortable middle game, but then I overlooked some of his resources in the endgame.

20 January 2016

Training with Caruana

Lesson of the Week

We know from the broadcast of Giri -- Caruana, Tata Steel Chess 2016 (see my blog post on the same) that Fabiano Caruana could have maintained his winning position with 55...Ra3, instead of 55...Rxh3. His move led to a draw that Anish Giri executed easily. The resulting position may have been something straightforward to most Grandmasters, but it is not an elementary ending for the rest of us.

Black to move

Armed with the knowledge that Black is winning here, I tried playing it agianst Hiarcs on my iPad while my beginning students were solving checkmate in one problems. Naturally, I was only partly focused on the exercise as I needed to guide the students through their occasional difficulties. I was not successful.

This morning, I awoke very early and watched Danny King's "Power Play" YouTube video on yesterday's Tata Steel games. He went through Hou -- Navara from Hou Yifan's rook sacrifice to David Navara's resignation, then he turned his attention to the ending in Giri -- Caruana. After watching the video, I tried again against my iPad and won easily.

Later in the morning, I played the position against Stockfish 7 on my notebook computer and on my desktop. I also played the position against Hiarcs 12 and Rybka 4. Different engines tried different replies for White.

After playing the position against several engines, I searched Nikolay Minev, A Practical Guide to Rook Endgames (2004) for positions that are helpful. One position in this book elucidates a technique that I stumbled upon in my play against the computer.

This position from Minev's text and some of my play against the computer will form the core of the lesson for my advanced students tomorrow afternoon.

In the game scores below, 1...Ra3 takes the place of 55...Ra3 as a variation in Caruana's game yesterday.

Hiarcs on the iPad and on the Desktop followed the same basic defensive idea that GM Danny King highlighted in his video. This game is one of several.

Hiarcs 12 -- Stripes,James
Blitz 10m, 20.01.2016

1...Ra3 2.Ra7 e3 3.Re7 Kf3 4.Kb4 Rd3

This move was the one that I was not finding until I watched King's video. Taking control of the d-file keeps White's king separated from the pawn that will promote while also offering a possible shield of Black's king from rear checks.

4...Ra1 seems as though it should be adequate, but always led me to positions where I found success elusive.

5.Kc4 Rd6 6.Rf7+ Kg2 7.Re7 Kf2 8.Kc3 e2 9.Rf7+ Ke1 10.Rb7

Black to move

10...Rf6

With my pawn only one square from promotion, transferring the shield to the f-file allows my king to come out from in front of the pawn.

10...Kd1 11.Rb1# would be embarrassing.

11.Rb1+ Kf2 12.Kd2 Rd6+ 13.Kc2 e1Q 14.Rxe1 Kxe1 

The rest is easy.

15.Kc3 Kf2 16.a5 Kg3 17.Kc4 Kxh3 18.Kb5 Kg3 19.a6 Rxa6 20.Kxa6 h4 21.Ka7 h3 22.Kb6 h2 23.Kc5 h1Q 24.Kb5 Kf4 25.Kc5 Ke5 26.Kc4 Qf3 27.Kb5 Qc3 28.Kb6 Kd6 29.Ka7 Qb4 30.Ka6 Kc7 31.Ka7 Qa5# 0–1

Rybka 4 threw me a curve and a bit of calculation revealed a surprising response, which I played with success.

Rybka 4 x64 -- Stripes,James
Blitz 10m, 20.01.2016

1...Ra3 2.Kb4

Black to move

2...e3! 

2...Rd3 seems to fail 3.Kc4 Rd7 4.Rxh5 e3 5.Rh8 Kf3 6.Rf8+ Ke2 7.Re8 Rh7 8.a5 Rxh3 9.a6 Rh7 10.Kd4 Rd7+ 11.Kc5 Kd2 12.Rxe3 Kxe3 13.Kb6 Rd6+ 14.Kb7 Rxa6 15.Kxa6.

3.Kxa3

3.Ra7 leads to a solution similar to the game above. 3...Rd3 4.Rf7+ Kg3 5.Kc4 Rd6 6.Re7 Kf2-+.

3...e2 4.Rc5

Komodo suggest 4.Rxh5, but Black still wins after 4...e1Q 5.Rb5 Ke4 6.h4 Kd3 7.h5 (7.Rb4 Qa1+ 8.Kb3 Qc3+ 9.Ka2 Qxb4) 7...Qa1+ 8.Kb3 (8.Kb4 Qc3#) 8...Qc3+ 9.Ka2 Kc2 10.Rb8 Qc4+ 11.Ka3 Qc5+ 12.Ka2 Qd5+ 13.Ka3 Qd6+ 14.Rb4 Kc3 and the rook falls.

4...e1Q 5.Rb5 Qa1+ 6.Kb4 h4 7.Rc5 Qb2+ 8.Kc4 Kg3 9.a5 Kxh3 10.Rb5 Qa2+ 11.Kc3 Kg4 12.a6 Qxa6 13.Rb4+ Kg3 14.Rb3 h3 15.Kb2+ Kg2 16.Rc3 

Black to move

16...Qe2+ 17.Rc2 Qxc2+ 18.Kxc2 h2 19.Kc3 h1Q 20.Kc4 Kf3 21.Kd4 Qh5 22.Kc4 Ke3 23.Kb3 Kd3 24.Kb4 Qd5 25.Ka3 Kc3 26.Ka4 Qf5 27.Ka3 Qa5# 0–1

Most of my play against the engines involved the immediate loss of a pawn.

After a couple of failures, I was able to find my way.

Stockfish 7 64 -- Stripes,James
Blitz 25m, 20.01.2016

1...Ra3 2.Rxh5 Rxa4+ 3.Kc3 Ke3

I went for a classic Lucena position.

White to move

4.Rh6 Ke2 5.h4 e3 6.h5 Ra3+ 7.Kc4 

7.Kb4 Ra7 8.Rf6 Ke1 9.h6

7...Ke1 8.Rf6 e2 9.h6 Rh3 10.Ra6 Kd2 11.Rd6+ Kc2 12.Re6 Rh4+ 13.Kb5 Kd2 14.Rd6+ Ke3 15.Re6+ Kd3 16.Rd6+ Kc3 17.Rc6+ Kb3 18.Re6

After stumbling in the blindness, I found a tactical shot. Alas, it leads to an ending of queen versus rook that I find terribly difficult when playing against engines.

Black to move

18...Rh5+ 19.Kc6 Rxh6! 20.Rxh6 e1Q 21.Kd7 Qe5 22.Re6 Qf5 23.Kd6 Kc4 24.Re5 Qf4 25.Ke6 Qh6+ 26.Ke7 Kd4 27.Ra5 Qc6 28.Rh5 Ke4 29.Rh1 Kf5 30.Rf1+ Kg6 31.Rg1+ Kh7 32.Rg5 Qc3

32...Kh6 33.Re5 Kh7 34.Rg5 Qe4+ 35.Kd6

33.Ke6 Kh6 34.Re5 Kg6 35.Kd5 Kf6 36.Re6+ Kf5 37.Rc6 Qd2+ 38.Kc4 Qd7 39.Rc5+ Ke4 40.Kb3 Qe6+ 41.Kc3 Ke3 42.Rc4 Qb6 43.Kc2 Qa6 44.Kb3 Kd3 45.Rc3+ Kd4 46.Rc1 Qb5+ 47.Kc2 Qc5+ 48.Kb1 Qb4+ 49.Ka2 Kd3 50.Rb1 Qa4+ 

50...Qa5+ 51.Kb2 Qb6+ 52.Ka2 Qa7+ 53.Kb2 Qa4 54.Rc1 Kd2 55.Rb1 Qb4+ 56.Ka2 Qa5+ 57.Kb3 Qb6+ 58.Ka2 Qa7+ 59.Kb3 Qb8+ 60.Ka2 Qg8+ 61.Ka3 Qg3+ 62.Ka4 Kc2 63.Rb6

51.Kb2 Qc2+ 52.Ka1 Qc3+ 53.Ka2 Qe5 54.Kb3 Qb5+ 55.Ka2 Qd5+ 56.Kb2 Kd2 

Finally! White is in zugzwang.

White to move

57.Rg1 Qb5+ 58.Ka2 Qa6+ 59.Kb3 Qb6+ 60.Kc4 Qxg1 61.Kd5 Kd3 62.Kd6 Kd4 63.Kc6 Qg7 64.Kd6 Qf7 65.Kc6 Qe7 66.Kb6 Qd7 67.Ka5 Kc5 68.Ka6 Qg7 69.Ka5 Qa1# 0–1

In the next example, I discovered on my own something that I might have learned from a book.

Stockfish 7 64 -- Stripes,James
Blitz 25m, 20.01.2016

1...Ra3 2.Rxh5 Rxa4+ 3.Kc3 Ke3 4.Rh6 Ke2 5.Rh4 Kf2 

5...Ra3+ seems inadequate.

6.Kb3 Rd4 7.Kc3 Rd3+ 8.Kc2 Ke3 

8...Re3 fails.

9.Rh6 Ke2 10.h4 e3 11.h5 Rd5 12.Rh7 Rc5+ 13.Kb2 Rf5 

13...Ke1 throws away the win 14.Re7 e2 15.h6 Rh5 16.h7 Kd1 17.Rd7+ Ke1 18.Re7 Kf1
13...Rd5 also loses all advantage.

14.h6

Black to move

14...Rf6!

Minev presents a position from Beliavsky -- Radulov, St. Petersburg 1977 in which he highlights the technique that I stumbled across out of necessity here.

15.Rh8 Kf2 16.h7 Rf7! 17.Rb8 Rxh7 18.Rf8+ Ke1 19.Kc2 e2 

A textbook Lucena, but with Black to move

20.Kb3 Rh5

20...Rc7
20...Re7 21.Kc2 Creates a textbook Lucena 21...Rc7+ 22.Kb2 Rc5

21.Kc3 Rc5+ 22.Kd4 Rc2 

22...Rc7

23.Ke3 Rc3+ 24.Kd4 Rc6

24...Kd2 25.Rf2 Ra3

25.Kd5 Rc7 26.Rh8 Kd2 27.Rh2 

Black to move

27...Kd1 28.Rh1+ e1Q 29.Rxe1+ Kxe1 30.Kd6 Rc4 31.Kd5 Rh4 32.Kc5 Ke2 33.Kd5 Ke3 34.Kd6 Ke4 35.Kc5 Rh5+ 36.Kd6 Re5 37.Kc6 Kd4 38.Kd6 Ke4 39.Kc6 Rd5 40.Kb6 Ke5 41.Kc6 Ke6 42.Kc7 Rd6 43.Kc8 Rd7 44.Kb8 Kd6 45.Kc8 Kc6 46.Kb8 Kb6 47.Kc8 Rd1 48.Kb8 Rd8# 0–1

07 August 2015

Blitz Hinders Skill

Speed kills. Chess players are prone to error when they are under time pressure. In blitz, the time pressure begins with the first move. Games start in the normal fashion as players make moves they have made many times before. Some games may go twenty moves or more without either player being forced to confront an unfamiliar position. Some endgames, too, can be played very rapidly with little error.

In complex middlegames, however, blitz is groping in the dark. There is no time for analyzing the position. There is only time for reacting to concrete threats or for playing generic principled moves without concrete analysis of the nuances that are unique to the position on the board. Often there are familiar patterns in the position, of course. Strong players see more of these patterns and consequently make fewer errors.

Weak players reinforce the bad habits that make them weak. Improving players stagnate.

Blitz can help players improve. In one of the many chess forums discussions on the merits of blitz, a strong internet player offered a succinct statement on the principal benefits:
Blitz is good for getting a sample of what to expect against your opening repertoire. It also helps with exploring your intuitive tactical vision to see where you need work.
FirebrandX, "Does Blitz Actually Help Your Chess?" Chess.com
If you play enough blitz, you should encounter every likely response to your opening repertoire. That can be a useful addition to one's training regimen. To benefit, however, it would seem that a player needs more than just the experience of playing against every likely response. Playing the best moves in reply would be useful experience. To gain this experience, it is helpful to save blitz games into a database and review them. Check the lines against opening monographs and encyclopedias. Check these lines against a database. Check key moves with an engine from time to time. Play through master games in those lines.
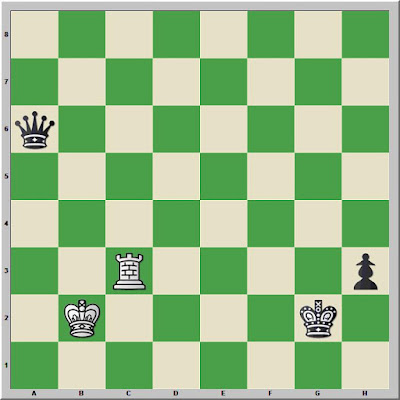
Post-game analysis of blitz games helps to reinforce any lessons available from the opening. Such analysis seems even more critical for determining areas of one's intuition that need work. Here, too, a database can be a useful tool. During post-game analysis, if you see you failed to account for a bishop tucked away on a7, you can search your games to see if this problem is a recurring one.


15 December 2014

Elementary Rook Ending

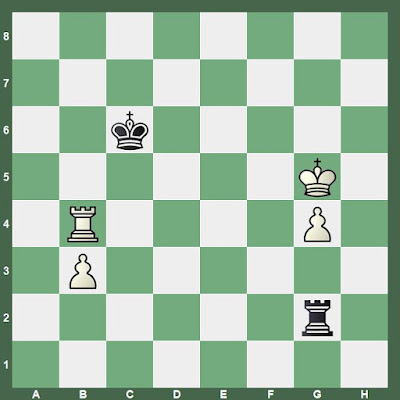
In this diagram, if it is White's move, it is an elementary Lucena Position. But what if is is Black's move?

Black to move

03 May 2014

More Rook Ending Tragicomedies

Thanks to the need to effectively teach the Lucena and Philidor rook endgame positions to a strong young chess player, I have been using my database to review my own games. My OTB (over the board games) reveal some degree of skill, but errors in blitz expose weaknesses in my intuitive understanding.

Blitz can reinforce bad habits, but it may also be useful for diagnosing and correcting those habits.

Black to move

I threw away a decisive advantage with 57...gxh3. This game was played in April 2014.

Black to move

53...Kf4 preserves winning chances, but I played 53...g4?? to reach a dead drawn ending.


The Good News

Despite these many failings, my database reveals an abundance of games in which I was able to convert a Lucena or or similar position.

This one from the Free Internet Chess Server (FICS) in February 2014 shows that I missed the best line, but found a wholly adequate solution nonetheless.

White to move

67.Rf6+ (67.Rb8 was best) 67...Kg3 68.b7 Rb6 69.Kc4 Rb1 70.Kc5 Kg4 71.Kc6 Kg5 72.Kc7 Rc1+ 73.Kb8 Rb1 74.Rc7 Kf6 75.Kc8 Re1 76.b8Q Re8+ 77.Kb7 Rxb8 78.Kxb8 and my opponent opted not to test how quickly I could deliver checkmate with a rook and king against his lone monarch.

I also avoided a trap in this finish from March 2013 on Chess.com. Then I saw a trap that was not there.

White to move

47.Kc6 Rf2 48.Kc5 Rc2+ 49.Kb4 Kc7 50.Ka3 Rc3 51.Kxb2 Rxb3+ 52.Kxb3. Game drawn.


02 May 2014

Philidor Position: Practice

Demonstrating fundamental understanding of the Philidor position in rook endings is one of the tests for the Rook Award in my series of scholastic chess awards. Naturally, when I have a student working through that stage, I spend additional time looking through my own games both to find evidence of correct play and to extract study positions where failure occurred.

Tragicomedies abound in my database of online games, which includes thousands of turn-based (correspondence) games, nearly as many "standard" (fifteen minute and longer) live online games, and fifty thousand blitz games. There are dozens of games where the last several moves clearly indicate both players trying to run the other out of time in a dead drawn ending, or even in endings where one player has a decisive advantage but the other manages to win. There are also far too many games where moves played demonstrate intuitive failure or lack of understanding of correct technique.

Using the classification keys in ChessBase 11, I am able to quickly locate hundreds of rook endings and skim through the positions rapidly. With an eye for thematic positions, I seek those with results at odds with the truth of the position. I play out the position from before the error to practice correct technique. This practice also tests my understanding of which positions are drawn and which won or lost.

As White, I threw away a draw from this position, but then won on time a few moves later. The game was played on the Internet Chess Club in August 2000.

White to move

54.Ra6?? loses to 54...Rf6+. My opponent returned the position to drawn status with 54...f4, allowing my rook to maneuver to f1 where it awaited help from its king.

My ICC opponent in 2000 could have held the next position easily by shuffling the rook across to a3, b3, ... Even 78.Rh5, the move played, could have held if not for the blunder several moves later.

White to move

78.Rh5 Kg4 79.Rh3 Re7 80.Rg3+ Kf4 81.Rg2 Rh7+ 82.Kg1 Ke3 83.Rf2?? and I won with a rook swap that took us into an elementary pawn ending. Playing my opponent's position against Stockfish DD earlier this week, I reached a draw in a few seconds of play keeping the rook on the third rank until Black advancd the pawn to f4, then keeping up a barrage of side checks.

My own errors were glaring in the next game.

Black to move

In a three minute game on ICC in 2001, I played 55...Re5?? in this position. My opponent exploited the error to win.

In this game from 2001, I maintained the draw for several moves. Even so, my moves call into question my intuitive sense. Keeping my king in front of Black's pawn should not require conscious thought.

White to move

70.Ke3 (I played 70.Kf3 against Stockfish) 70...Ra3+ 71.Kd4 Ra4+ 72.Kc3?? and I lost the game.

Improvement?

Moving forward in the database to 2006, I should find better play. By then, I had spent at least a little time learning some principles of rook endings, although serious work began in 2007. It was then that I bought Jeremy Silman's new book, Silman's Complete Endgame Course (2007) and quickly went through everything up through the chapter for C Class. In the fall of 2006, I also broke through to B Class with my USCF rating.

After studying the section on the Lucena and Philidor positions in Silman's text, I changed the requirements for my Rook Award. The Lucena and Philidor positions replaced checkmate with a bishop and a knight. Silman's arguments concerning the relative value of each influenced my decision, as did one of my pupils requiring 51 moves to checkmate my king with a bishop and knight after many attempts over several weeks.

In this game on Free Internet Chess Server (FICS), I started well.

White to move

52.Rh3+ Ke4 53.Rb3 f4 54.Kf1 f3

I have occupied the third rank. Black has advanced his pawn.

55.Rb4+ Ke3 56.Rb3+ Kf4 57.Rb4+??

I threw it away. It was time to check from the rear.

In another game on FICS in 2006, I threw away a win.

Black to move

56...f2?? leaves my king unprotected from White's checks. Against Stockfish this week, I won quickly after 56...Re1+.

Several years later, rear checks allowed my to transition into a drawn pawn ending in this game from Chess.com that was played in 2013.

Black to move

70...Rxg3+ 71.Kf4 Rg1 72.Ke5 Re1+ 73.Kd6 Rxe6+ 74.fxe6 Ke8

My opponent tested my time management skills for seven moves before we reached stalemate.

Nonetheless, failures continued to manifest themselves in 2013.

I blew a draw in this game on Chess.com.

White to move

70.Rf3+?? leads to passive first rank defense that is lost (and straight out of the textbooks).

Against the engine, I held the draw after 70.Rb6+ Kc3 71.Kb1.

As recently as January of this year, I demonstrated a continuing need for improvement.

White to move
52.Kh1

Choosing the short side is as effective here as 52.Kf1.

52...f3 53.Rc4+ Kh3 54.Rc1??

54.Rc8 would have been simple and effective. Passive defense leads to checkmate.

The work continues.