
Game of the Week
After several people recommended J.H. Donner, The King: Chess Pieces (2006), I finally bought a copy. It arrived two days ago. This game is presented in one of the early essays in the book, "Fun and Seriousness" (26-28).Evans,Larry Melvyn -- Larsen,Bent [D32]
Dallas, 1957
1.d4 d5 2.c4 e6 3.Nc3 c5
J.H. Donner notes, "Officially, the line is known to be unfavorable for Black" (27). Readers of Seigbert Tarrasch, on the other hand, know that in his opinion this move must be played sooner or later, and playing it without loss of tempo has its merits.
4.e3
4.cxd5
4...Nf6 5.Nf3 Nc6
Symmetry, it seems to me, should favor the first player.
6.cxd5
6.a3 has become the main line.
6...exd5
White to move

I have had this position at least 27 times in online play. Black scored over 60% in my games. I had White in 13 of these 27 and my record from both sides is +1.
7.Bb5 a6
This move has not been played by any of my opponents, nor by me.
7...Bd6 is slightly more popular. It seems sensible to prepare castling before the center opens further. I have faced this move once. I won that game after a long struggle.
8.Bxc6+
8.Be2 The handful of games with this move have favored Black.
8...bxc6 9.0–0 Bd6
9...c4 and Black won in 35 moves in Howard,G. -- Whitfield,K., Hamilton 1924.
10.dxc5 Bxc5
White to move

This position has been reached more than fifty times since this game.
11.e4
"It seems White is taking the initiative" (Donner 27). Three other moves are more popular. Trying to open the center before Black castles seems sensible.
11.b3;
11.Qc2;
11.Qa4
11...0–0 12.Bg5
12.e5 does not seem to offer White much 12...Nd7.
12...Be7 13.Nd4
Striking at an obvious target that is easily defended. Does this move provoke a concession as Black defends the pawn?
13.Qa4;
13.exd5 cxd5 Black has two isolated pawns 14.Nd4 (14.Qd3) 14...Qd6 15.Qd2 Ne4 and White went on to win after a long struggle (60 moves) in Barlocco,C (2144) -- Wohl,A (2362) Arco 2008.
13...Qd6 14.e5
14.Nf5 Bxf5 15.exf5
14...Qxe5 15.Nxc6 Qxg5 16.Nxe7+ Kh8 17.Nxc8 Raxc8
White to move

Donner, who was preparing to face Larsen over the board when he wrote this article states, "Black has easily parried all white threats, obtaining comfortable play. That is when Larsen is at his most dangerous" (28). Perhaps the point of White's move 13 was to eliminate the clergy.
18.Qd3 Rfd8
"If Evans thought even for a moment that Larsen would defend the a6 pawn, he didn't know whom he was up against" (Donner 28). It seems to me that now Black is seizing the initiative.
19.Qxa6
Donner gives this move !??. Does this annotation mean an interesting blunder?
19...d4 20.Ne2 Rc2
"Note that Black is no longer in danger of being mated on the back rank" (Donner 28).
21.Rad1 Qe5 22.Ng3
One alternative, 22.Nxd4, is the sort of move weak chess engines make when they are programmed to see three plies deep, as it appears that White is provoking a back-rank weakness. 22...Rxd4 23.Qa8+ Ng8 24.Rxd4 Qxd4. It's also the kind of move I might make in blitz.
Black to move
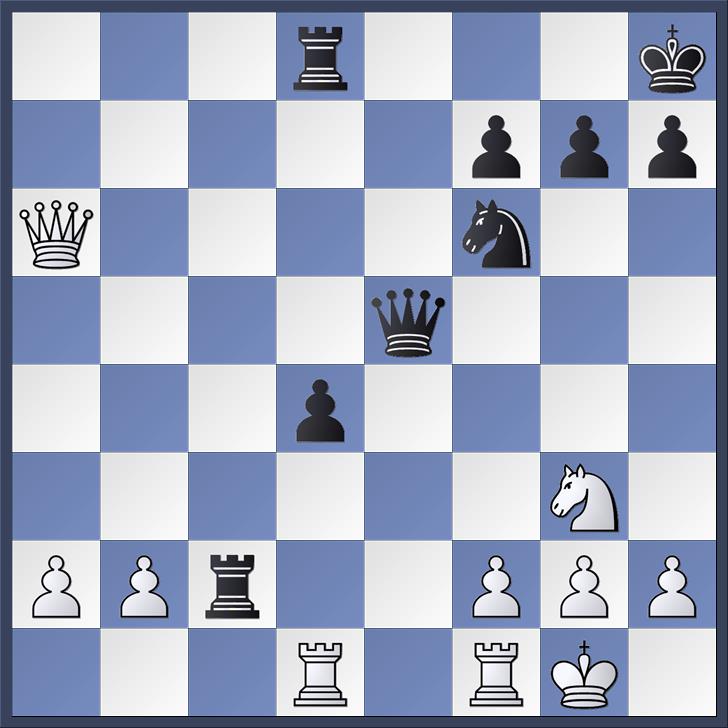
22...h5
Donner gives this move an explanation mark. The computer sees snatching the b-pawn as the only way for Black to maintain a slight edge.
23.Rfe1 Qd5 24.Re2
Quite possibly the decisive error.
24.Qd3 Rxb2
24...d3 25.Re3
A mistake, according to Donner.
25.Red2 Rxd2 26.Rxd2 h4 27.Nf1 Ne4 Black still has the upper hand. That's why I see the critical error as one move earlier than Donner's assessment.
Black to move

This position makes for a good tactics exercise.
25...Rxf2
Donner offers a double exclam and, "A most unexpected combination, with the point appearing soon" (28).
26.Ne4
26.Kxf2 Ng4+
26...Nxe4
The computer likes 26...Ng4. Perhaps Donner might have noted the role of luck in chess, because here Larsen lets it slip away, if only Evans, who has been under enormous pressure could have found the correct response.
White to move

This position, also, could serve in a battery of tactics exercises. White might yet resist Black's attack.
27.Rexd3
Now, Larsen can finish.
27.Rdxd3 Qg5 28.Rxd8+ Qxd8 29.Rxe4 Rxb2 and this position should develop into a draw.
27...Rf1+
Another double exclam from Donner, and possibly a third tactics exercise.
28.Rxf1
28.Kxf1 Qf5+ 29.Rf3 (29.Kg1 Qc5+ 30.Rd4 Rxd4 31.Qa8+ Rd8+ with smother mate to follow) 29...Rxd1+ 30.Ke2 Nc3+ 31.Rxc3 Qf1+.
28...Qc5+
Evans resigned.
29.Kh1 Nf2+ 30.Rxf2 (30.Kg1 Nh3+ 31.Kh1 Qg1+ 32.Rxg1 Nf2#) 30...Qc1+ 31.Rd1 Rxd1+ 32.Rf1 Rxf1+ 33.Qxf1 Qxf1#
0–1


