Showing posts with label Keres (Paul). Show all posts

16 September 2022

Outside Passed Pawn

In Jeremy Silman, Silman's Complete Endgame Course (2007), he uses the term "the fox in the chicken coop" for the concept that I learned as "outside passed pawn". It is a skill that I routinely teach beginning students and require for completion of my Knight Award. The core idea that Silman explains--abandoning a passed pawn to create another--appears in the endgame book that I have had since my youth. Irving Chernev, Practical Chess Endings (1961) presents this position. Perhaps that is where I first learned the concept many years ago.

White to move
Chernev explains, "White abandons his passed pawn. Capturing it will keep Black busy on one side of the board, while White gets time to win on the other" (39). He gives the moves:

1.Kf5 Kh6 2.Ke5 Kxh5 3.Kd5 Kg6 4.Kc6 Kf6 5.Kxb6 Ke7 6.Kc7

When young players learn this simple idea, they have a requisite skill for navigating a great many pawn endings that will occur in their own games.

Chernev gives a second solution that employs a fundamentally different set of principles, but that leads to a faster checkmate. Hence, the position is less than ideal for my purposes. Even so, I had the exact position in a blitz game in July 2021 and played it according to book.

Silman's illustration is cleaner. While there are several winning moves that can be played, his solution appears to follow the top engine moves.

White to move
1.b5 Kb7 2.Ka5 Ka7 3.b6+ Kb7 4.Kb5 Kb8 5.Kc6 Kc8 6.Kd6 Kb7 7.Ke6 Kxb6 8.Kxf6 Kc7

White to move
9.Kxg5

Silman writes, "the rest is mindlessly easy" (67).

I would play 9.Ke7, which wins faster.

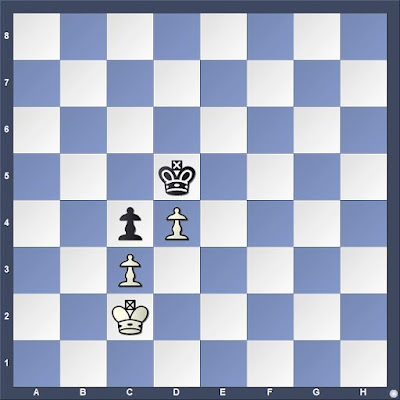
When teaching or testing students, I usually compose positions on the spot. But, perhaps it would be useful to have a printed sheet in my chess bag with some of the most instructive positions from books and game. Paul Keres, Practical Chess Endings (1974) offers one that is excellent. His term is "distant passed pawn" (55). As he notes, without the passed pawn that will be sacrificed (or exchanged for Black's passed pawn), White would be lost. 

White to move
1.f5 Ke5 2.f6 Kxf6 3.Kxd4 Ke6 4.Kc5 Kd7 5.Kxb5 Kc7 6.Ka6

Reviewing my own internet games stretching back to the late-twentieth century produced many positions where the basic idea of using a passed pawn to deflect the opponent's king from the main scene was required. In many cases, the correct move was not played.

I played it correctly in this position from the Internet Chess Club in 2001.

Black to move
38...b3! was the only winning move. My opponent resigned after 39.Kxb3 Kxd5 40.Kc3 Ke4 41.Kd2 Kf3

Thinking I was applying this idea, I managed to throw away the win in this game from 2001.

White to move
I played 45.h4 and succeeded in forcing Black's king to the h-file while gobbling Black's two remaining pawns with my king. However, Black's king was able to get back to the a-file in time. This position shows that calculation is necessary in pawn endings and sometimes there is more than one idea in play.

1.Kf4! is the only winning move.

If Black then goes after the a-pawn, White needs to win a queen vs. pawn ending where it is important that Black's pawn is two squares from promotion. If the Black king tries to get the the h-file, then the distant passed pawn is far enough away that White will be able to promote the a-pawn.


10 July 2022

To Know a Position

Two pawns against one when the stronger side has one that is both passed and protected is generally a win. There are exceptions when the pawns are too close to the edge of the board with one of the pawns (stronger or weaker side) on its starting square. Having a pawn on a rook file also limits the stronger side's chances. The position of the kings often proves critical.

This position, ending no. 107 in Pandolfini's Endgame Course (1988), also arises while playing through examples 8 and 9 in José R. Capablanca, Chess Fundamentals (1921). Josef Kling and Bernhard Horwitz, Chess Studies, or the Endings of Games (1851) presents a study that reaches this position after the first two moves.

White to move
Sacrificing the forward pawn allows White to win Black's pawn after a few moves using opposition and outflanking maneuvers, resulting in a standard position that Bruce Pandolfini covers earlier in the book (endgames 60-62).

The diagram position is important enough in Lev Alburt's view that it appears in Chess Training Pocket Book: 300 Most Important Positions and Ideas (1997). Alburt writes that to become a strong tournament player one needs to know only 12 key pawn endings, promising that the right 12 are in the book (9). A similar position appears in Rashid Ziyatdinov, GM-RAM: Essential Grandmaster Knowledge (2000), but did not make the cut for Thomas Engqvist, 300 Most Important Chess Positions (2018).

Lest there be any doubt about the practical value of understanding how White should play, consider the ending from Polgar,I.--Ciocaltea,V., Baja 1971, which is presented in C.G. Van Perlo, Van Perlo's Endgame Tactics, new, improved and expanded edition (2014).

White to move
54.Kg3

54.Kg5 fails to make progress, Van Perlo notes.

54...Kf7 55.Kf3 Ke7 56.Ke3 Kd7 57.Ke4 Ke6

White to move
Flip the side to move, remove White's f-pawn and place a Black pawn on f6, and the position is identical to one that appeared at the Spokane Chess Club in April 2005 between two of the group's strongest players. Black pushed the unopposed pawn and the game was dead drawn, yet the game continued for many moves more because the weaker side has very little time left on the clock.

58.g5!

"Depriving the black king of some vital squares in the tempo battle" (Van Perlo 25).

58...Kd6 59.f5 Ke7 60.f6+

Now White has a passed pawn.

60...Kf7 61.Ke5 Kf8

We have reached the position at the top of this post.

62.f7

Black resigned.

We can move the initial position right or left, up or down. In most cases, the stronger side has an easy win.  Sacrifice of the forward pawn is the easiest method when the blocked pawn is on the fifth rank, but this fails when the pawn is further back.

Two key positions are analyzed in Johann Berger, Theorie und Praxis der Endspiele (1890), referencing the earlier work of George Walker, A New Treatise on Chess (1841).

No. 483
Das Spiel ist leicht zu gewinnen
It is an easy win, regardless of who has the move, Berger explains.

No. 484
Weiss gewinnt nur mit dem Zuge.
White wins only with the move.

Mark Dvoretsky, Dvoretsky's Endgame Manual, 5th ed. (2020) offers one full page of analysis with one winning and two drawing positions, plus a well-known 1921 study by Nikolai Grigoriev earlier in the chapter. Grigoriev's study, "underscore[s] that a system of corresponding squares certainly does not have to always be 'straight line', as with the opposition. Each case demands concrete analysis" (23). Alex Fishbein, King and Pawn Endings (1993) offers two positions, both of which are Grigoriev compositions. Reuben Fine, Basic Chess Endings (1941) has seven diagrams over a little more than three pages. Karsten Müller and Frank Lamprecht, Fundamental Chess Endings (2001) offer two positions from games, one winning and one drawing. Comparable positions do not appear in Jeremy Silman, Silman's Complete Endgame Course (2007), unfortunately.

Paul Keres, Practical Chess Endings (1974) offers the most thorough discussion with 11 diagrams over six pages. He begins with Berger's no. 483 (see above).

After nine moves in Keres' analysis, the following position is reached.

White to move
"White would spoil everything with 10.b6?" Keres notes (34).

10.Kd5! Kc7 11.Ke6 Kb6 12.Kd6

This outflanking idea is another standard technique.

12...Kb7 13.Kc5

Keres then turns to the most important technique for endgame book authors: shifting the position. Shift everything up on rank and White can no longer win because of the same stalemate threat noted after 10.b6? Shift one square down, and White still wins. Two squares down and it matters who has the move. White must have the move to win.

Moving the position one file to the right and one rank up, White wins, even when Black has the move.

Black to move
1...Kd6 2.Ke4 Ke6 3.Kf4 Kd6 4.Kf5 Kc7 5.Ke6 Kc8

White to move
6.c7!

The pawn must be sacrificed, as we should know from Capablanca and Pandolfini.

Continuing the shift to the right and this time down a rank, Keres sets the kings in a manner optimal for Black. After a few moves, the following position is reached.

White to move
To secure the win, White must use threats of moving to either side of the mass of pawns to perform the opposition and outflanking maneuvers.

6.Kc1!

Working out the rest is good training. Keres book is helpful, too. It was when I reached this position in my reading yesterday morning that I started playing against Stockfish from this position and then many other variations with the same arrangement of pawns across the range of possibilities.

Shift the starting position one rank down and this resource no longer exists for White.

Knowing a position well is knowing an arrangement of pieces that may be, in fact, many hundreds of possible positions. Some of these have arisen in my games in the past and can be expected to do so again. 


10 June 2022

A Study Position

How does a position reached in a game played many years ago become an important study position?

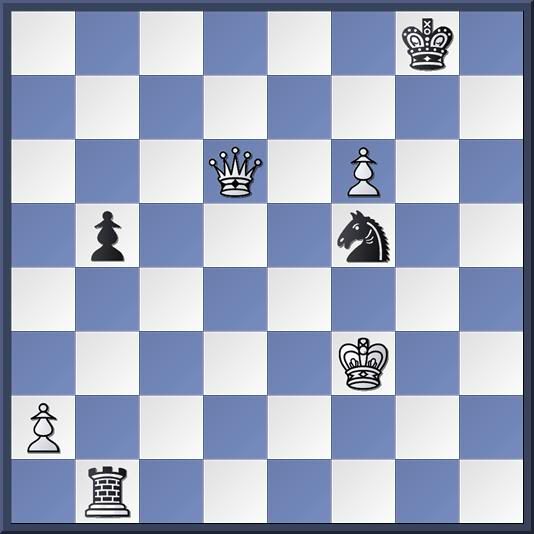
Consider a position from Euwe -- Smyslov, Moscow 1948. The game was played in the fourteenth round of the five-player world chess championship to determine the successor to Alexander Alekhine. Max Euwe finished in last place, winning only this single game.

White to move
In Paul Keres, World Chess Championship 1948 (1949), the author criticizes Euwe's move from this position, 27.Qe3. Euwe's position is so strong that this move "assures him of an easy win." But, "he misses the worthy finishing combination ... which would immediately have forced Black to resign" (332).

This position appears as number 1 in Thomas Engqvist, 300 Most Important Tactical Positions (2020). The first 27 positions in the book highlight five basic tactical ideas--"tricks" is Engqvist's term. The first three positions, the writer tells us, are "from top level chess where one highly qualified player missed a fork at a certain point. It pays to study positions where a strong player missed a tactical solution" (13).

Engqvist mentions that Keres gave the move played in the game a question mark, offers Keres' improvement, and also discusses a second alternative to the text move.

05 June 2022

Corresponding Squares

When I was studying a position from Paul Keres, Practical Chess Endings, trans. John Littlewood (1974) this morning, it was familiar. I thought the winning idea was rooted in understanding corresponding squares, especially because Keres placed it in that section of the book (he uses the term "related squares"). Nonetheless, I struggled to calculate the solution without working out all critical cases of correspondence, and only through trial and error against Stockfish did I discover the correspondence between a5 (Black) and d2 (White), highlighted in red below.

White to move
I solved the exercise before reading Keres' solution and discussion of related squares, but could not avoid seeing the paragraph below the diagram: "White's task is made extremely difficult by the fact that his passed pawn is on the rook's file and that he has no manoeuvring space for his king to the left of this pawn" (28). Hence, the general idea was clear from the outset if I did not already know that.

Initially, I thought triangulation would allow me to reach the same position, but with Black to move, calculating 1.Ka3 Kb6 2.Kb2 (distant opposition). But if Black plays 1...Ka6, do I still go to b2? This scenario did not occur in my play against Stockfish. Keres notes, as I learned later, that when the Black king is on a6 or b6, White's king can move to c1, c2, or c3 because all three squares allow Kd2 should Black play Ka5.

My play against Stockfish on the iPad follows.

1.Ka3 Kb6 2.Kb2 Ka5 3.Kb3

Already, I have successfully reached the diagram position above with Black to move.

3...Kb6 4.Kc3 Ka5

White to move
An advantage of playing against the computer is that you can learn immediately when you have gone astray. If the engine suddenly shows an evaluation of 0.00, it is clear that an error has been made. Here, 5.Kd3 seems tempting because after 5...Kb4, White has the resource 6.a3. However, it takes little calculation to see that 7.Ke5 fails because Black has 7...Kb3 8.Kd5 Kb4 and suddenly Black is winning.

I may have tried it anyway, but I do recall that I tried 5.Kc2 and watched the evaluation hit 0.00. What then? Going back to the b-file clearly makes no progress. Hence, there is only one move and I would have found it sooner had I more thoroughly considered all sets of corresponding squares instead of trying to see everything through brute force calculation.

5.Kd2! Kb6 6.Ke3

6.Kd3 is as good. Both squares lead to e4.

6...Kc6 7.Ke4

Tablebases indicate that 7.a3 and 7.Kf4 are both equally good, but taking the opposition in such positions is practically routine.

Black to move
7...Kd6 8.Kf5

This simple outflanking maneuver is not superior to 8.a3. However, it is easier to understand. I am reminded of Vladimir Kramnik's words in the Foreword to the 5th edition of Dvoretsky's Endgame Manual (2020): "it is impossible to attain real endgame mastery by just working with a computer. An explanation of why an endgame is winning, ... described in words and in language that a person understands (as opposed to computer variations), is needed" (12).

8...Kd7 9.Ke5 Kc6 10.Ke6

Continuing with moves that alternate between taking the opposition and outflanking is relatively simple and something I've done hundreds of times. Nevertheless, I spent a fair amount of additional time with this exercise after completing it. 

From the starting position, Stockfish notes that it is checkmate in 26 moves. My first effort following the discovery of 5.Kd2 led to checkmate with two queens on the 28th move. I knew that I could do better.

Where else have I seen this position?

I thought that the diagram Keres presents was familiar, but do not find it in Dvoretsky's Endgame Manual. Dvoretsky does have a similar position as a diagram that reaches a nearly identical position after three plies. it is a variation stemming from inaccurate play from a composition by Franz Sackmann (1913).

Black to move
After 10...Kb7 11.Kb4 Ka6, the position in the diagram from Keres is reached one square up the board. The solution follows the same process. Dvoretsky discusses it in the section on mined squares, noting that the d4 square is mined.

Perhaps this derivative from Sackmann's study was sufficiently lodged in my memory to recognize it, especially if I played out Dvoretsky's analysis.

I did find the original position in Alex Fishbein, King and Pawn Endings (1993), where it is no. 126 and credited to George Walker. However, I bought this book with unrealized intentions and have spent very little time studying it. Walker, A New Treatise on Chess (1841) has the position, which Walker states came up in a game that he observed. It is interesting that in Walker, the position is reached with black to move, but White did not know how to play it. Nor did Walker find the correct way. According to Johann Berger, Theorie und Praxis der Endspiele (1890), it was Josef Kling who pointed out the correct manner of play.

From Walker, A New Treatise on Chess
Walker's line follows.

White to move
1.Ka3 Kb6 2.Kb2 Ka5 3.Kb3

Here, we have the diagram at the top of this post, but with Black to move. It is the position I had to produce via triangulation.

3...Ka6 4.Kc3 Ka5 5.a3?

Walker does not give this move the question mark, I do. My memory fades on whether this was one of my errors this morning. I know I certainly considered it.

5...Ka4 6.Kd3 Kxa3 7.Ke4

Can we call this an example if hope chess? Even if Black plays 7...Ka4, the best White gets is a draw.

Black to move
7...Kb3

Now, White must fight for a draw. To Walker's credit (and the player of the White pieces), the drawing method is demonstrated.

8.Kd3

"Best", according to Walker. These days, the move gets a box--only move.

8...Kb4 9.Kd2 Kxc4 10.Kc2 

White draws by holding the opposition, as noted by Walker.


29 May 2022

Schlage -- Ahues 1921: Historical Inquiry

A substantial number of chess endgame books present a position said to have been from a drawn game between Willi Schlage (1888-1940) with White and Carl Oscar Ahues (1883-1968). The game was played in Berlin in 1921, but no event is listed. Nor has a complete game score appeared. Schlage missed a win, as later pointed out by Ilya Maizelis.

White to move
From this position, Schlage started well, but his second move demonstrated that he did not discover the critical idea.

1.Ke6 Kc3 2.Kd6 

Maizelis pointed out that 2.Kd5! would have won.

2...Kd4 3.Kc6 Ke5 4.Kb7 Kd6 5.Kxa7 Kc7 1/2-1/2

As this ending appears in Mark Dvoretsky, Dvoretsky's Endgame Manual (2003), the position is on one of my pawn ending flash cards. Many of my students have tried to find the solution and then had it shown to them. When I encountered it this morning in Paul Keres, Practical Chess Endings (1974), I wanted to know more about the game. Searching for a game score took me down a rabbit hole of book after book. If no game can be found, then perhaps I can trace the analysis back to first publication.

It certainly did not originate with Jesus de la Villa, 100 Endgames You Must Know Workbook (2019) that a Wikipedia editor referenced. To the credit of the Wikipedia editors, Keres is also credited with presenting this ending.

Keres does not credit Maizelis, but Dvoretsky does. Chess Informant's Encyclopedia of Chess Endings: Pawn Endings (1982) has the position as number 65 and credits Maizelis with the solution.

My next step is the inquiry was Pawn Endings (1974) by Yuri Averbakh and Ilya Maizelis. An editor added to the text: "Maizelis was the first to point out the correct solution. so position No. 78 must be credited to him. Rabinovich indicated this in the first edition of his book, Chess Endgames, 1927" (26).

Happily, Mongoose Press brought out an English edition of the second edition (1938) of Rabinovich's text: Ilya Rabinovich, The Russian Endgame Handbook, trans James Marfia (2012). Rabinovich credits "I.M.", which he calls a pseudonym, with mentioning in the Soviet magazine 64 (1925, No. 6) that White's king "should move according to the most twisted, broken route" (as quoted by Rabinovich). Perhaps someone has access to old copies of 64 and can read Russian. I still have questions.

15 February 2021

What is Reading?

Some books are to be tasted, others to be swallowed, and some few to be chewed and digested; that is, some books are to be read only in parts; others to be read, but not curiously; and some few to be read wholly, and with diligence and attention.
Francis Bacon, "Of Studies" (1625)
What do you mean when you say you've read a book? Have you read every word?

During a class my first year of graduate school, my professor stated her view that for a master's degree, a history student should know 300 books. For the doctorate, she said, one thousand books was the expectation. Her statement was a little intimidating at first, for it meant reading one academic book every two to three days. Many of these books are densely written and run 400-500 pages.

For that class, we each bought the twelve required texts, and were each assigned one for our individual presentations, and two written assignments--an annotated bibliography and a 15-20 page paper. For my bibliography and paper, I "read" perhaps a dozen more books, and several journal articles. The assignment was to place the book in question in the context of other scholarship on the same topic.* Reading a book with this purpose meant spending as much as two hours identifying the central arguments and the nature of the supporting evidence of each book. An article should take fifteen minutes. With practice, and some familiarity with the subject matter, this level of reading can be achieved in about thirty minutes for most history books.

Reading a novel is another matter. It must be read in sequence and cover-to-cover. Some books may remain unfinished--there is a long list of popular classics that I started and did not finish because I did not like them. For other novels, reading only begins the second or third time through the book. This need for a second and third reading is a characteristic of the sort of dense fiction that I prefer. All reading is rereading, as some French theorist famously suggested.**

How do you read a chess book?

For some chess books, the practice of the historian--skimming, assessing, highlighting key points--might be all you need. A few weeks ago, I reviewed three chess books for beginners that were all terrible. Each was self-published and two seemed as if they were not written by chess players. The third read like a bad machine translation of a decent book in a language other than English. Perhaps two hours were required to read the combined 300 pages of these three books. I did not skip any pages, but did pass rapidly over the surface looking for points where the author said something of merit, or got something egregiously wrong.

There are many chess books on my shelves that I read for an hour or two on the day of purchase, often with the intent to go back and peruse with more attention to detail. Most chess books offer verbal discussion of key ideas, illustrative positions with diagrams, and detailed analysis of positions, sometimes with many branches of possible variations. Reading the text often does not take long, while pondering the variations can keep you tied up for years.

The day I bought Jeremy Silman's Complete Endgame Course (2007), I spent less than two hours racing through the first third of the book, pausing only to think through a few diagrams. Most of the content through what he calls "Endgames for Class C" consists of knowledge I assimilated before I bought the book. Even so, Silman's book transformed the curriculum I was using to teach elementary age chess players. He convinced me that checkmate with knight and bishop was an inefficient use of time, while the Lucena and Philidor rook endings deserved far more attention. Prior to buying his Endgame Course, some ideas presented in How to Reasssess Your Chess, 3rd ed. (1993) had worked their way into my teaching. I cannot say that I have read either of these books, except in part. But I have frequently reread a few parts of Reassess, both 3rd and 4th editions.

I read Excelling at Technical Chess (2004) by Jacob Aagaard more slowly and more deliberately, but still not wholly. It had a profound impact on my play that was vital as I rose from B Class to A within the USCF rating system. Where I was once eager to accept a draw in a seemingly equal position, I started refusing these offers after reading Aagaard. If there is an imbalance that allows me to create problems for my opponent to solve, I insist that we should play on at least a few more moves. I also began to see that some endings, while long and potentially difficult, were not at all equal. See "Excelling at Technical Chess" for an example of the fighting spirit Aagaard helped inspire.

Prereading


When reading some chess books, especially those that present whole games well-annotated, I often follow a longer process. First I locate the next game in the text in a database. I play through the game several times without reference to the book. The first few times, I use no aids, but seek the key moments in the game. Where did the player who lost begin to go wrong?

When I am comfortable with understanding some of the key tactical and positional points, I may use an opening database to research a bit. After I have worked to acquire a thorough understanding of the game, I read the annotations in the text.

Sometimes I will continue by looking at how other books present the same game. I have used this process for dozens of books on my shelves, but Logical Chess Move by Move (1998) by Irving Chernev is the only book for which I have taken this process all the way through every game. I went through the algebraic edition a few years ago, but also have vague memories of a more superficial reading of a library copy of the original descriptive edition in the late-1970s.

This process of "chewing and digesting" a chess book is one that I advocate. Perhaps, if I find the time, I will complete other books in this manner. I started this process a bit over a year ago with Paul Keres, World Championship 1948 (2016), which is a terrific book. Alas, work and other chess books got in the way.

*I discuss this specific book and that graduate class in more detail on Patriots and Peoples, "Pandemic History".
**Roland Barthes, S/Z: An Essay, trans. Richard Miller (1974).

20 January 2020

Study Position

A new book arrived Saturday and I spent some time going through the first game. Paul Keres, World Chess Championship 1948 (2016 [1949]) is an old classic now available in English. It was sent to me because I solved a chess history exercise on the cover of Chess Life (December 2019).  Keres had Black against Max Euwe in the first round. He was losing, according to his annotations, until Euwe failed to find the correct plan from this position.

White to move


Stockfish does not agree with Keres' assessment of the position. What should we make of his analysis if the computer disagrees?

15 January 2016

Read Critically

The Art of the Middle Game (1964) by Paul Keres and Alexander Kotov is an often recommended classic. I have the old Penguin paperback edition with an introduction by Harry Golombek, who also translated the book. This book is worthy of detailed study. I have started it on several occasions, but have yet to progress far.

Going through Kotov's "Strategy and Tactics of Attack on the King" (30-79), I get hung up on the first game fragment. One move played (9...R-Kt2; 22...Rb7 in the game score below) clearly loses material. Kotov does not consider alternatives. His book shows why the position after this move is lost for Black. But Black might have played a different move here or on the previous move.

Concerning attacks on opposite wings, Kotov offers a story that might be remembered when chess enthusiasts debate the relative merits of blitz (see "Improving through Blitz").
When I stayed behind at school with my school friends after lessons, and managed to play up to a hundred games in a single afternoon, the strategy was simple enough: I castled on the opposite side in the middle of violent (and mutual) king attacks. Whoever got his attack in first, won. The result was that I acquired an unfailing mastery of those positions where castling takes place on opposite sides, and from that time on I knew how to find my way about them.
Kotov, 32
As he begins to elucidate the principles of attacks on opposite wings, Kotov notes that "an offensive with pawns must be calculated with the same careful deliberation that one uses in assessing a combination" (32). Alas, Alexander Konstantinopolsky's calculations could have been refuted, even though his opponent did not do so.

Alexander Konstantinopolsky - Frank [E60]
Leningrad corr USSR, 1935

Kotov's analysis begins with the position after White's 14.O-O-O

Black to move

Kotov writes:
At the first glance it seems as though Black should arrive at a pawn attack first on the grounds of the advanced White pawns on c4 and b3 and also because he has 'good' pawns. But instead the isolated and scattered White pawns on the King's wing take over the task of destroying the enemy position." (33-34)*
14...a4 15.f4 axb3 16.axb3 b5 17.cxb5 Be6 18.h5

Although White's b- and c-pawns only appear to offer Black prospects for attack, Kotov suggests that Black's g-pawn is an essential target.

18...Bxb3 19.Rdg1 Ra7 20.f5! 
Black has not obtained anything concrete. The pawn on b5 is still alive and kicking; it stands adequately guarded and meanwhile Black's king's position collapses completely. Kotov, 34
20...Qa8
White to move

21.Bd3

A lesson that Kotov does not elucidate to my satisfaction in this example is the role of piece play. This move looked essential to me because the shattered pawn shield is less consequential due to the the defense of critical squares by White's minor pieces. Testing my belief that 21.Bd3 was necessary, I looked at some alternatives and then checked my analysis with Stockfish.

As it happens, my effort to refute alternative moves here revealed the refutation of White's next move. This refutation is absent from Kotov's text.

a) 21.fxg6 Ne4

a1) I considered 21...Ra1+? and saw 22.Bxa1?? loses for White 22...Qxa1+ 23.Nb1 Ne4 24.gxh7+ Kh8 25.Qd4 (25.Qb4 Bb2#; 25.h6 Bb2+) 25...Bxd4 26.exd4–+.

However, after 21...Ra1+, 22.Nb1± gives White the edge.

22.gxf7+ (22.gxh7+) 22...Rxf7 23.Qd4 Nxc3 24.Qxc3 Qxh1! and Black is better.

b) 21.hxg6 was judged by the engine as the only move offering White equality.

21...c5
Now White gets the opportunity of spreading confusion in the enemy camp. But other continuations too are of little help to Black. Kotov, 35
Confusion did indeed reign. Perhaps Kotov's choice of this word offers a clue that he understood the unplayed refutation of White's calculated attack.

21...Ra1+!! was not prevented by White's seemingly essential 21...Bd3.

22.Bxa1 is best (22.Nb1 Ne4-+) 22...Qxa1+ 23.Bb1 Nd5 24.Qb2 Qxb2+ 25.Kxb2 Bc4 and the pin on the knight leaves Black with more pieces.

22.b6! (Kotov)

Black to move

22...Rb7?

This move bothers me every time I go through Kotov's discussion. It should be clear than it loses a rook as well as abandoning the attack. If a rook must be lost, why not sacrifice one for play against the enemy king? After all, the other rook defends the pesky b-pawn's promotion square.

22...Ra1+!! is the correct move for much the same reasons offered in my analysis of the previous move.

23.Ne4 Nxe4 24.Bxe4 Qa4 25.Bxb7
White has already won a rook and Black's attack has still hardly got into motion. It is interesting to note that White defers for so long on the final capture on g6 and that the mere threat of exchanging forces Black to lose a piece. A beautiful illustration of the precept 'the threat is stronger than the execution.' Kotov, 35

25...Qc4+ 26.Kb1 Rb8 27.hxg6 hxg6 28.Bxg7 "and White soon won." Kotov 1–0


*My copy of the book is in descriptive notation. I have converted the notation in quotations to algebraic.

27 April 2011

The Active Rook

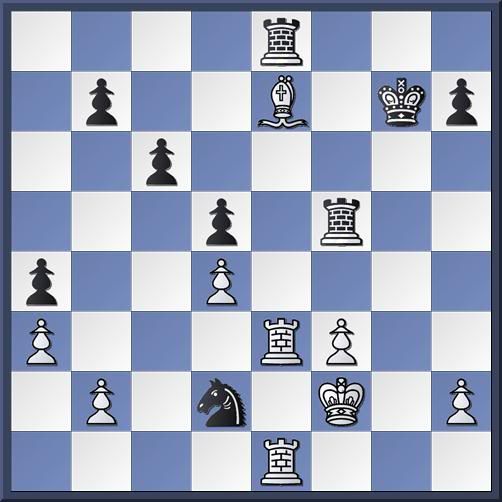
In 1941, Vasily Smyslov was no longer a teenager and was gaining lessons from many of the top players in the world. The second world war put an end to international chess competition for several years. For players in the Soviet Union, however, opportunities remained. The USSR had far more than its share of future grandmasters (a title FIDE created in 1949). Young Smyslov took some lumps in the Absolute Championship of the Soviet Union, played in March and April in Leningrad and Moscow.

Smyslov earned a reputation as an extraordinary endgame player. Perhaps this lesson from Paul Keres helped him develop such skills.

Black to move


Keres played 30...Ne4+.

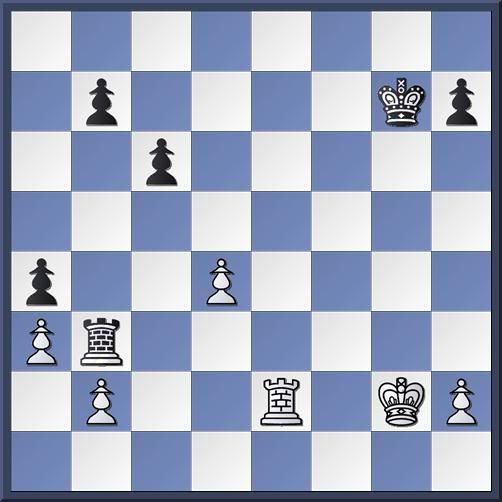
After a sequence of exchanges, Smyslov found himself in a rook endgame where he was forced into passive defense. In time, Black broke through.

31.Kg2 Rxe7 32.fxe4 Rxe4 33.Rxe4 dxe4 34.Rxe4 Rb5 35.Re2 (White's rook takes a passive defensive position) ...Rb3 (Black's rook restrains the White king).

White to move


Black has slightly better pawn structure, an aggressively placed rook, and a mobile king. Does Black have a decisive advantage?

The entire game is replayable at http://blog.chess.com/view/the-active-rook.

07 March 2011

Smyslov - Keres 1941

In the Absolute Championship of the Soviet Union in 1941, Vasily Smyslov reached this position on move against Paul Keres.

White to move


My engine finds a continuation slightly better than the one Smyslov chose.

When I tried a seemingly obvious plan against the computer, I fell into a drawn pawn endgame.