Showing posts with label Minev (Nikolay). Show all posts

05 December 2021

Knowledge

When does a player refuse a draw offer in a dead drawn position? If time is a factor, such a refusal could make sense. Often a draw offer is refused because a player does not know the position is a draw, or suspects that the opponent does not have the requisite knowledge to hold the position.

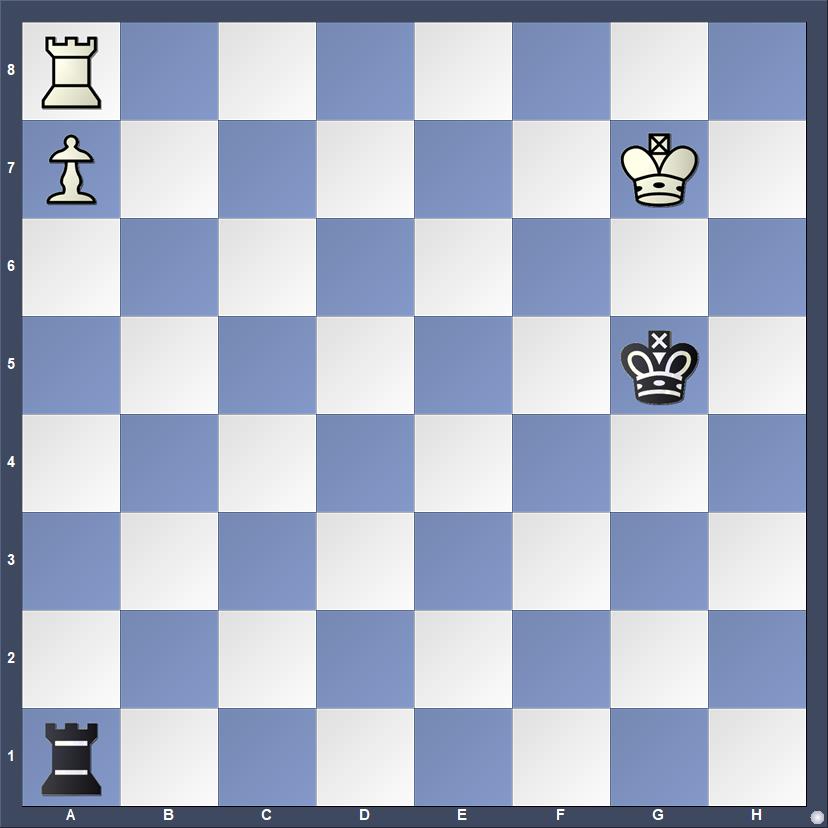
I had Black in this position this morning.

White to move
49.b7??

After this error, the game is a dead draw. White should have played 49.g4, or started moving the king towards the b-pawn. I offered a draw after a dozen moves, having reached this position.

White to move
Instead of accepting the draw, my opponent played another 20+ moves, eventually setting a trap with 84.Rh8?? (White's king was on e4). I could take the pawn, stepping into a skewer. Or, I could take the free rook. After I took the rook, White resigned.

I have played similar endgames before in all sorts of time controls (see one example at "Winning" [2016]). I am guided in the knowledge that my king must remain on the seventh rank and the g- or h-file. With the pawn on g6, the king cannot move. I recall reading about this technique in a book that included a discussion of the resulting skewer tactic if the defending king strays.

However, looking through my endgame books, I could not find the remembered passage. Even so several books contain examples that are close enough that an attentive reader can easily derive the relevant knowledge.

The Books


Nikolay Minev, A Practical Guide to Rook Endgames (2004) shows a stalemate trap when the stronger side has a useful f-pawn, but prematurely sets up the skewer (21-22). From Khiut -- Alalin, USSR 1952.

White to move
1.Kf4 Kf7 2.Rh8??

White sets up the skewer.

2...Rxa7 3.Rh7+ Kf6 4.Rxa7 stalemate.

Yuri Averbakh, Chess Endings: Essential Knowledge (1996) shows an interesting drawing idea from Johann Berger (67).

White to move
1.Kf7

Black cannot get to the seventh rank fast enough, but can avoid checks using the Black king as a shield.

1...Kf5 2.Ke7 Ke5 3.Kd7 Kd5 4.Kc7 Kc5 5.Kb7 Rb1+ forcing Black's king back to the c-file.

Although it was fixed in my memory that I learned the technique employed this morning from Averbakh, it is not in Chess Endings: Essential Knowledge. I did find the idea expressed clearly in Edmar Mednis, Practical Rook Endings (1982), but I've known the technique far longer than I've owned this book. Mednis explains, "the stronger side wants to avoid the following two potential problems: immobilizing his Rook and depriving his King of shelter" (22). Both problems exist in the illustrative diagram. My opponent created the first with 49.b7. Pushing the g-pawn forward introduced the second, but there was no way to dislodge my rook from the c-file.

White to move
In his illustrative diagram, Mednis explains both Black's need to keep the king on g7 or h7, and the rook remains on the c-file, leaving only to check White's king when it gets near its pawn.

Two books that I have had for several years and have spent some time reading explain the ideas, too. One of the critically important blue diagrams in Dvoretsky's Endgame Manual (2003) shows the winning idea missed in Minev's example when the stronger side has an f-pawn (152).

White to move
White wins with 1.f6+ because taking the pawn leads to 2.Rf6+ followed by a8Q, while moving in front allows White to set up the skewer with 2.Rh8. Dvoretsky points out that a pawn on the g- or h-file, however, does not present problems for Black. Although Dvoretsky's description of the skewer does not match my recollection, it may be the book from which I learned this idea.

Jeremy Silman, Silman's Complete Endgame Course (2007) offers three pages of analysis with three diagrams with the white pawn on a7, and three more pages and diagrams with the pawn on a6. These are in the endgames for Class A. I recall that I read about that far within days of buying the book when it first came out. His "A key tactical idea" underneath the diagram below comes close to what I recall studying. Black attempted a "queenside trek" (230).

Black to move
So, I may have learned the idea from Dvoretsky, and certainly encountered it in Silman. It may also be in some other endgame books on my shelf. The simple idea appears in many books. My opponent either lacked this knowledge, or suspected that I did. In the end, he set up a skewer threat that was shocking enough I could have fallen for it on impulse. However, I took a few seconds to assess and grabbed the free rook.


19 December 2020

Rubinstein -- Heilmann 1905

In October 2012, my wife and I loaded into the SUV our three month old puppies, and two dog crates, and headed to Eden Valley Guest Ranch. I also carried along a book that had recently arrived in the mail, Akiba Rubinstein: Uncrowned King (1994) by John Donaldson and Nikolay Minev. I wrote about this trip and the game annotated here after returning home (see "Practicing Visualization"). The Hauptturnier was a tournament for aspiring masters. Rubinstein scored 12 points in 15 games, finishing in a tie for first. He was then recognized as a master.

Rubinstein,Akiba -- Heilmann,Ernst [D40]
Hauptturnier-A Barmen (2), 1905

1.d4 d5 2.Nf3 e6 3.c4 c5 4.e3 Nf6 5.Nc3 Nc6

White to move

There are more than 9000 games with this position in Mega Database 2020, reached via several move orders.

6.a3

The main move has been known since Saint Amant played it against Staunton (see "Staunton Annotates").

6...b6

White scores over 70% after this move. Donaldson and Minev call it an error in Akiba Rubinstein: Uncrowned King (1994). Staunton criticizes his own play of this move, calling it "premature" (Chess Player's Companion, p. 342). Daniel Fiske notes this in reference to his own game in the First American Chess Congress, where it was played against him by Napoleon Marache. However, Fiske switches players, asserting that St. Amant played it against Staunton.

6...Ne4;
6...a6;
6...cxd4

7.cxd5! exd5

7...Nxd5 does not fare much better; White wins at least a pawn, according to Donaldson and Minev, citing Minev -- Morcken 1956 (Olympiad). Sherwin -- Chertkof 1957 New Jersey State Championship also offers an instructive reference game.

8.Bb5

First played by Saint Amant in the eleventh match game against Staunton

Black to move

8...Qd6

This move was a novelty at the time that worsens Black's position.

8...Bb7 was played in the two nineteenth century games referenced above. 9.Ne5 Rc8 10.Qa4 Qc7 11.Qxa7 Ra8

(Both players may have studied 11...Be7 12.Bxc6+ Bxc6 13.Qxc7 Rxc7 14.Nxc6 Rxc6 1-0 (50) De Saint Amant,P -- Staunton,H, Paris 1843)

12.Bxc6+ Qxc6 13.Qxa8+ Bxa8 14.Nxc6 Bxc6 1-0 (42) Fiske,D -- Marache,N, New York 1857. The game was published in the book of the tournament, edited by Daniel Fiske. 

8...Bd7 was recommended as an improvement by Saint Amant 9.dxc5 bxc5 10.0-0 Qa5 11.b4 Qb6 12.Ba4 cxb4 13.Nxd5 Nxd5 14.Qxd5 1-0 (46) Wallace,A -- Crane,B, Sydney 1893

9.e4!

This exciting move happens to be the engine's third choice.

9.Ne5 is Komodo's second choice. 9...Bd7 10.Nxd7 Qxd7 11.Qa4 Rc8 12.0-0 Be7 13.e4 Nxe4 14.Nxe4 dxe4 15.Rd1 a6 1-0 (35) Jovanic,O (2476) -- Grbac,B (2190), Porec 2011;

9.dxc5 bxc5 10.e4 is Komodo's top choice

9...Bd7

9...dxe4 10.d5 Nxd5 (10...exf3 11.Qxf3 Nxd5 12.Nxd5 Bb7) 11.Qxd5 Bb7 12.Qxe4+ Be7 13.Bf4 and Black resigned 1-0 Lundin,E -- Staehelin,A, Zuerich 1952

10.e5 Qe7 11.0-0

Black to move

11...Ng8

11...Ng4 12.Nxd5 Qd8 13.Bg5 Ne7

12.Nxd5 Qd8 13.Qa4

Other moves might be a little better if the engine should be heeded, but White's advantage is overwhelming in any case.

13.Re1 Be7 14.e6 fxe6 15.Nf4;
13.e6 fxe6 14.Nf4;
13.dxc5 Bxc5 14.Qa4

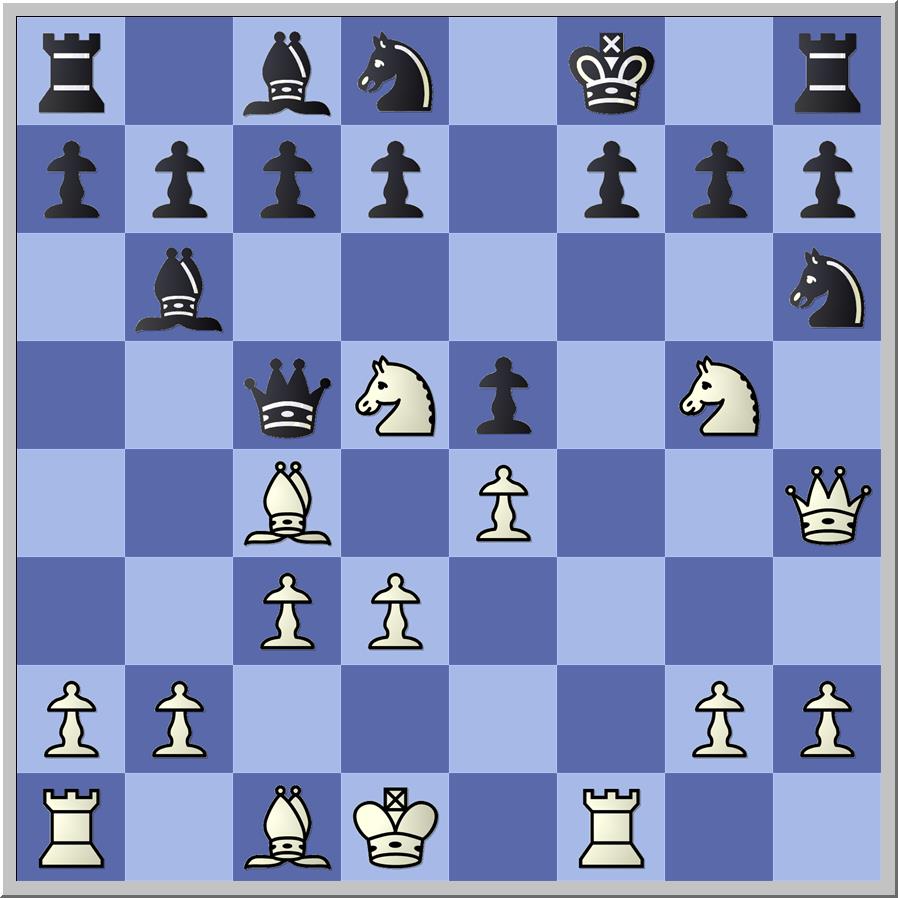
13...Rc8 14.Bg5 14...Nge7

White to move

There is something about this position that makes me think of Morphy's Opera Game.

15.dxc5

15.Nc3

15...bxc5 16.Rad1 a6 17.Qxa6 Nd4

17...Nb8 18.e6 Nxa6 19.exd7+ Qxd7 20.Bxd7+ Kxd7 21.Nxe7+

18.Nxd4 cxd4 19.Rxd4 1-0

Rubinstein's play was exemplary. I return to this game from time to time and marvel at how Heilmann's game fell apart so quickly.

26 October 2018

Find the Error

Luck is what happens when preparation meets opportunity.
                                                                    Seneca
Wilhelm Steinitz famously claimed, "by best play on both sides a draw ought to be the legitimate result" (The Modern Chess Instructor [1889], xxxi). I introduced to my students in an after school club this week the notion that a game of chess can only be won one way: someone must make an error. The good news is that their opponents all make errors. The bad news is that they also do so.

We then proceeded to examine this game. First we went through all of the moves on the demo board without comment. Then, after resetting the pieces, I asked students for their ideas concerning Black's decisive error.

After some discussion, we went through the game again considering the consequences and alternatives where they thought they perceived error. A student earned a chess pencil for suggesting the move given a question mark by John Donaldson and Nikolay Minev, Akiba Rubinstein: Uncrowned King (1994).

Rubinstein,Akiba -- Heilmann,Ernst [D40]
Hauptturnier-A Barmen (2), 1905

1.d4 d5 2.Nf3 e6 3.c4 c5 4.e3 Nf6 5.Nc3 Nc6 6.a3

Black to move

6...b6

This move's weakening of the c6 square does not look so bad until Rubinstein demonstrates how to exploit it. Even so, it had been employed by Staunton and a few others prior to this game, and has appeared since in dozens more.

After claiming that chess is a draw with best play, Steinitz lists several types of errors that can be fatal, including "the mere weakness of any square on any part of the board" (xxxi).

7.cxd5 exd5

7...Nxd5 fares somewhat better for Black than the text, but White still wins a substantial percentage.

8.Bb5

Black to move

8...Qd6

This move was another of our candidates for the decisive error, but it was my suggestion rather than that of a student.

P. De Saint Amant -- H. Staunton, Paris 1843 continued 8...Bb7 9.Ne5 Rc8 10.Qa4 Qc7 11.Qxa7 In analysis with the youth players, I took it as far as Black's tenth move and suggested that Black was not in as bad of shape as Heilmann found himself.

9.e4 Bd7 10.e5 Qe7 11.0–0 Ng8

One student criticized this move, but every alternative we examined seemed worse. By this point, White has a decisive advantage.

White to move

12.Nxd5 Qd8 13.Qa4 Rc8 14.Bg5 Nge7 15.dxc5 bxc5 16.Rad1 a6 17.Qxa6 Nd4 18.Nxd4 cxd4 19.Rxd4 1–0

Rubinstein was given an opportunity, but it was one that could have been overlooked had he not been prepared.

02 August 2017

Alekhine -- Lugowski 1931

An unusual smother checkmate piqued my interest. It is presented in Mikhail Tal and Victor Khenkin, Tal's Winning Chess Combinations (1979), where it is credited as Alekhin -- Lugovsky 1931 (58). Due to spelling variances, my initial efforts to turn up the game score fell short. However, the game is in ChessBase database with the spelling Lugowski, and also on Chessgames.com. The game appears in John Donaldson, Nikolay Minev, and Yasser Seirawan, Alekhine in Europe and Asia (1993), spelled Lugovski.

The game was played as part of a simul during Alekhine's tour of Yugoslavia between two blitz tournaments in Ljubljana (12 December 1930) and Zagreb (25 January 1931). Alekhine in Europe and Asia contains 47 games from this tour and a table compiling his score through 555 games in 17 events (70-76).

Alekhine,Alexander -- Lugowski,S [C25]
Belgrade 1931

1.e4 e5 2.Nc3 Nc6 3.Bc4 Bc5 4.Qg4

Already, Black must make an unpleasant choice.

Black to move

4...Qf6

I do not agree with the Chessgames.com user who identifies this move as the losing one.

4...g6 is the most popular try, and was played in Larsen -- Portisch, Santa Monica 1966, which continued 5.Qf3 Nf6 6.Nge2 d6 (here ECO recommends 6...Bf8) 7.d3 Bg4 8.Qg3 h6 9.f4 Qe7 10.Nd5 Nxd5 11.Qxg4 Nf6 12.Qh3 Larsen went on to win in 53 moves.

4...Kf8 has been tried fairly often. Of note is a game won by Viswanathan Anand when he was a teenager 5.Qg3 d6 6.Nge2 Nd4 (6...h5 might be better) 7.Nxd4 exd4 8.Na4 Be6 9.Bxe6 fxe6 10.Nxc5 dxc5 11.Qb3 Qc8 12.Qf3+ Ke7 13.Qg3 Kf7 14.Qf4+ Kg6 15.Qg4+ Kf6 16.d3 Anand,V (2405) --Ravisekhar,R (2390), New Delhi 1986 (57 moves).

4...Nd4 5.Qxg7 Qf6 6.Qxf6 Nxf6 7.Bd3 has occurred in a few games.

4...Bf8 led to a miniature worthy of analysis. 5.Qg3 d6 6.Nge2 Nf6 7.f4 exf4 8.Nxf4 Nd4 9.Qd3 Nc6 10.Qg3 Nd4 11.0–0 g6 12.Qf2 Nxc2 13.d4 Nxa1 14.Nfd5 Bg7 15.Bg5 0–0 16.Nxf6+ Bxf6 17.Bxf6 Qd7 18.Qf4 1–0 Genzling,A (2408) -- Migot,T (2257), Belfort 2012.

5.Nd5 Qxf2+

There is no better option. Here also, the comments on Chessgames.com are less than helpful.

5...Qg6 is no good. 6.Qxg6 hxg6 7.Nxc7+ Kd8 8.Nxa8+-.
5...Bxf2+ is just as bad 6.Kf1 Qg6 7.Qxg6 hxg6 8.Nxc7+ Kd8 9.Nxa8 Bxg1+-.

6.Kd1 Kf8

6...Bf8 was played in Lengyl -- Ruck in the 1995 championship of Hungary and Black won. Lengyl played 7.Nh3, but a better line seems 7.Nxc7+ Kd8 8.Nxa8 d5 9.Qe2 Qxe2+ 10.Bxe2 when White has the upper hand.

7.Nh3 Qd4?

7...h5! 8.Qg5 Qd4 9.d3 and White's threats are not yet decisive.

8.d3

Black to move

8...Bb6?

Black defends c7, but the knight on d5 also targets e7.

8...d6 was played by none other than Mikhail Chigorin, who also lost quickly. 9.Qh4 Bxh3 10.Qxh3 Na5 11.Rf1 Nxc4 12.Qd7 f6 13.Nxf6 Qf2 14.Rxf2 Bxf2 15.Nh5 1–0 Mieses,J (2467) -- Chigorin,M (2546), Ostend 1906.

8...h5 still seems worthwhile. 9.Qf3 d6

8...Nf6 9.Nxf6 d5 10.c3 Bxg4+ 11.Nxg4 dxc4 12.cxd4 is better than was played against Alekhine.

9.Rf1 Nd8

A sad looking move, but Black is already lost.

10.c3 Qc5 11.Ng5

White has five pieces attacking Black's king.

11...Nh6

A defensive fork

11...f6 seems reasonable, but also loses.

12.Qh4

Threatening a discovered attack against the knight with a fork of king and queen.

Black to move

12...d6 1–0

12...Ke8 would have held out longer.

According to Donaldson, et al., Alekhine announced a checkmate in four (74). This checkmate is what caught my interest in Tal and Khenkin's book.

Do you see it?

30 January 2017

Researching a Rook Ending

A rook ending that came up in Chess Mentor on Chess.com sent me to the books. The first two moves were easy, but then I lost my way. Once I absorbed the basic idea and found the correct answer within Mentor, I tried it again against Stockfish on the iPad. I went down several blind alleys before finding the correct route.

After learning to win the position easily against the computer, I went in search of additional instruction on this ending in my books. I pored through ten endgame books, including three that are entirely about rook endings, and did not find the position.

It does not appear in Grigory Levenfish, and Vasily Smyslov, Rook Endings (1971 [1957]); in Nikolay Minev, A Practical Guide to Rook Endgames (2004); nor in John Nunn, Nunn's Chess Endings, vol. 2 (2010). I also checked endgame books by Yuri Averbakh, Mark Dvoretsky, Reuben Fine, Mikhail Shereshevsky, and Jeremy Silman. In addition, I checked Smyslov, Vasily Smyslov: Endgame Virtuoso (1997); and Karsten Mueller, and Frank Lamprecht, Fundamental Chess Endings (2001). The last of these had the nearest equivalent, a version of the Kan ending below, but with more work to be done by the stronger side as the pawn behind the rook has not yet moved. That position is from Ivanchuk -- Yusupov, Horgen 1995 (Mueller, and Lamprecht, 198). The solution, however, is completely different due to the exigencies of the position.

The position in Chess Mentor purportedly comes from a game Smyslov lost to Mikhail Botvinnik in their 1954 World Championship match. The first match game, Smyslov -- Botvinnik, Moscow 1954 reached this position after 52...Ra3.

White to move

Smyslov played 53.Kh3 and resigned five moves later.

Had play continued instead 53.Kf2 a4 54.Kg2 Ra1 55.Ra5 a3 56.Ra7, the game would have reached the position that I found in Chess Mentor. This lesson appears in "Rook and Other Endgames", a course created by Jeremy Silman. From the position in the photograph above, the student is presented with these directions.
This endgame would be confusing to most players, however a good understanding of Variations One and Two immediately tells you the dream positions that you would like to achieve. This shows that a working knowledge of basic situations allows you to easily solve otherwise difficult problems. In the position in question, Black must decide when to take on g5 and when to push his a-pawn to a2.
Silman, "Rook and Other Endgames," Chess Mentor, Chess.com
Silman's assertion that Botvinnik played this ending is thus somewhat misleading. That it did not occur in an actual game also serves to explain its absence from textbooks.

Some of the pitfalls that White must avoid are easily found in books. For example, after many moves, Black might threaten a skewer. Minev, A Practical Guide to Rook Endgames presents this position almost at the very beginning of the book (12).

White to move

In my database, I found another game played in the Soviet Union a few years before Smyslov -- Botvinnik that reached a final position where White could no longer avoid this skewer.

White to move
After 65...f4
In Rabinovich -- Kan, Moscow 1935, White resigned in this position. Silman's course offers several exercises almost identical to this position that guides the student to understanding why White chose to resign. White either blockades the pawn with 66.Kf3, allowing 66...Rf1+ and promotion of the pawn, or permits the skewer after 66.Kf2.

I did not initially see a final position like that in Kan's game from the position in Chess Mentor, but nonetheless understood that advancing the a-pawn first created such threats.

Chess Mentor Screenshot
After a couple of correct moves, Silman points out that Black has moved his king towards the center. His note refers the user to "Variation Five", a perplexing reference (see comments on Chess Mentor below). In any case, I was able to discern through trial and error the correct plan and complete the lesson. Then, I played it out against Stockfish with colors reversed.

Stripes,J -- Stockfish
30.01.2017

1.h7 Rh3+ (in Silman's lesson, White shuffled the king between a7 and b7) 2.Kxb4 Rh4 3.Kc3 Rh1 4.Kd3 Rh2 5.c5! bxc5 6.c4

Black to move

This position is "a well known theoretical win," according to Silman. Naturally, I thought it must be in some of my endgame books. In my battle with Stockfish, I tried getting my king to b5, which was possible. However, Black simply sticks the rook on h5 and shuffles the king between a7 and b7. I discovered that I needed to walk the other way.

In my second game against Stockfish, I set up the position with the colors as they are in the lesson.

Stockfish -- Stripes.J
30.01.2017

1...a2 2.Ra6+ Kxg5 3.Ra5 Kf6 4.Ra3 Ke6 5.Ra5 Kd6

This time I headed in the right direction even prior to advancing my f-pawn, a slight inaccuracy it would seem from Silman's lesson, but one that did not matter against Stockfish.

6.Ra8 f4 7.gxf4 f5 8.Ra5 Kc6 9.Ra8 Kb5 10.Ra3

Black to move

10...Kc4 11.Kh2 Kd4 12.Kg2 Ke4 13.Ra5

I unnecessarily expended time worrying about 13.Ra4+, thinking the rook could stay there. But, then I realized that White cannot plant the rook and shuffle the king because I can play Kf3 either forcing the rook to abandon protection of the pawn or walking into checkmate with Ka3.

13...Kxf4 14.Ra8 Ke5 15.Re8+ Kd6 16.Rd8+ Ke7 17.Rd2 f4 18.Rf2

Black to move


18...Rg1+ 19.Kxg1 a1Q+ 20.Kg2 Qc1 21.Ra2 Qe3 22.Rf2 Kf6 23.Rf3 Qe4 24.Kf2 Kf5 25.Rh3 

Black to move

At this point matters are quite simple. The exercise is over. However, Stockfish is not set to resign, so I play until checkmate or abandon the game. The rest of the game required only a few seconds.

25...Kg4 26.Rh8 Qd4+ 27.Ke1 Qxh8 28.Kd2 f3 29.Kc2 f2 30.Kb1 f1Q+ 31.Kc2 Qd4 32.Kb3 Qb1+ 33.Ka3 Qdb4# 0–1


Some Thoughts on Chess Mentor

Chess Mentor was developed several years ago as stand alone software. It remains available as such through their website. In addition, at some point several years ago, the owners of Chess.com purchased the rights to this product. The entire package is embedded within Chess.com's "Chess Lessons" (version three), where it was called "Chess Mentor" under versions one and two. It is available to premium members.

Embedding stand alone software into a web-based format was not accomplished seamlessly. Comments such as Silman's reference to "Variation Five" do not reference anything that can be found under that name in the web version. Sometimes, as in this particular exercise, the carefully crafted teaching modules of Chess Mentor break down.

The original Chess Mentor also offers a "hint" feature, but Chess.com's site design does not implement this feature.

In general, the lessons in Chess Mentor are well designed. I am finding it useful to go through elementary level lessons in search of ideas to use in my teaching, and more challenging lessons as an aid to my own improvement. The lack of an embedded hint feature often leads to blind trial and error until I stumble across the correct move. That groping in the dark can provoke frustration.

Chess.com also gives users a "Lessons" rating. One would not expect to gain rating points from a lesson rated far below one's current rating. However, I have made every correct move in dozens of easy lessons only to discover that I scored 94% and suffered a rating loss of 10 points. I care little enough for the rating, but the logic of 94% for a string of correct moves mystifies me.

It seems to me that Chess.com could invest some of the money it collects from premium users to hire people who can edit the comments to remove references that lead no where and to debug the rating and evaluation system. On the other hand, maybe the technical difficulties of such a task are overwhelming.

The "Lessons" on Chess.com are useful with a few caveats.

20 January 2016

Training with Caruana

Lesson of the Week

We know from the broadcast of Giri -- Caruana, Tata Steel Chess 2016 (see my blog post on the same) that Fabiano Caruana could have maintained his winning position with 55...Ra3, instead of 55...Rxh3. His move led to a draw that Anish Giri executed easily. The resulting position may have been something straightforward to most Grandmasters, but it is not an elementary ending for the rest of us.

Black to move

Armed with the knowledge that Black is winning here, I tried playing it agianst Hiarcs on my iPad while my beginning students were solving checkmate in one problems. Naturally, I was only partly focused on the exercise as I needed to guide the students through their occasional difficulties. I was not successful.

This morning, I awoke very early and watched Danny King's "Power Play" YouTube video on yesterday's Tata Steel games. He went through Hou -- Navara from Hou Yifan's rook sacrifice to David Navara's resignation, then he turned his attention to the ending in Giri -- Caruana. After watching the video, I tried again against my iPad and won easily.

Later in the morning, I played the position against Stockfish 7 on my notebook computer and on my desktop. I also played the position against Hiarcs 12 and Rybka 4. Different engines tried different replies for White.

After playing the position against several engines, I searched Nikolay Minev, A Practical Guide to Rook Endgames (2004) for positions that are helpful. One position in this book elucidates a technique that I stumbled upon in my play against the computer.

This position from Minev's text and some of my play against the computer will form the core of the lesson for my advanced students tomorrow afternoon.

In the game scores below, 1...Ra3 takes the place of 55...Ra3 as a variation in Caruana's game yesterday.

Hiarcs on the iPad and on the Desktop followed the same basic defensive idea that GM Danny King highlighted in his video. This game is one of several.

Hiarcs 12 -- Stripes,James
Blitz 10m, 20.01.2016

1...Ra3 2.Ra7 e3 3.Re7 Kf3 4.Kb4 Rd3

This move was the one that I was not finding until I watched King's video. Taking control of the d-file keeps White's king separated from the pawn that will promote while also offering a possible shield of Black's king from rear checks.

4...Ra1 seems as though it should be adequate, but always led me to positions where I found success elusive.

5.Kc4 Rd6 6.Rf7+ Kg2 7.Re7 Kf2 8.Kc3 e2 9.Rf7+ Ke1 10.Rb7

Black to move

10...Rf6

With my pawn only one square from promotion, transferring the shield to the f-file allows my king to come out from in front of the pawn.

10...Kd1 11.Rb1# would be embarrassing.

11.Rb1+ Kf2 12.Kd2 Rd6+ 13.Kc2 e1Q 14.Rxe1 Kxe1 

The rest is easy.

15.Kc3 Kf2 16.a5 Kg3 17.Kc4 Kxh3 18.Kb5 Kg3 19.a6 Rxa6 20.Kxa6 h4 21.Ka7 h3 22.Kb6 h2 23.Kc5 h1Q 24.Kb5 Kf4 25.Kc5 Ke5 26.Kc4 Qf3 27.Kb5 Qc3 28.Kb6 Kd6 29.Ka7 Qb4 30.Ka6 Kc7 31.Ka7 Qa5# 0–1

Rybka 4 threw me a curve and a bit of calculation revealed a surprising response, which I played with success.

Rybka 4 x64 -- Stripes,James
Blitz 10m, 20.01.2016

1...Ra3 2.Kb4

Black to move

2...e3! 

2...Rd3 seems to fail 3.Kc4 Rd7 4.Rxh5 e3 5.Rh8 Kf3 6.Rf8+ Ke2 7.Re8 Rh7 8.a5 Rxh3 9.a6 Rh7 10.Kd4 Rd7+ 11.Kc5 Kd2 12.Rxe3 Kxe3 13.Kb6 Rd6+ 14.Kb7 Rxa6 15.Kxa6.

3.Kxa3

3.Ra7 leads to a solution similar to the game above. 3...Rd3 4.Rf7+ Kg3 5.Kc4 Rd6 6.Re7 Kf2-+.

3...e2 4.Rc5

Komodo suggest 4.Rxh5, but Black still wins after 4...e1Q 5.Rb5 Ke4 6.h4 Kd3 7.h5 (7.Rb4 Qa1+ 8.Kb3 Qc3+ 9.Ka2 Qxb4) 7...Qa1+ 8.Kb3 (8.Kb4 Qc3#) 8...Qc3+ 9.Ka2 Kc2 10.Rb8 Qc4+ 11.Ka3 Qc5+ 12.Ka2 Qd5+ 13.Ka3 Qd6+ 14.Rb4 Kc3 and the rook falls.

4...e1Q 5.Rb5 Qa1+ 6.Kb4 h4 7.Rc5 Qb2+ 8.Kc4 Kg3 9.a5 Kxh3 10.Rb5 Qa2+ 11.Kc3 Kg4 12.a6 Qxa6 13.Rb4+ Kg3 14.Rb3 h3 15.Kb2+ Kg2 16.Rc3 

Black to move

16...Qe2+ 17.Rc2 Qxc2+ 18.Kxc2 h2 19.Kc3 h1Q 20.Kc4 Kf3 21.Kd4 Qh5 22.Kc4 Ke3 23.Kb3 Kd3 24.Kb4 Qd5 25.Ka3 Kc3 26.Ka4 Qf5 27.Ka3 Qa5# 0–1

Most of my play against the engines involved the immediate loss of a pawn.

After a couple of failures, I was able to find my way.

Stockfish 7 64 -- Stripes,James
Blitz 25m, 20.01.2016

1...Ra3 2.Rxh5 Rxa4+ 3.Kc3 Ke3

I went for a classic Lucena position.

White to move

4.Rh6 Ke2 5.h4 e3 6.h5 Ra3+ 7.Kc4 

7.Kb4 Ra7 8.Rf6 Ke1 9.h6

7...Ke1 8.Rf6 e2 9.h6 Rh3 10.Ra6 Kd2 11.Rd6+ Kc2 12.Re6 Rh4+ 13.Kb5 Kd2 14.Rd6+ Ke3 15.Re6+ Kd3 16.Rd6+ Kc3 17.Rc6+ Kb3 18.Re6

After stumbling in the blindness, I found a tactical shot. Alas, it leads to an ending of queen versus rook that I find terribly difficult when playing against engines.

Black to move

18...Rh5+ 19.Kc6 Rxh6! 20.Rxh6 e1Q 21.Kd7 Qe5 22.Re6 Qf5 23.Kd6 Kc4 24.Re5 Qf4 25.Ke6 Qh6+ 26.Ke7 Kd4 27.Ra5 Qc6 28.Rh5 Ke4 29.Rh1 Kf5 30.Rf1+ Kg6 31.Rg1+ Kh7 32.Rg5 Qc3

32...Kh6 33.Re5 Kh7 34.Rg5 Qe4+ 35.Kd6

33.Ke6 Kh6 34.Re5 Kg6 35.Kd5 Kf6 36.Re6+ Kf5 37.Rc6 Qd2+ 38.Kc4 Qd7 39.Rc5+ Ke4 40.Kb3 Qe6+ 41.Kc3 Ke3 42.Rc4 Qb6 43.Kc2 Qa6 44.Kb3 Kd3 45.Rc3+ Kd4 46.Rc1 Qb5+ 47.Kc2 Qc5+ 48.Kb1 Qb4+ 49.Ka2 Kd3 50.Rb1 Qa4+ 

50...Qa5+ 51.Kb2 Qb6+ 52.Ka2 Qa7+ 53.Kb2 Qa4 54.Rc1 Kd2 55.Rb1 Qb4+ 56.Ka2 Qa5+ 57.Kb3 Qb6+ 58.Ka2 Qa7+ 59.Kb3 Qb8+ 60.Ka2 Qg8+ 61.Ka3 Qg3+ 62.Ka4 Kc2 63.Rb6

51.Kb2 Qc2+ 52.Ka1 Qc3+ 53.Ka2 Qe5 54.Kb3 Qb5+ 55.Ka2 Qd5+ 56.Kb2 Kd2 

Finally! White is in zugzwang.

White to move

57.Rg1 Qb5+ 58.Ka2 Qa6+ 59.Kb3 Qb6+ 60.Kc4 Qxg1 61.Kd5 Kd3 62.Kd6 Kd4 63.Kc6 Qg7 64.Kd6 Qf7 65.Kc6 Qe7 66.Kb6 Qd7 67.Ka5 Kc5 68.Ka6 Qg7 69.Ka5 Qa1# 0–1

In the next example, I discovered on my own something that I might have learned from a book.

Stockfish 7 64 -- Stripes,James
Blitz 25m, 20.01.2016

1...Ra3 2.Rxh5 Rxa4+ 3.Kc3 Ke3 4.Rh6 Ke2 5.Rh4 Kf2 

5...Ra3+ seems inadequate.

6.Kb3 Rd4 7.Kc3 Rd3+ 8.Kc2 Ke3 

8...Re3 fails.

9.Rh6 Ke2 10.h4 e3 11.h5 Rd5 12.Rh7 Rc5+ 13.Kb2 Rf5 

13...Ke1 throws away the win 14.Re7 e2 15.h6 Rh5 16.h7 Kd1 17.Rd7+ Ke1 18.Re7 Kf1
13...Rd5 also loses all advantage.

14.h6

Black to move

14...Rf6!

Minev presents a position from Beliavsky -- Radulov, St. Petersburg 1977 in which he highlights the technique that I stumbled across out of necessity here.

15.Rh8 Kf2 16.h7 Rf7! 17.Rb8 Rxh7 18.Rf8+ Ke1 19.Kc2 e2 

A textbook Lucena, but with Black to move

20.Kb3 Rh5

20...Rc7
20...Re7 21.Kc2 Creates a textbook Lucena 21...Rc7+ 22.Kb2 Rc5

21.Kc3 Rc5+ 22.Kd4 Rc2 

22...Rc7

23.Ke3 Rc3+ 24.Kd4 Rc6

24...Kd2 25.Rf2 Ra3

25.Kd5 Rc7 26.Rh8 Kd2 27.Rh2 

Black to move

27...Kd1 28.Rh1+ e1Q 29.Rxe1+ Kxe1 30.Kd6 Rc4 31.Kd5 Rh4 32.Kc5 Ke2 33.Kd5 Ke3 34.Kd6 Ke4 35.Kc5 Rh5+ 36.Kd6 Re5 37.Kc6 Kd4 38.Kd6 Ke4 39.Kc6 Rd5 40.Kb6 Ke5 41.Kc6 Ke6 42.Kc7 Rd6 43.Kc8 Rd7 44.Kb8 Kd6 45.Kc8 Kc6 46.Kb8 Kb6 47.Kc8 Rd1 48.Kb8 Rd8# 0–1

27 August 2015

Skewer

I am working through a book that had been collecting dust on my shelf for a few years. Nikolay Minev, A Practical Guide to Rook Endgames (2004) offers an informative discussion of tactical elements and strategic elements in the first chapter, which comprises half of the book. The tactical elements listed are skewer, double attacks, pinning, deflection, far-advanced pawns, and stalemate. He describes each of these elements in simple terms and then with reference to rook endings from actual play.

This position is the last one in the section on skewer. It occurred in Vasiukov -- Dzindzichashvili, Soviet Championship 1972.

White to move

15 October 2012

Exploiting Opening Errors

My opponent has made an error in the opening. How can I exploit it? Do I understand why it is an error? How does a chess player learn to spot opening errors?

Studying many positions in which an error has been made helps develop this understanding. Consider the following position with White to move.


Black has just played 6...b6? This position occurred in Rubinstein -- Heilmann, Barmen 1905. I found it in Akiba Rubinstein: Uncrowned King (1994). The authors, John Donaldson and Nikolay Minev, identify the move as an error. I have not played against it, but had Black with the position before the error in one internet blitz game--I played 6...cxd4, which is the second most popular move. I lost that game, but not due to the opening. Rather, I blundered away a knight on move 25. The main line is 6...a6. Both my choice and the main line are presented in the Encyclopedia of Chess Openings as offering Black good prospects to achieve equality.

Knowing the main line is no assurance that one will recognize errors. A deviation from a main line is not always an error. It could be an improvement. In many cases, deviations are simply another way to play a given position. There are more than 85 billion possible legal chess positions after the fifth move. The majority must be quite bad for one player or the other, but certainly there are many good positions that have yet to be examined.

Minev has faced this error over the board twice.

From the position after White's 6.a3, twice Vassily Ivanchuk has played 6...dxc4, drawing both. That move and 6...Be7 are given in footnotes in ECO. Bobby Fischer played 6...Ne4 during his Candidates match with Tigran Petrosian in 1971. 6...Ne4 is the first line in ECO, but is presented as favoring White slightly. 6...b6 is the most popular move that is not in ECO. The Chess Base online database turns up 108 games when 6...b6 was played. White scores over 75% in these games.

What is wrong with 6...b6 in the symmetrical variation of the Queen's Gambit Declined, Semi-Tarrasch?

It weakens the a4-e8 diagonal, exposing the c6 knight to a pin. Does this pin allow White to gain material or positional advantage? In Akiba Rubinstein: Uncrowned King, the authors give the game Minev -- Morcken, Moscow 1956 with the line 7.cxd5 Nxd5 8.Bb5 Bb7 9.Ne5 Rc8 10.Qa4. "White wins at least a pawn," they observe (21).

7.cxd5

Other moves have been played, but other moves fail to exploit the weakness on c6. 7.dxc5 might have merits, as after 7...bxc5 White plays 8.cxd5.

Black has two replies: 7...Nxd5 and 7...exd5.

Studying the games that have been played by strong players following both replies offers a method for developing the skills to exploit this error. While trying to show the Rubinstein -- Heilmann game to a friend on Saturday, I forgot about Rubinstein's 9.e4!

Rubinstein -- Heilmann continued:

7...exd5 8.Bb5 Qd6 9.e4

Black to move

Heilmann quickly found his pieces lacking mobility and the game ended ten moves later. Most other efforts by Black fared just as poorly.

06 October 2012

Practicing Visualization

During a social time at a professional retreat for my spouse, I found a surprising opportunity to practice board vision and visualization skills. Her group met all afternoon yesterday, and they are meeting all day today. Their work is interesting and engaging, but it differs from mine. I came along to enjoy Eden Valley Guest Ranch (outside Oroville, Washington), and to care for our puppies.

View from our cabin at Eden Valley Guest Ranch
While the planners (that's their profession) work, I enjoy the woods, the views, and the solitude of the cabin. I brought along a chess set and my copy of John Donaldson and Nikolay Minev, Akiba Rubinstein: Uncrowned King (1994). Although the book is old, it is new to me. It arrived in the mail earlier this week. As I read the biographical portions of the book, I play through selected games on the chess board.

One of the games that caught my interest yesterday afternoon was a miniature from the Barman Chess Congress, August 1905. Donaldson and Minev explain that the Hauptturnier was for those who aspired to the rank of master:
Rubinstein made his international debut at the Barmen Chess Congress in August of 1905. Playing in the Hauptturnier, which was comprised of aspiring masters, Akiba turned in an excellent result, scoring 12 points from 15 games to tie for first with Oldrich Duras. (20)
Rubinstein had White against Ernst Heilmann in the second round. Heilmann finished the event in seventh place with 9.5.

Rubinstein,Akiba -- Heilmann,Ernst [D40]
Hauptturnier-A Barmen (2), 1905

1.d4 d5 2.Nf3 e6 3.c4 c5 4.e3 Nf6 5.Nc3 Nc6 6.a3 b6? 7.cxd5 exd5

In the notes, the authors present a few moves from a game that Minev played in 1956. Minev's opponent played 7...Nxd5 and White won a pawn. That game ended drawn, although that bit of information is not in this book.

8.Bb5 Qd6 9.e4! Bd7


10.e5 Qe7 11.0–0 Ng8 12.Nxd5 Qd8 13.Qa4 Rc8 14.Bg5 Nge7 15.dxc5 bxc5 16.Rad1 a6 17.Qxa6 Nd4 18.Nxd4 cxd4 19.Rxd4 1–0

After spending a bit of time studying Heilmann's errors in this brief game, and looking through a few others in the text, my wife's afternoon session ended. Spouses and others accompanying the retreat participants were invited to dinner and the social time before and after. My wife and I spent half an hour playing with the puppies, then we put them in their kennels with food, water, and toys. We headed back down the hill to the conference center with a few bottles of wine. Others in the group brought some local beer. I opened a couple of our bottles of wine, sampled the beer, and fell into some conversations. A few of the planners whom I was standing with started talking about their afternoon's workshops. Nothing surprising there, but it left me on the margins of the conversation.

It would have been rude to force a change of topic so that I could participate. Instead, I stood quietly, smiling and nodding, keeping others comfortable with my presence. Meanwhile, my mind was back at the table in our cabin. I was playing through Rubinstein -- Heilmann in my head.

In my mental analysis, I made it as far at the diagram in the game score above when I was addressed directly by one of the retreat participants. She showed me some cards the group had worked with earlier that day. The cards were color-coded lists of behavior patterns, mental orientations, personality traits. I matched pretty well with the list on the green card.