Showing posts with label zugzwang. Show all posts

20 February 2026

Zugzwang

Black is busted, as only pawns can move.

White to move
One winning idea would be to march the king to b7 or d6. Black can do nothing to prevent this. Even pushing the majority is rooted in illusion.

For instance, 38.Kf2 g5 39.Ke3 f5 40.Kd3 f4 41.Kc4 g4 42.Kc5 f3 43.gxf3 gxf3 44.Kd6

Black to move
44...f2 45.Rb1 Nb5+ 46.Ke5

Black can capture the passed a-pawn, giving up the knight. White's extra piece would still prevail.

Inexplicably, White played 38.Ne7?? After 38...Ke7 39.Rxe8+ Kxe8, Black was in complete control.


21 December 2024

Endgame Gambit

Black is clearly worse in the position. While playing it, I remembered some discussion with Gary Younker, then president of the Spokane Chess Club, about the difficulties he faced with a rook against three connected passed pawns. I neither had seen the game not studied the ending.

This post is a continuation of yesterday's "Rook vs. Three Connected Passed Pawns".

Black to move
With the memory of Gary's comments, I opted for the rook exchange. My opponent was Phil Weyland, one of the strongest youth players in my city at the time. He was a B Class player; I was in C class. The game took place during our Taxing Quads event in April 2002.

46...Rxd4+ 47.Rxd4 g5 48.Ke3

The right idea. The rook cannot battle the pawns alone.

48...Kg6 49.Ke4 f5+

White to move
50.Ke5!

Phil finds the only winning move.

50...h4 51.Rd6??

This move spoils the win. White had to play 51.Rd3, putting Black in zugzwang.
Analysis after 51.Rd3

51...g4 and here the intuitive 52.Kf4 is premature, due to h3 and 53.Rd8 leads to a position similar to that in Sam Shankland, Theoretical Rook Endgames (see yesterday's post).

51...f4 and White has several possibilities. 52.Rh3 Kh5 53.Kf5 (only move) g4 54.Ra3 f3 55.Ra8 and facing a mate threat, Black must surrender a pawn.

51...Kh5 52.Kxf5 is easy to see, as is

51...h3 52.Rxh3

51...Kf7 also allows 52.Kxf5

Phil's move looks strong because it wins the f-pawn by force, but Black has a drawing resource.

51...Kh5 52.Kxf5 h3!=

White to move
53.Rd7 Kh4

The only move to avoid checkmate.

54.Rd4+ Kh5

I found the drawing idea, but not yet. Perhaps, 55.Rg4+ worried me somewhat.

55.Rd8 Kh4 56.Rh8+

Phil forced me to find the right idea.

Black to move
56...Kg3

Here, the only legal move is one I could have played two moves earlier.

57.Kxg5 h2 58.Rxh2 and we agreed to a draw.


15 April 2024

Elementary Technique

Josef Kling and Bernhard Horwitz, Chess Studies, or Endings of Games (London, 1851) was one of the earliest books to emphasize chess endings. It was written in English descriptive notation, so even the presence of a free digital version does not make it particularly accessible to today’s chess players. Happily, Carsten Hansen has brought out a new edition containing the text of the 1851 edition, an expanded edition Horwitz was preparing when he died, and thorough analysis of their work. Hansen’s edition is published as part of his Alexander Game Books Classics series, available through Amazon.

A position in the original 1851 edition will serve as part of my lessons with young chess players this week, as it offers some elementary instruction in techniques that every chess player needs.
Kling and Horwitz note the beginner’s tendency to prematurely push a pawn—something I’ve observed in many hundreds of youth games over the past couple of decades. They note that rooks can be forced off the board, leading to an easily won pawn ending. When I played it against Stockfish, I reached a position that is also reached when playing the first and most elementary position in the book.

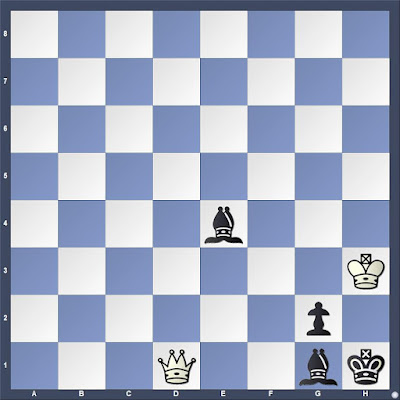
After the moves given by Kling and Horwitz, 1.Re3+ Rxe3 2.fxe3, Black is in zugzwang. Black loses because required to move. Were it White’s move, the game would be drawn.

Black to move
2…Kxe3

This move is marginally more testing than 2…Kxg3. In both cases, White will employ the same technique to bring the remaining pawn close to promotion. But, with the g-pawn, there will be stalemate dangers that do not surface while trying to promote the e-pawn.

Here, again, the beginner must learn not to hastily push the pawn. Rather, White’s king must work its way in front of the pawn to control the key squares.

3.Kg2 Ke4 4.Kh3 Kf5 5.Kh4 Kg6

White to move
The beginner’s game begins to improve when they learn to move the king in front of the passed pawn. Such placement is as vital for the defender as for the stronger side. 
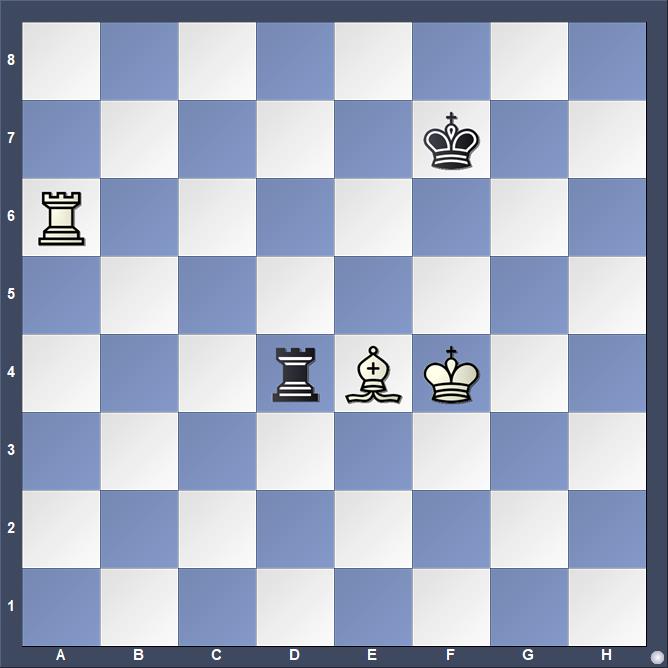
6.Kg4 Kf7 7.Kg5 Kg7

Black, seizing the opposition, puts up the most stubborn defense. Now, and only now, White may advance the pawn. In this case, that takes the opposition from Black.

8.g4 Kh7

White to move
Once beginners have learned to curb the tendency to push the pawn too soon, and have learned the concept of gaining the opposition, the next step is to understand that opposition is only a means to an end. Here, taking the opposition fails to make progress. White must perform an outflanking maneuver to gain control of one of the key squares—f7, g7, h7.

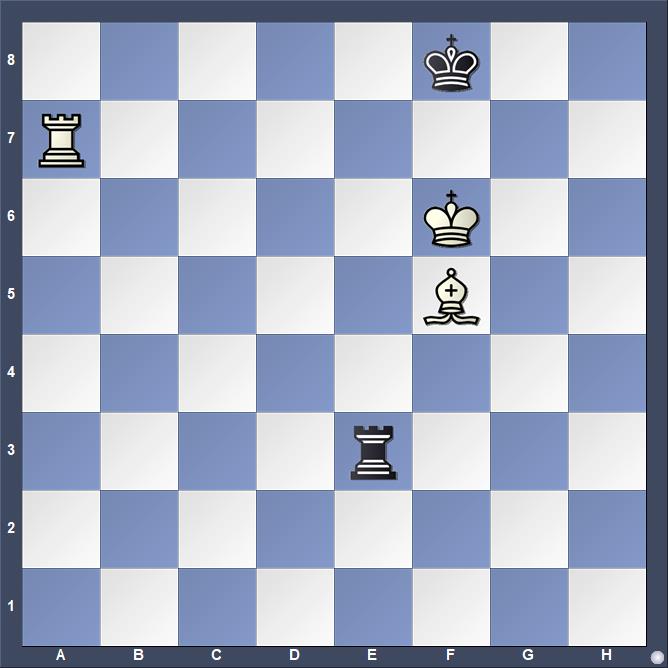
9.Kf6 Kh6 10.g4+ Kh7

This is the first position in Kling and Horwitz, Chess Studies.

11.Kf7 Kh8

White to move
Now, White must be wary of the stalemate danger.

12.Kg6

12.g6 would leave Black no legal moves, ending the game with a draw.

12…Kg8 

White to move
13.Kh6

13.Kf6 does not spoil the win, but the game must return to the same position for another opportunity to play the correct move.

13…Kf7

The engine opts for the longest distance to mate. While testing students, I choose 13…Kh8 so they must show that they understand that pushing the pawn works here. 14.g6 Kg8 15.g7 Kf7 16.Kh7.

For my beginning students, we are likely to continue all the way to checkmate.


10 November 2023

The Week's Lessons

My own failures often become lessons for my students. Tuesday morning I had a winning position in what should have been a drawn ending, misplayed it, and managed to win on the clock after my opponent recovered from his error. I had briefly studied rook and bishop vs. rook ten years ago after watching Levon Aronian and Fabiano Caruana play out a drawn ending for 37 moves in the Tata Steel tournament in Wijk aan Zee (see "Tata Steel Chess, Final Round" and "Rook and Bishop versus Rook").

I had this position from which I created a problem for my opponent.

White to move
70.Ke5 Rd2 71.Ra7+

Driving the king to the back rank is White's only chance to create a winning advantage.

71...Kf8

Black finds the only square for the king.

72.Bf5

Black to move
72...Re2+??

Black must play 72...Ke8

73.Kf6 Re3

White to move
Several of my students saw this position and were given a chance to win from the White side. I failed to find the winning plan and my students mostly played it the way I did with the same result. Then, I showed them how I and they could have played.

74.Rf7+

This move does not spoil the win, but nor is it the correct idea.

White wins quickly with 74.Rh7 Kg8 75.Rh1

Black to move
Analysis diagram
Black is in zugzwang.

a) 75...Rf3 76.Rd1 renews the mate threat and Black can delay longest by exchanging rook for bishop.
b) 75...Re2 allows Be6+ and exchanging rook for bishop is the only move to prevent immediate checkmate.

74...Ke8

74...Kg8 is no better.

Now, White forces a return to a position with a second opportunity to play it correctly.

75.Rh7

75.Ra7 is slower. 75.Rc7 is best, as it threatens checkmate.

75...Kd8

Black plays the most stubborn defense.

White to move
76.Rh8+??

Of course I knew, or should have known that driving the king off the back rank returns the game to a technical draw. I spent 13 seconds on this error.

76.Rd7+ was best, driving the king back towards mine. 76...Ke8 (76...Kc8 allows a discovery that picks up a rook) 77.Rc7 Kf8 and White can win with 78.Rh7 as above.

Lessons are tailored to the student's skill level.

Other advanced students were presented with a sequence of tactical positions to solve from classic games that every chess player should know. Working from a series of books that present 300 critical positions (Rashid Ziyatdinov, GM-RAM: Essential Grandmaster Knowledge [2000], and a trilogy by Thomas Engqvist, 300 Most Important Chess Positions [2018], 300 Most Important Tactical Chess Positions [2020], and 300 Most Important Chess Exercises [2022]), I am assembling study positions for my students. The link to a Lichess study is public.

Beginning students worked on checkmates in one and saw two short games: my worst OTB tournament loss and a recent online win with the same idea.

White to move
8.Bxf7+ deflects the king from defense of the queen (also see "Attraction").


23 April 2023

Fails

It seems that I pick up The Manual of Chess Combinations, vol. 2 by Sergey Ivashchenko once every other week to work a page of exercises. A few days ago, half a page occupied part of my morning. I solved three successfully. This morning, the fourth one on the page did not present difficulty, but the last two did. I also managed to err in the sixth exercise on each of the the next two pages.

Exercise 144 struck me as a study in corresponding squares on first glance, but I gave too little attention to the simplicity of Black's ability to gain and maintain the opposition. Had I considered the possibility of a sacrificial breakthrough, I might have more quickly perceived the floating square idea. I spent some time teaching the floating square to a couple of students last week and should have seen it.

White to move
1.Kf2 (or any other king move) fails. 1...gxh4 2.gxh4 Kg6 3.Ke3 Kf5 4.Kf3 Ke5 and Black can shuffle the king back and forth.

Instead, 1.g4! wins 1...hxg4 2.h5 (also 2.d6). 

Before that one, I thought I had correctly solved number 143, but had also overlooked something simple.

White to move
I tried 1.Kg5, overlooking that I had nothing after 1...e6 2.Kf6 Ke8 3.Kg7 Ke7 and somehow I had hallucinated there being possible an outflanking maneuver. After 1.Kg7 Ke8 2.e6! fxe6 3.Kg8 Kd8 4.Kf8 Kd7 5.Kf7 Kd6 6.Ke8, White has successfully outflanked the Black king.

Number 150 was familiar and I instantly knew the correct answer, but could not perceive the reason the rook had to move to d2 instead of d1, so I tried Rd1 against Stockfush. Again, simple opposition gives Black a draw.

White to move
1.Rd2! wins 1...d4 2.Rd1! Kd5 3.Kd7 Ke4 4.Kc6 d3 5.Kc5 Ke3 6.Kc4 d2 7.Kc3 and the rook captures the pawn on the next move. After 1.Rd1 d4 2.Kd7 Kd5, White can try 3.Rd2 Kc4 4.Ke6 Kc3 5.Rd1 d3 6.Ke5 Kc2 and the rook must be given up for the pawn.

My error in number 156 stemmed from failing to recognize the possibility of Black achieving a Philidor position.

White to move
Black got a Philidor-type position after 1.Kc4 Rg8 2.Kc5 Rg1 3.dxe6 Rc1+.

White wins easily either with 1.dxe6 fxe6 2.Ra7 Rf8 3.Ra8+ Kd7 4.Rxf8 or with 1.Ra7 straight away.


12 February 2023

Two from Maki

Jim Maki, a FIDE Master, runs the analysis table at youth tournaments in my city while I run the pairings. He nearly always has a couple of puzzles to show me. He doesn't compose them, but is very good at finding puzzles that balance instruction, simplicity, and thinking outside the box.

Sometimes I can solve them, often I struggle. Yesterday, I solved the harder one quickly, but failed the easier one. Both are forced checkmate in two move. Maybe you'll do better than I did.

White to move

White to move


06 November 2022

Knowing and Doing

My opponent's draw offer leads me to believe that he understood that a queen vs. a c-pawn one square from promotion is a draw. Nonetheless, I demanded proof and the opportunity to present it was missed. Alas, my own errors allowed the draw to remain after my opponent's first error, and the queen vs. pawn occurred only because I exchanged rooks when they should have remained on the board.

My individual students saw this endgame last week and then most of them solved some exercises from Georges Renaud and Victor Kahn, The Art of the Checkmate (1953). My afterschool club solved worksheets with checkmate in one. This week, they will see mates in two from some of the same games.

Black to move
56...Rxf6??

Simple counting shows that the next diagram will be reached. I should have played 56...Rc4.

57.Kxf6= Kf4 58.Ke7 g3 59.Kxd7 g2 60.c6 g1Q 61.c7 Qa7

White to move
62.Kd8??

Now, we have reached a position that I know from endgame books. 62.Kc6 was the only move to hold the draw.

62...Qb6??

I know, but did not do. After 62...Ke5-+ 63.c8Q Kd6, White is in zugzwang with a worthless king. In fact, Black has a mate in three.

63.Kd7= Qb5+ 64.Kd8 Qd5+ 65.Kc8 Ke5 66.Kb8 Qb5+ 67.Ka7 Qc6 67.Ka7 Qc6 68.Kb8 Qb6+

White to move
69.Kc8??

69.Ka8=. Knowing this stalemate resource is essential to understanding why a c- or f-pawn against the queen is a draw when the pawn is one square from promotion.

69...Kd6-+

White resigned.


05 April 2022

Study by Johann Behting

When I posted this position two days ago on Facebook, it reached thousands more people than is usual for my high-performing posts, but elicited very replies with the correct move. There were responses, but most failed to observe the critical move--the only one that maintains a winning advantage.

White to move

According to Harold van der Heijden, Endgame Study Database VI, the study was published in Rigaer Tageblatt, a Riga newspaper. The composer is Johann Behting (1856-1944). His brothers, Karl and Robert, also published studies. When I encountered* this study in The Manual of Chess Endings by Sarhan Guliev on Sunday, credit was given to Karl and Johann with a date that was clearly incorrect (14). Guliev has 1984, while van der Heijden has 1894. The one in Guliev is one move earlier. Both appear in Endgame Study Database VI.

White to move
I contemplated my solution while eating breakfast, then set it up on my iPad to play against Stockfish. Although 1.Ke4 looked forcing, I could not see clearly to the end and opted to push a pawn first, instead--the wrong pawn, it turns out. Nevertheless, I prevailed against the engine.

1.f7 Ke7 2.Kf3!

As in the first position presented above, this move is the only one that wins.

2...c6 3.Kf4! c5 4.Ke4!

White moves to this square only after Black's c-pawn has advanced to c5, although it also can be played before advancing either White pawn. The computer's line reaches the same position that I did at move 8 (below).

4...Kf8 5.Kf5

Threatens checkmate.

5...Kg7 6.Ke5 d3

White to move
7.Kd6! d2 8.Ke7 d1Q 9.f8Q Kg6

Every move I've played after the first has been an only move.

White to move

I did not get the sense that my play from this point was the best, although it was good enough. After two more efforts from the beginning on my iPad, I spent some time evaluating the first effort on my computer.

In my second effort against Stockfish on the iPad, I started with the e-pawn, hence reaching the position in the other study after one move.

1.e7 Kf7 2.Kf3 c6 3.Kf4 d3

White to move
Stockfish chose the longest line to checkmate, I thought, but this choice made the rest of the exercise too routine. According to tablebases (the iPad app does not access these), both 3...d3 and 3...c5 lead to mate in 16. Only 3...c5, however, tests a human's skills above an elementary level.

On the third effort, I helped Stockfish a bit (switching sides) to get a chance to play the critical line against the app.

3...c5 4.Ke4 Ke8 5.Kd5 Kd7

White to move
6.Kc4! Ke8 7.Kxc5 Kd7

Here, 7...d3 strikes me as more testing. 8.Kd6 d2 9.Ke8 mates with a pawn, and concludes as in the solution given by Guliev.

8.Kxd4

The rest is simple.


*Note: After starting this post, I discovered that I had previously written about this study in "Two Endgame Compositions" (2016). Questions that I had then, I still have.

17 December 2021

Seeking Understanding

Five years ago, I posted "Two Endgame Compositions", giving only the solution to the second. This week I was asked to provide the solution to the first, an 1888 composition by Johann Berger that was first published in Columbia Chess Chronicle. The past two mornings, I have been studying the solution with an aim to understand every move. Although the maneuvers appear complex, they are based on some simple ideas.

White to move
J. Berger, 1888
1.Qb8

The only winning move, according to the tablebases. It forces the light-squared bishop to move because of the checkmate threat Qh2#.

1...Bc4

Threatens Be6+, followed by Bf2+ (or Bh2+).

Other moves lose more quickly.

1...Be2 2.Qf4 (see at move 4 below)
1...Bd3 2.Qf4
1...Bb5 2.Qxb5 Ba7 3.Qd5
1...Ba6 2.Qg8 Bb7 3.Qh7 Bc8+ (3...Bf2 4.Qxb7) 4.Kg3+

2.Qe5

Prevents the check while keeping the dark-squared bishop immobile.

2.Qd6 is one move slower. This move is presented as a "cook" in Harold van der Heijden's Endgame Study Database with a line leading to underpromotion of Black's pawn. It is an instructive alternative.

2...Ba6

Threatens Bc8+

2...Bd3 3.Qg5 threatens Qxg2#. 3...Be4 4.Qh4 Bf5+ (4...Bf2 5.Qxe4) 5.Kg3+
2...Be2 3.Qxe2
2...Bb5 3.Qxb5

3.Qc7

Prevents the check while keeping alive the Qh2 threat.

3.Qe1 is one move slower according to tablebases.

3...Bd3

3...Bb5 allows 4.Qg7
(4.Qc1 Is given ! in Genrikh Moiseyevich Kasparian, 888 Miniature Studies [2010]. Pins the dark-squared bishop so a check can be met by Kg3 and then Qh6+ 4...Bf1 5.Qf4 Ba6 6.Qg4; 4.Qb7)
4...Bc6 5.Qh6 Bd7+ (5...Bf2 6.Qxc6; 5...Be3 6.Qxc6) 6.Kg3+
3...Be2 is second best 4.Qg7 Bf3 5.Qa1 Be2 6.Kg3

4.Qf4

Threatening to move to g4 where checks along the c8-h3 diagonal are blocked and Qxg2 is threatened. This move forces the light-squared bishop onto the a8-h1 diagonal.

Black to move

4...Bb5 5.Qg4

Shields the king from check and threatens Qxg2#

5...Bc6

Defends g2

6.Qd1

Pins the dark-squared bishop and prepares Kg3

6...Be4

White to move

7.Kg3

Threatens Qh5+. The complex battle between White's queen and Black's light-squared bishop has concluded. Now, White threatens checks on the h-file, which Black can delay briefly.

7...Bg6

Guards h5

8.Qc1

Threatens Qh6+

8...Bh5

Prevents the check

9.Qa1

Forces the bishop off the h-file.

Black to move

The rest is easy.

9...Be2 10.Qh8+ Bh5 11.Qxh5+ Bh2+ 12.Qxh2#

23 June 2021

Instinct

Blitz offers little time for calculation. One must see patterns or play by instinct. Naturally, many players work on having openings that trip up their opponents for a quick win. But games often last into the endgame, too.

I had this position this morning.

White to move

With a 3-2 pawn majority on the queenside, of course I want to exchange rooks.

Stripes,J. -- Internet Opponent [C40]
Live Chess Chess.com, 23.06.2021

34.Rxg7+ Kxg7

Both players are under a minute. White 58 seconds; Black 55 seconds.

35.Kg1 Kf6 36.Kf2 Ke5 37.Ke3 Kd5 38.Kd3

Coincidentally, I was able to maintain the opposition as the kings moved towards the center. Or, was that something I noticed before the rook exchange?

Black to move

38...c6

38...h4 also would be met with 39.a4.

39.a4 a6

White to move

40.g3

Best

40...g4 41.h4

Black is in zugzwang. The king must give way to allow White's plans to convert his majority into a passed pawn. And that results in a pawn race of sorts, and then queen against pawns.

41...Ke5 42.Kc4 Ke4 43.b5 axb5+ 44.axb5 cxb5+ 45.Kxb5 Kf3 46.c6 Kxg3 47.c7 Kxh4 48.c8Q Kh3

White to move

Instinct tells me to move my king closer. How would I have such instinct? I've studied positions in many endgame books, have taught these positions to my students, and have played them against computers and against human opponents.

49.Kc4

Tablebases say that it is mate in nine and this is the only move to make it mate in eight.

49...h4

49...Kh4 50.Kd3 g3 51.Ke2 g2 52.Kf2

50.Kd3

50.Kd4 was equally good.

50...Kg3 51.Ke3

51.Qf4 was as good.

51...h3

White to move

52.Qc7+

When the standard is perfection, as it should be, this move must be accounted an error. I missed a mate in five.

52.Qc2 h2 53.Qf2+ Kh3 54.Kf4 h1N 55.Qg1 Nf2 56.Qg3#

52...Kg2 53.Qc6+

And again, 53.Qc2+ or 53.Qf4 g3 54.Ke2 Kh1

53...Kh2 54.Qd6+

Still missing the fastest checkmate.

54.Qc2+ Kg1 55.Qf2+ Kh1 56.Kf4 g3 57.Kxg3 h2 58.Qf1#

54...g3 55.Qf4 

Black to move

55...Kg2

55...Kh1 is more stubborn. 56.Qxg3 h2 57.Qf3+ Kg1 58.Qf2+ Kh1 59.Qf1#

56.Ke2 h2

Still 56...Kh1 holds out a few moves longer. 57.Qxg3 h2 58.Qf3+ Kg1 59.Qf2+ Kh1 60.Qf1#

57.Qf1# 1-0

The endgame was easy, but felt rushed even though I had almost half a minute left when it ended. Three minute chess is always frantic. 

29 November 2020

Endgame Study Database

Harold van der Heiden has released the sixth edition of his definitive Endgame Study Database. The first version was released in 1991 and contained 23,358 studies. Subsequent expanded editions were released in 2000, 2005, 2010, and 2015. Keeping with this schedule, he plans a seventh edition in 2025. The sixth contains 93,839 studies. Each edition adds to the size, while also correcting errors found in previous editions.

More information is available on his website.

When I initiated the purchase process this morning, he sent me a PayPal invoice. Shortly after I paid the invoice, I received an email with download instructions. I installed it in ChessBase.

Poking around among the pawn endings brought this position to my notice.

White to move

M. Zinar 2020

The solution runs 77 moves, but in fact everything is quite simple.

Perhaps after I have used this resource extensively, I can write a full review. For now, I can say that I've read about it for many years, and have been on the cusp of purchasing it more than once. This morning when I saw the new edition had been released, I acted within minutes. I'm happy that I did.

27 August 2020

Endgame Battle

In Wednesday's Morning Membership tournament, my round two game ended quickly because my opponent hung a piece early and gracefully resigned on move 20. That gave me time to watch Twitch, where Chris Bird was broadcasting the event. The top rated played in the event was struggling against a player who has given me trouble. The lower rated player exchanged queens into an endgame that Chris was sure should be winning for Black (the higher rated player), but the game finished in a draw.

Given that both players had perhaps twenty seconds remaining plus the two second increment when queens were exchanges, it is not surprising that both of them missed wins in the pawn ending. I found the errors instructive.

After the tournament, I downloaded this game, set up what I thought was a critical position where Black might have played differently, and proceeded to easily beat Komodo 13. I was less successful playing the queen ending, sustaining a slight advantage with White, but unable to find the win.

White (1386) -- Black (1994) [C01]
Live Chess Chess.com, 26.08.2020

White to move

30.Qxe8+

White exchanged into a lost pawn ending, but Black must play correctly to win.

One of my efforts against Komodo continued: 30.Qxb7 Qa4 31.Qd5 h5 32.Qc5+ Kf7 33.a3 h4 34.Qd5+ Kf8 White is better, but such positions are hard to play on a short increment, and I managed to find ways to lose.

30...Kxe8 31.Kg3 Ke7 32.Kf3 b5 33.Ke4 Ke6

White to move

34.d5+

White's move is technically best, but 34.g4!? presents Black a problem. 34...Kd6 is the only move. For instance, 34...a5 35.d5+ Kd6 36.Kd4 b4 37.Kc4+- and Black is the one in zugzwang.

34...Kd6 35.Kd4

Black to move

35...a5??

Yes, the queenside majority is the decisive advantage in the position. However, the position of the kings makes all the difference. The extra pawn on the queenside must be used to take the White king out of action long enough for Black's king to gobble up pawns on the kingside. See "Fox in the Chicken Coop". Or watch this video on my Facebook page: "Fox in the Chicken Coop".

A little patience reducing White's choices to gain a tempo or two by placing White in zugzwang is necessary to win this ending.

35...f5 would be my instinct, and the computer confirms that this move (or 35...h5) is necessary. My play against Komodo continued 36.Kc3. Why did the computer give up the pawn so easily?

In analysis of my game with the engine, I examined 36.g3 h5 37.f3 a5 38.g4 fxg4 39.fxg4

Black to move
Analysis Diagram

39...h4 is the only move. 40.a3 a4 41.Ke4 b4 and Black will win.

Continuing my game with the engine: 36...Kxd5 37.Kb4 Kc6 38.Kb3 a5 39.Kc3 Kc5.

Black's 35...a5 was not only not the way to win, but it gave White an opportunity.

36.a3??

36.g4! and White is winning. 

Black to move
Analysis Diagram

Black is in zugzwang. For instance, 37...b4 38.Kc4 and White will have the outside passed pawn on the queenside. 37...a4 is met with 38.a3.

Back to the game as played.

Black to move

36...b4??

I also played this position against Komodo: 36...f5 37.Kd3 Kxd5 38.Ke2 b4 39.a4 Ke4 40.Kd2 f4 41.Kc2 f3! 42.gxf3+ Kxf3

36...h5 is the alternative.

37.axb4 axb4 38.Kc4 b3 39.Kxb3 Kxd5 And the game was drawn by repetition after another dozen moves.