31 December 2024

Process

On the sixth day of my quest to study 300 carefully selected chess positions in 60 days, another speed bump was thrown in my way. I have worked through 15 pawn endings and now find myself at the 12th opening position. Thomas Engqvist, 300 Most Important Chess Positions (2018), writes, “At higher levels there are many subtleties when in the process of developing the pieces” (19). He proceeds to narrate an account of how Mark Taimanov developed the Sicilian variation that bears his name. This narrative sent me to look at his 1972 loss to Anatoly Karpov, and then to a book he wrote on the variation.

Other books, too, might be on the docket as I decide how much time should be given to this one position.

As I wrote in “Ten Books to Achieve 1800+”, I started playing the Sicilian Defense in the 1970s. In the late 1990s, I became enamored with the Kalashnikov variation and sought to memorize the critical lines, inevitably finding myself in trouble when White played a move outside my book knowledge. In 2003, I took up the French, which is not a better defense for Black. In fact, it might be worse. But, my approach to understanding the opening was altered.

Memorization of lines grows out of comprehension of the ideas, rather than the reverse. Now, Engqvist pushes me to comprehend the ideas in some move order nuances of Sicilian lines that I often reach via the French when White opts to play something other than 2.d4.

After writing and posting the above, I continued with the next positions in Engqvist's book. Three of today's five positions are from a single game (a feature I like about Lev Alburt and Al Lawrence, Chess Training Pocket Book II (2008)--one of the 300 positions series). Engqvist's analysis references some by the winner of the game, and his book of selected games has been ordered.

29 December 2024

Corresponding Squares

My quest to learn 300 chess positions in 60 days is proving time consuming. Most of the time that I could spare today was expended laboring to understand number 37. The first day was a review of some pawn endings that I know: positions 151-155 in Thomas Engqvist, 300 Most Important Chess Positions (2018). My quest is an effort to read all of this book in less than two months. On the second day, I reviewed some Paul Morphy positions that I know well. An obscure line in the Slav Defense captured my interest yesterday. Today, I went back into endgames with numbers 156-160 in Engqvist. Number 157 is a much analyzed study by Emanuel Lasker (some books employ the version published by Gustavus Reichhelm after Lasker and he discussed Lasker’s composition).

First, I set up Lasker’s position on my iPad and spent some time analyzing it. Then, I played against the engine, backing up and trying again when I failed. I have worked with this position in the past and knew the basic ideas, but have not developed well my ability to calculate the whole series of corresponding squares. Looking for help drove me into other books on the shelf. I confirmed that Jeremy Silman, Silman’s Complete Endgame Course (2007) lacks the position. I know that corresponding squares are mentioned early in Mark Dvoretsky, Dvoretsky’s Endgame Manual (2003) and the concept is trumpeted in Paul Keres, Practical Chess Endings (1974). I opted to check John Speelman, Endgame Preparation (1981) and was pleased with the instruction.

Speelman offers a digested version of what he found in Yuri Averbakh and Ilya Maizelis, Pawn Endings (1974), which I consulted later in the day. My process was to read some in Speelman, and then construct a position derived from Lasker/Reichhelm. First, I sought to find positions with Black to move that were winning for White. With all the pawns fixed as in Lasker’s study, I placed the Black king on a8. Where must I place the White king for the position to be winning if Black is on the move?

Black to move
Then, I repeated the process with Black’s king on b8. After several such efforts, I went back to Reichhelm’s version of the original study and played against the computer. Then, additional modifications and more play against the engine.

This version was one of the easier ones.

White to move
After many hours of play against the engine and study of several books, I have the sense that I am beginning to scratch the surface of this difficult position.


28 December 2024

Down a Rabbit Hole

My plans to race through 300 chess positions in 60 days took a detour this morning. At 5:50 am, I started the coffee and opened 300 Most Important Chess Positions to number 6. My study of this position did not cease until 8:00 am.

Although this position, like those from Paul Morphy’s games that I looked at yesterday, is one I’ve examined in previous partial readings of Thomas Engqvist’s book, today it raised questions that kept me hunting for more.

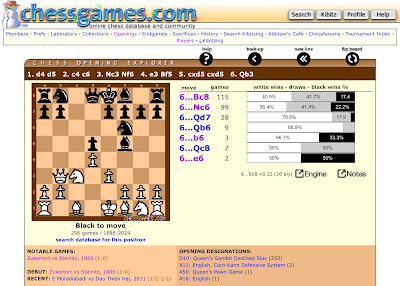
The position arose after Black on move 4 brings the bishop to f5, “(too) early”, Willy Hendriks wrote in The Ink War: Romanticism versus Modernity in Chess (2022), 338. Hendricks speculates that William Steinitz may have expected 5.c5, similar to game one via a different move order. But Johannes Zukertort sought to punish the inaccuracy with 5.cxd5 and Steinitz soon brought the bishop back to its starting square.

As late as 2011, Cyrus Lakdawala in The Slav: Move by Move asserted that 4…Bf5, the Reversed London, was unplayable after 1.d4 d5 2.c4 c6 3.Nc3 Nf6 4.e3 because of the problems Black faced in Zukertort — Steinitz, New York 1886, the fifth game of the first official world championship. Lakdawala notes, "Black experiences difficulties defending both b7 and d5." He offers four options and concludes that 6...Bc8 is best.

But, no less than three high level games were played in 2012 with a move that Lakdawala did not mention. With this “revolutionary improvement” that Engqvist presents vie Wojtaszek — Wang Yue, White’s queen snatches a pawn and then gets driven back to its starting square. “Black has good compensation since he is ahead in development and has seized the initiative” (16).
While taking the first sip of yesterday’s microwaved coffee (before the fresh pot of French press was ready), I decided correctly on Black’s initial move from the position, but then found the errors in the first line that I considered to chase the queen back. In both the line I began with and the one played by Wang Yue and other masters, the bishop retreats from f5.

5.cxd5 cxd5 6.Qb3

Position 5 in Engqvist

6…Nc6!

This move is the improvement over the old main line, 6…Bc8.

7.Qxb7 Bd7

7…Na5, which I considered first, has not been played, but not by masters. I saw 8.Bb5+ Bd7 9.Bxd7+ Nxd7 10.Qxd5 and it is clear that dropping two pawns was not Black’s idea.

8.Qb3 Rb8 9.Qd1 e5!

White to move

This is where Engqvist’s analysis ends. I could have stopped there, but the sequence leading to the position first grabbed my interest, then the lines played prior to 2012 sent me searching through books and databases. During two hours, I explored the opening tree and several games on chessgames.com, utilized the ChessBase iPad app, and then turned on my computer where I have three ebooks on the Slav Defense resident within ChessBase.

I looked at several games with the bishop retreating to c8. I explored move order nuances reaching the initial position. There is much to learn even though the basic concept Engqvist wants the reader to see is simple: through a somewhat logical developing move in what seems a difficult position, Black sacrificed a pawn for the initiative.

Wojtaszek — Wang Yue was played in October 2012. In May, Sabino Brunello was the first to play Black’s idea. In the Italian Team Championship, Black got a lasting initiative and prevailed through a tactical melee against Csaba Horvath. John Shaw also played Black’s idea in August at the Istanbul Olympiad against Luc Winants. Wang Yue was at that event.

The other four positions that I hope to examine today are all among those I have examined in the past. I recall that one or two of the others have also sent me down some rabbit holes. There is wisdomn in Engqvist's suggestion that the reader study five positions per week, rather than race through the book the way I am struggling to achieve.

27 December 2024

60 Days, 300 Positions: Day Two

Thomas Engqvist urges review as an integral aspect of the process of learning 300 chess positions. Today, I reviewed the first five positions in 300 Most Important Chess Positions (2018). Three of these appear among those in Rashid Ziyatdinov, GM-RAM: Essential Grandmaster Knowledge (2000), a book I labored part-way through more than a decade ago.

All five positions are derived from four games played by Paul Morphy. One, from a game against his father, is a position I had not studied prior to working through the first part of the book in February 2019, although I have a position from the game in my collection of exercises for students, Checkmates and Tactics (2019).

As noted yesterday, I wrote about the first position in the book shortly after it arrived in the mail. I noted there that two moves—both played by Morphy at different times—differ only slightly in their merits, but Morphy’s move in the reference game has been the dominant choice of masters. As both moves are playable, judgement is necessary. Engqvist’s observation that “one should avoid unproductive one-move threats” (14) is worth reviewing.

Positions 4 and 5 both derive from Schulten — Morphy, New York 1857, game 7 in GM-RAM. I have memories of attempting to imitate Morphy’s play in this game against a student in a blitz or rapid event a week or two after we had studied the game together. I remember his laugh as we found ourselves in the same opening. He won the tournament, but I won that game. Morphy’s play inspired my plans, but my young student avoided Schulten’s errors. That student achieved an expert rating as a high school student when he won the Spokane Falls Open in August 2019.

Both Engqvist and Ziyatdinov urged memorizing this game. Engqvist writes, “learn this model game by heart” (16). I had it lodged in my short-term memory when I was working through it with Ziyatdinov’s book about the time that I studied it with my young student, but I cannot completely reconstruct it from memory this morning.

Schulten, J. — Morphy, P.
New York 1857

1.e4 e5 2.f4 d5 3.exd5 e4!

I recall studying the opening stats and learning that 3…exf4 appears to score better. Nonetheless, I nearly always play 3…e4 here. I have had the position after 3.exd5 at least 426 times in online play. Black has won five games more than White. I've been White more often as the King's Gambit is an opening I play with some regularity. The first time that I played 3...e4 was in 2007 in a 15 minute game with a three second increment. I won in 45 moves.

My recollection of the game begins to falter here. I remember the next move, but with some uncertainty.

4.Nc3 Nf6

At first, I wrote Bb4 without sight of the board. I corrected the notation after checking the game score in 300 Most Important Chess Positions.

5.d3 Bb4

Of course, the timing of the bishop move is important, as here it pins the knight.

6.Bd2

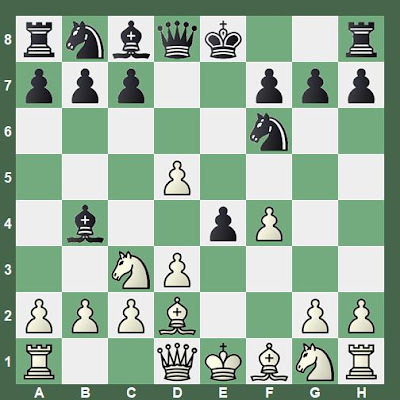
Black to move
This is position 4 in Engqvist’s book. It does not appear in Ziyatdinov as a key position.

6…e3!

I played 6...exd3 in that 2007 game, which preceded my study of Morphy's game. I played 6...e3 for the first time in 2016. winning that game in 48 moves.

7.Bxe3 O-O 8.Bxd2 Bxc3

I still struggle with Morphy’s choice here, as it is not clear to me how the exchange of bishop for knight implements the principle of development.

9.bxc3

Why not Bxc3? This was the move played against me in 2016. According to the engines, bxc3 appears slightly better that capturing with the bishop.

9…Re8+ 10.Be2

This game is one of several Morphy games that merit study because of his effective use of pins. When my memory of this game gets me to point, I always remember Morphy’s moves when I’m able to recall Schulten’s.

10…Bg4 11.c4

Would Schulten have been better off here with 11.Nf3? Stockfish 16 favors 11.Kf2.

Black to move
Position number 5 in Engqvist is position number 150 in Ziyatdinov.

11…c6! 12.dxc6??

I identified this move as Schulten’s critical error when I first studied this game in detail, and capturing this pawn was one of my own errors in one of the worst tournament games I have played (see "Knowing Better"). In that game, my opponent played 3...c6!? and things went downhill quickly for me.

12…Nxc6-+ 13.Kf1

This position is number 151 in Ziyatdinov and I had it once doing tactics training on Chess.com.

13…Rxe2!

Morphy’s exchange sacrifice that maintains one of the pins on e2 is reminiscent of the Opera Game.

14.Nxe2 Nd4 15.Qb1

It is difficult to find a move for Schulten here that makes sense. The position is resignable. 

15…Bxe2+ 16.Kf2 Ng4+ 17.Kg1

Black to move
Morphy has a forced mate in seven.

17...Nf3+ 18.gxf3 Qd4+ 19.Kg2 Qf2+ 20.Kh3 Qxf3 21.Kh4

Philip W. Sergeant, Morphy's Games of Chess (1957 [1916]), 229 ends the game score here, giving the moves to mate as a comment. Other books and some databases carry the game all the way to mate.

Both 21...Nh6 and 21...Ne3 finish the job. My students rarely find 21...Nh6 and then 22.h3 Nf5+ 23.Kg5 Qh5#.

26 December 2024

60 Days, 300 Positions: Day One

Thomas Engqvist, 300 Most Important Chess Positions (2018) has been in my possession about five years. I bought it early in 2019 (see “A New Book and a Morphy Game”). Often it sits on the shelf, but I read bits from time to time. I’ve studied some of the positions for my own edification, and used some with my students. This afternoon, I resolved to read the whole book in 60 days.

Failure may be expected. Life offers many opportunities that disrupt a disciplined schedule of study, as well as occasional challenges. But, perhaps, perseverance will get me through. I do not expect to blog the process every day and certainly will present only a fraction of the positions here. Readers who wish to know the contents of Engqvist’s book should buy a copy. It is not my intention to violate the author’s intellectual property.

Going through this book in 60 days is violation enough of the author’s work. He suggests five positions per week, not five per day. In my defense, I will note, however, his advice that a student needs “to integrate the positions into your conscious chess thinking as early as possible in your life” (6-7). I am 64 years old and have been reasonably serious about studying as well as playing chess since 1975.

Because of the nature of the book, I will not read it in sequence. Today, I did positions 151-155, the first five endgame positions. I use two of them routinely in my teaching. The ideas in the other three also occur while I’m working with students via other positions.

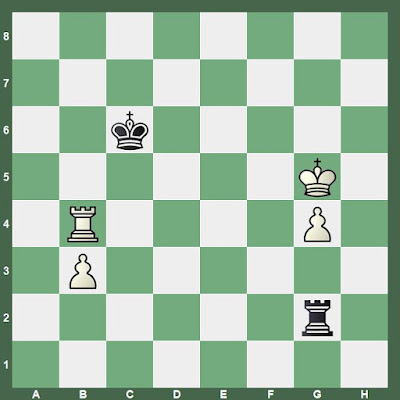
One of today’s positions intrigued me enough that I set it up to play against the computer on chessdotcom. Usually, I’ll play set-positions against Stockfish on my iPad or against one of several engines on my notebook computer with ChessBase and Fritz software installed. The website’s computer gave me the same frustration I usually find with elementary endgames on other devices: it did not make the moves that are most testing. The position is a Nikolai Grigoriev composition.

White to move

Unhappy with the computer’s move on chessdotcom, I also played this position on my iPad. That early version of Stockfish running on a weak processor started with the line Engqvist gives in the book, presumably the most testing.

1.Kg3 is White's only drawing move. Why?

If I could calculate deeply enough, I might recognize this square as the only one that assures I will be able to step onto b4 after Black plays Kxb6. White must take the opposition at that point.

1.Kh3 takes the distant diagonal opposition. Why does this effort fail? Black's shouldering manuever leaves the White king too far from the b-fil when the pawn on b6 falls. 1...Kc2 2.Kg4 Kd3 3.Kf3 Kc4 4.Ke4 White has taken the opposition with each move, but will no longer be able to maintain it when it matters.

Although Engqvist does not mention it, Kg3 begins an outflanking maneuver.

1...Kc2 is Black's critical try, as it leaves White only one drawing move. Chessdotcom's computer played 1...Kb2, giving me three three viable moves, including the option of seizing the distant opposition. Only after the subsequent 2.Kf2 Kc3 3.Ke3 Kc4, was there a single drawing move. In this case, it is an elementary outflanking maneuver. 4.Kd2.

2.Kf2 is the only move.

2...Kd3, is testing in the sense that White again has a single drawing move is offered in a variation in 300 Most Important Chess Positions.

2...Kd2 also leaves White a single drawing move.

3.Kf1 Kd3 4.Ke1 Kc4

Black to move
5.Kd2

It is clear that White's king will be able to reach b4 at the critical moment.

For the fifth time, White had only one move that draws. It would be nice if chess engine programmers could create an algorithm that has the computer choose the move that leaves the opponent a single choice to maintain the evaluation. Engines would become better training partners for this sort of endgame that way.


21 December 2024

Endgame Gambit

Black is clearly worse in the position. While playing it, I remembered some discussion with Gary Younker, then president of the Spokane Chess Club, about the difficulties he faced with a rook against three connected passed pawns. I neither had seen the game not studied the ending.

This post is a continuation of yesterday's "Rook vs. Three Connected Passed Pawns".

Black to move
With the memory of Gary's comments, I opted for the rook exchange. My opponent was Phil Weyland, one of the strongest youth players in my city at the time. He was a B Class player; I was in C class. The game took place during our Taxing Quads event in April 2002.

46...Rxd4+ 47.Rxd4 g5 48.Ke3

The right idea. The rook cannot battle the pawns alone.

48...Kg6 49.Ke4 f5+

White to move
50.Ke5!

Phil finds the only winning move.

50...h4 51.Rd6??

This move spoils the win. White had to play 51.Rd3, putting Black in zugzwang.
Analysis after 51.Rd3

51...g4 and here the intuitive 52.Kf4 is premature, due to h3 and 53.Rd8 leads to a position similar to that in Sam Shankland, Theoretical Rook Endgames (see yesterday's post).

51...f4 and White has several possibilities. 52.Rh3 Kh5 53.Kf5 (only move) g4 54.Ra3 f3 55.Ra8 and facing a mate threat, Black must surrender a pawn.

51...Kh5 52.Kxf5 is easy to see, as is

51...h3 52.Rxh3

51...Kf7 also allows 52.Kxf5

Phil's move looks strong because it wins the f-pawn by force, but Black has a drawing resource.

51...Kh5 52.Kxf5 h3!=

White to move
53.Rd7 Kh4

The only move to avoid checkmate.

54.Rd4+ Kh5

I found the drawing idea, but not yet. Perhaps, 55.Rg4+ worried me somewhat.

55.Rd8 Kh4 56.Rh8+

Phil forced me to find the right idea.

Black to move
56...Kg3

Here, the only legal move is one I could have played two moves earlier.

57.Kxg5 h2 58.Rxh2 and we agreed to a draw.


20 December 2024

Rook vs. Three Connected Passed Pawns

This position arose in a game that I played Wednesday morning online. It is a technical draw, but my opponent erred along the way.

White to move
Several moves earlier, I could have reached a favorable ending with the same material, except that my  understanding of rook vs. three connected passed pawns was deficient. 

Black to move
In haste to eliminate the passed b-pawn, I played 54...Rb1

54...Rd3 is better, as it prepares to get behind the b-pawn while also protecting the h-pawn with a threat on the f-pawn. 

55.Kxh3

Black to move
Tablebases reveal that Black has two winning moves here, but they do not explain the reasoning. I've spent a bit of time playing through tablebase lines in search of understanding.

I started looking through the 65 endgame books on my shelf. Few books are helpful. Reuben Fine, Basic Chess Endings has three pages on rook vs. three pawns, but these have limited application to the position before me. Ilya Rabinovich, The Russian Endgame Handbook has a page and a half with some of the same illustrative positions found in Fine. I have this book both in a print version and in the Forward Chess app.

Some useful analysis appears in Sam Shankland, Theoretical Rook Endgames.

In the game, I played 55...Rxb4?? 56.Kg3 Kg7 to reach the diagram at the top of the page. After several more moves, we reached this position.

White to move
My opponent's move here was the decisive error, but it took me quite a few more moves to find the winning idea.

65.Ke4??

Either 65.Kf2 or 65.Kg2 holds the draw.

Shankland has this position.

Black to move
Shankland points out that the king needs to step back and shuffle the king between g7 and h7. The h-pawn is secure because otherwise Black's other two pawns became a serious threat, although White can hold the draw. Shankland does not analyze this line in detail, stating only, "White is lucky not to be lost" after snatching the h-pawn (373). When I played the White side against two students on Thursday, I failed to hold the draw after snatching the pawn.

Shankland's position differs from that in my game, but the idea of shuffling the king back and forth on the second rank could have been known to my opponent from Theoretical Rook Endgames.

How Could I Win?


Back to the position after 55.Kxh3. My haste to eliminate the b-pawn was an error. Instead, there were two winning moves that I could have played. Lines following from either move require me to centralize my king.

a) 55...Kg7!

The best move, according to Stockfish.

After 56.Kg3, only one move wins.

Black to move
56...Kf6! 57.h4 Ke5!

Again, there was only one winning move.

58.f4+ Ke4!

Another only move.

White to move
After 59.b5, 59...Rg1+ is the shortest distance to mate.

59.g5 is the longest distance to mate, and now Black has 59...Kf5.

b) 55...Rg1 was also winning.

56.b5 Kg7! 57.b6 Kf6 58.f4

Black to move
58...Ke6!

The only winning move.

59.b7 Rb1

At this point, not earlier, it is necessary to stop the passed b-pawn. Afterwards, Black's king will move to d5 and then e4. For example, 60.Kg3 Rxb7 61.Kh3 Rb3+ 62.Kg2 Kd5 63.h3 Ke4 64.f5

Black to move
The pawn chain is vulnerable because of the placement of Black's pieces. Shankland's defensive idea fails here because the pawns all need to advance one square further.

In two games this week, I prevailed with a rook against three pawns. Analysis of these games showed that there is much that I can learn about these endings, which can often lead to interesting positions demanding precise play. 22 years ago, I chose to exchange my last rook for one of my opponent's rooks, reaching a ending where I had three connected passed pawns against a rook. I drew that game, but only because my opponent missed the right idea in a critical position. That is the subject of tomorrow's post, “Endgame Gambit”.


18 December 2024

Two Positions

When FM Jim Maki does game analysis at local youth chess tournaments, as he usually does, he always shows me some interesting puzzle positions. Last Saturday he showed me one that had been shown him by a chess parent, a strong player who was active in the Spokane Chess Club until his daughter was born. Now his daughter is playing chess.

I do not recall the exact placement of the rooks, but the solution for this position matches the one that Maki showed me.

White to move

Can you solve it?

Yesterday at an after school chess club, two players reached this position and then asked me whether it was a draw. I said that I would try to beat Stockfish on my phone while they played on. After I failed, I showed the position and the moves of my efforts against Stockfish on the demo board. I took White. 

Black to move
The young students saw many stalemate positions as we looked at my efforts together. I then positioned the pawns on the 5th and 6th rank to illustrate the difference it makes. Finally, I removed the Black pawn and placed the bishop on a light square, showing another sort of position where material superiority is of no value.

16 December 2024

Doing it Right

I had White and the move from this position a couple of days ago. As a couple of my students and I have been working on rook endings, I spent some time in post game analysis. I thought that I played the ending well.


32.Rxc8

32.Ree1 was worth considering, but I was aiming to simplify, trusting that I could prevail with minimal risk in a rook ending with a one pawn advantage.

32...Rxc8 33.Bxd4

33.Rg4 g6 34.Bxd4 Bxd4 35.Rxd4 was not even considered.

33...Bxd4 34.Rxd4

Black to move

34...Rc7?

This error gives me winning chances.

34...a5 35.Re4 Kf7 36.Re5 Rc1+ 37.Kg2 Ra1 38.Rxb5 Rxa2 more than likely leads to a draw.

35.Kg2 Kf7 36.Rd6 Ke7 37.Ra6 h6?!

37...Rd7 38.d4 keeps White's advantage minimal.

38.Kf3+-
Black to move

38...g5 39.Ke4 Rd7 40.d4 Kf6 41.g4!

Black to move
Black's options are limited. My rook is more active and my king is threatening to advance.

41...Rc7

41...b4 42.h3 Kf7 was a better option for Black.

42.d5 Re7

42...Rc2 43.Rxe6+ Kg7 44.Re7+ Kf6 45.Rxa7 Rxf2 46.Ra6+ Ke7 47.Rxh6 Rf4+ 48.Ke5 Rxg4+-

White to move
This position might serve as a training exercise.

43.Kd4

I considered 43.Rxe6+ Rxe6+ 44.dxe6 Kxe6 45.f4+- but did not correctly evaluate the pawn ending. That would have simplified the game.

43...Kf7 44.d6 Rb7 45.Ke5 b4

Better would have been 45...Ke8 46.Kxe6 Kd8

46.Rc6?

My first error in the ending.

46.Ra5+- and the rest is easy. 46...Ke8 47.Kxe6

46...Rb5+ 47.Ke4

Much of my advantage has slipped away.

Black to move
47... Ke8?

47...Rd5 48.f4 a5

48.Rc7+-

Aron Nimzowitsch assures me that this should be winning.

48...Rd5 49.Rxa7

49.Re7+ Kd8 50.Rxe6 Ra5 51.Rxh6 Rxa2 52.f4+-

49...Rxd6 50.Ke5

I was happy with this fork as I believed that the penetration of my king would be decisive even if several of my pawns came off the board.

Black to move

50...Rd2 51.Kxe6 Re2+

ChessBase auto analysis gives this move a question mark, but a greater depth of analysis by the engines concurs with Black's decision.

51...Kf8, recommended in the auto analysis is about the same. 52.f3 Rf2 53.Kf6 Rxf3+ 54.Kg6 Rh3 is not substantially different than what occurred in the game. 

52.Kf6 Rxf2+ 53.Kg6! Rxh2 54.Rb7 Rxa2

White to move

55.Rxb4??

I spoiled the win. Either 55.Kxh6 or 55.Rb8+ with 56.Kxh6 to follow would keep the win in hand. As often occurs with these online ten minute games, when I think that I played well, post game analysis with the help of my silicon friends reveals that I threw the game away with a terrible error.

55...Rg2??

My opponent returned the favor, and once again I am winning.

55...Rh2=

56.Kxh6 Kd7 57.Kxg5 Kc6

White to move

58.Rd4!

Cutting off the Black king from the side of the board where my king and pawn are ready to advance together assures me of reaching a Lucena Position.

58...Kc5 59.Rd8 Rg3 60.Kf5 Rxb3 61.g5 Rf3+ 62.Ke6 Re3+ 63.Kf6 Rf3+ 64.Kg7 Kc6 65.g6 Kc7 66.Rd1 Rh3 67.Kg8 Kc6 68.g7 Kc7

The Lucena position has been reached.

White to move

69.Rd5 Kc6 70.Rg5 Kd7 71.Kf7 Rf3+ 72.Kg6 and Black resigned.

06 December 2024

Poor Development

Konstantin Sakaev and Konstantin Landa, The Complete Manual of Positional Chess: Opening and Middlegame (2016) begins with development. They state, "everyone is aware of the rule [rapid development], but when it comes to practical play, one often sees players struck by 'amnesia'" (18). The first three examples show Mikhail Tal exploiting this amnesia when it afflicts normally strong players.

Wolfgang Uhlmann, the victim in the first example, annotated the game for Chess Informant 12. Tal's annotations appear in Life and Games of Mikhail Tal (1997). Prior to the game, Tal prepared a surprise for Uhlmann: his fifth move, which had appeared in some previous games and had been recommended by Alekhine.

1.e4 e6 2.d4 d5 3.Nd2 c5 4.Ngf3 Nc6 5.Bb5

The surprise! Uhlmann gives the move !? and the same annotation to his reply, which Tal reports that took more than twenty minutes off Uhlmann's clock (437).

Black to move
5...dxe5

Sakaev and Landa assert that this move is dubious.

6.Nxe4 Bd7 7.Bg5!

Tal, Uhlmann, and the authors of The Complete Manual of Positional Chess all agree on the excellence of this move, developing with tempo.

Other examples of amnesia recently came up in my reading and play. Leonid Stein fell to a beautiful attack by the relatively unknown Leonid Remeyuk in the 1959 Ukranian Championship. The game is annotated in P.H. Clarke, 100 Soviet Chess Miniatures (1963).

White to move
White played 10.Bxb5+ and Stein resigned nine moves later.

Clarke writes, "White is so indignant at the sight of the text move, which disdains the principle he himself has been so careful to keep, that he there and then determines to punish the offender" (78).

Another example was selected yesterday by my advanced students in an after school chess club. They started by looking for Adolf Anderssen's final assault in his first game against Howard Staunton at the 1851 London tournament.

White to move
Staunton's problems began early.

1.e4 c5 2.d4 cxd4 3.Nf3 e6 4.Nxd4 Bc5

4...a6 or a knight move is normal today.

5.Nc3 a6

5...Qb6 would at least apply some pressure on the knight.

6.Be3 Ba7 7.Bd3

White's lead in development should be abundantly clear. I tried to tell the students that Staunton had taken a journey through time on the T.A.R.D.I.S., met Ilya Kan, and learned some of Kan's ideas in the Sicilian Defense, but did not absorb the lessons well. They did not believe my story, finding time travel unlikely.

Black to move
In a rapid game this morning, I was presented with the opportunity to apply the lessons from these games.

White to move
15.Nxd5 Nxd5 16.Bg3?

And I blew it immediately. 16.Nxe6 rips open the center and defends the attacked bishop. Black's best response would have been 16...Nxf4, when White has several winning lines.

16...g5?? 17.Bh5

Again, Nxe6 is best, but this time my move is good enough to secure a decisive advantage.

17...Bg7 18.Nxe6! Qf6

White to move
I did not always find the best move with such a smorgasbord of winning choices, but I punished Black for poor development nonetheless. 


03 December 2024

Radiology

In a rapid game online this morning, I planned an attack well before conditions on the board were ready. My opponent failed to defend appropriately and the attack succeeded.

After some opening moves, we reached this position with White to move. I had White.


At this point in the game, I began to have fantasies about an attack along the f-file against a pinned knight. This attack requires a knight sacrifice on f7 to capitalize on the x-ray.

11.f4! gxf4

11...Bxe5 12.fxe5 Nd7 13.Qh5+-

12.Rxf4

12.Qf3 was better--battery 12...Rf8 13.exf4

12...Be7??

12...Rf8= anticipates White's threats and prevents them.

White to move
Now is the time!

13.Qe2

But. I thought that more preparation was necessary, planning to first double rooks on the f-file.

13.Nxf7!! Kxf7 14.Qh5+ Kg8 15.Qg6+ Kf8 16.Raf1+-

13...Bd7

13...Rf8 was still possible, neutralizing White's plans. 14.Raf1

14.Raf1

14.Nxf7 is less effective now 14...Kxf7 15.Qh5+ Kf8 16.Raf1 Be8 the point of Bd7.

14...Rg8

White to move

15.Nxf7! Kxf7

15...Qb6 16.Rxf6 Bxf6 17.Rxf6 Qxb2 18.Na4 Qb4 19.Nc5 is also winning for White.

16.Qh5+ Kf8 17.Qxh6+ Kf7

White to move

18.Be2?!

Throws away most of the advantage.
I considered 18.Bh7 Rg7 19.Qh5+ Kf8 but did not see the ideas clearly enough.

18...Rg6??

Black moves into forced checkmate.

18...Rg7 19.Bd3 (19.Qh5+ Kg8=) 19...Qh8 (19...Qg8 20.Rxf6+ Bxf6 21.Qxf6+ Ke8 22.Rf2) 20.Rxf6+ Bxf6 21.Qxf6+ Kg8 22.Ne2+-.

19.Qh7+ Rg7

19...Kf8 holds out longer 20.Qxg6 Be8 21.Qh6+ Kg8 22.Qg5+ Kf8 23.Rh4

White to move
White has a mate in five, which I saw to the end.

20.Bh5+ Kf8 21.Qh8+ Rg8 22.Rxf6+ Bxf6 23.Rxf6+ Ke7

23...Qxf6 24.Qxf6#

24.Rf7+ Kd6 25.Qe5# 1-0

02 December 2024

The Grob for Beginners

Beginners should not play the Grob.

Some may object to such a prohibition. Asserting it brings to memory my negative reaction to reading, “I cringe whenever I see 1600-players wheeling out the King’s Indian Attack” (3) in John Donaldson, A Strategic Opening Repertoire (1998). As a sub-1600 player with affection for the Reti Opening when I read this twenty years ago, Donaldson’s harsh words about the KIA seemed aimed at me, too. He states, "everyone should start with 1.e4 and 1.d4 and play classical chess at the beginning of his career” (3). My problem was that I had been playing chess thirty years and was still C-Class. Having learned the moves at age eight and started playing seriously at 15, I was hardly at the beginning of my chess career in my 40s. I thought I should be able to play openings that interested me.

My initial negative response to Donaldson's words were temporary. I agree with him. In fact, I find the so-called "recapitulation theory of chess development" useful pedagogically, even if it does not hold up as a description of most player biographies. See "On the Origin: Reading Journal" (2020). In several forum posts, I have offered the advice that a beginner should only play openings found among the games of Gioachino Greco--with White, that's the Italian, King's Gambit, and Queen's Gambit.

Beginning a game of chess with 1.g4 is clearly risky. The move has gone by many names, but today is most commonly called the Grob in honor of Swiss International Master Henri Grob (1904-1974) who advocated the opening in Angriff (1942) and employed it in correspondence games. The notorious criminal Claude Bloodgood (1937-2001) also employed it in correspondence chess and authored The Tactical Grob (1976).

A few days ago, a beginner played the Grob against me. The beginner in question favors 1.g4 and 1.Nf3 and was under 1200 after nearly 12 years and more than 8000 games on chessdotcom, although the player’s peak rapid rating is 1368.

Chessdotcom does not keep Explorer up-to-date. This data reflects a small portion of the player's games. Nonetheless, it serves to suggest that the Grob has not served him well.

One might object to the term “beginner” for someone who has been active on a chess playing site more than ten years. Although I use that term for everyone under 1200, regardless of how long they have been playing, I also have more than a few losses to such players.* Perhaps novice is a better term. This opponent, 1308 at this writing, is in the top 8% of players in chessdotcom’s pool. From another point of view, the player might be considered quite strong. Certainly he or she should have a plus score against those near the average rating on the site (the average rapid rating on the site today is 618).

Perhaps my advice should be modified somewhat. For a 1200 rated player, the Grob is not an ideal choice for developing the skills needed to rise above 1400. Nor is it a particularly good choice against a player rated hundreds of points higher. The Grob immediately gives Black a slight advantage. Nonetheless, it can be useful against an unprepared player who overestimates this slight advantage.

Here, then, is the game.

Internet Opponent — Stripes, J. [A00]
Live Chess Chess.com, 29.11.2024

1.g4 c6

My reply is not common and is not my usual response, but I have played it once before. I was thinking of a partially remembered line in Bloodgood's book where this move was played a few moves later. Bloodgood shows that it fails as an effort to protect d5 in that line.

Twelve years ago, I had the White side of this position. That game continued 2.e4 d5 3.exd5 cxd5 4.Bg2 Nc6 5.d4 g6 6.c3 Bg7 7.Qb3 Nf6 8.g5 and I won the d-pawn, eventually converting the advantage.

2.a3

This move does nothing for White's position.

2...e5 3.Nc3

In Bloodgood's line, both c4 and Qb3 are commonly combined with placing the bishop on the long diagonal. This move interferes with White's normal plans. The evidence so far is that White has chosen an offbeat opening, but has not taken the time to learn the principal ideas behind the initial move.

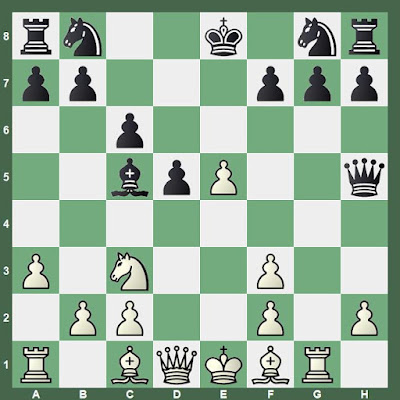
4...d5

White to move

Black has a strong center.

4.g5

White has a plus score on Lichess with this sacrifice.

4...Qxg5 5.d4

Perhaps many of those games on Lichess were played by players oblivious to the discovery.

5...Qh5!?

5...Qe7 is played more often here, but I like discouraging the move that White should have begun with.

6.dxe5 Bc5?!

Why not 6...Qxe5? Now, I'm trying to provoke 7.e3 to exchange queens. But also, 1.g4 weakens the e1-h4 diagonal, and I'm speculating that I might be able to use that. That I was able to shows that White's tactical sense needs considerable work--something that develops more rapidly when most games begin 1.e4.

White to move

7.Nf3

7.Bf4! secures the pawn and prepares Bg3, putting an end to my kingside fantasies. As with any opening, the board position makes demands to which the players must attend. My speculative sixth move looks silly if White responds appropriately.

7...Bg4 8.Rg1?? Bxf3-+ 9.exf3

Black to move

9... Qxh2

This fork picks up the e-pawn with tempo.

10.Rg2 Qxe5+ 11.Be2 Nd7 12.Rg5?

12.f4 at least chases the queen back instead of provoking Black to threaten checkmate.

12...Qh2 13.Bf1

13.Qd3 avoids immediate checkmate.

13...Qxf2# 0-1

If you are a novice or even stronger and want to play the Grob, at least do yourself the favor of looking at Bloodgood's pamphlet, The Tactical Grob. Also be aware that trotting out this opening against a much higher rated player means that you could be playing someone who knows the opening better than you.

*As many as 1/3 of them showed evidence of using assistance. 10% have been banned.