
At 9:00 pm, Wednesday 16 March 1921, Emanuel Lasker and José R. Capablanca sat down at the Union Club and Lasker's sealed move was opened so play could resume. Most annotators have viewed the endgame as did Amos Burn after White's 39th move, writing in The Field (and reprinted in American Chess Bulletin), "White now has a slight advantage, but not enough to win" (ACB, April 1921, 67). The critical position was reached ten moves into the day's session. In order to understand it more fully I played it out against Stockfish 13.
Black to move
 |
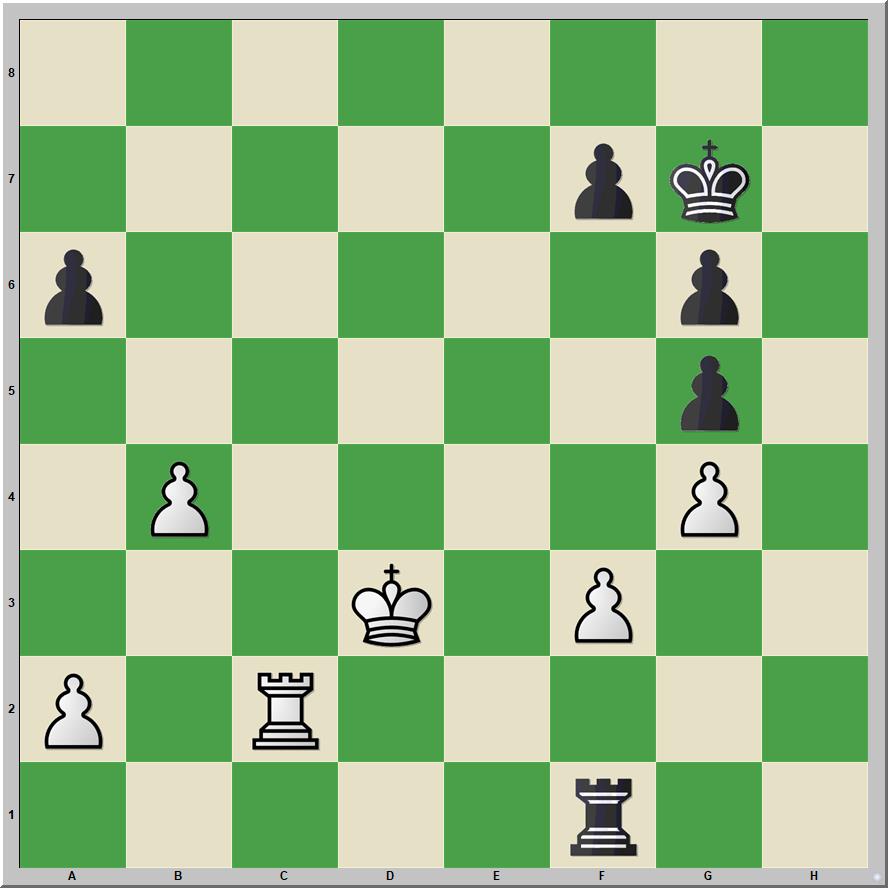
| After 32.g4 |
32...Qg5
The sealed move.
32...Qc8 might have been slightly better, according to my analysis with Stockfish 13.
33.g3 Rd6!
"Unquestionably the best move; with any other move Black would, perhaps, have found it impossible to draw" (Capablanca).
34.Kg2 g6 35.Qc4 Re6
"Also 35...Rd4 along with 36.-- Qxg4 would have been enough to equalize" (Lasker).
"Black cannot well avoid the exchange of Queens which results from this move; but though White remains with some positional advantage, any chance of winning is very remote" (Thomas, George A., British Chess Magazine).
36.Qxc5
Black to move

36...Qxg4 37.f3 Qg5
White to move

38.Qxg5 hxg5 39.Kf2 Rd6 40.Ke3 Re6+ 41.Kd4 Rd6+
White to move

42.Ke3
"The magazine of the Argentine Chess Federation made a win on 42.Kc5, but it is in the wrong position because it puts the a6 pawn on a5. Then 42.Kc5 Rd3 43.Kb6 Rxf3 44.g4 wins easily. But since the pawn is on a6, Rf6 is simple" (Lasker).
"42.Kc5 was too risky. The way to win was not at all clear and I even thought that with that move Black might win" (Capablanca).
"The only hope of winning seems to seems to lie in Kc5. But probably a draw is the legitimate outcome in any case. If 42.Kc5, there might follow 42...Rd3 43.Rf2 g4" (Thomas).
Lasker offers detailed analysis.
Lasker's Analysis
"Did White let go of the win on the 42nd move?"
42.Kc5 Rd3 43.Kb6
(for 43.Rf2!, see below, but also note above that Thomas saw this move.)
43...Rxf3 44.Kxa6
(44.g4 Rf6+ see Lasker's note above.)
44...Rxg3 45.b4 Ra3+ 46.Kb7 g4 47.b5 g3 48.b6 f5 49.Kc6!
Black to move
 |
| Analysis diagram |
a) 49... Ra6 50.Kb5 Rxb6+ 51.Kxb6 f4 52.Rg2 only move Kf7 53.Kc5 g5
White to move
 |
| Analysis diagram |
54.Kd4 g4 55.Kd3 Kg6 (Now 55...f3 is no longer possible) 56.a4 Kg5 57.Kd2
Black to move
 |
| Analysis diagram |
57...Kh4
(Or 57...f3 58.Rxg3 Kf4 59.Rxg4+ Kxg4 60.Ke1)
58.Ke1 f3 59.Kf1 "It almost looks like White can win."
"Black still has sufficient defense."
b) 49... Ra8!
I might add that Stockfish 13 find this to be the only move that holds; kudos to Lasker for pointing it out.
50.b7 Rb8 (On 50...Rf8 there would be 51.Kd5)
I might add that Stockfish 13 find this to be the only move that holds; kudos to Lasker for pointing it out.
50.b7 Rb8 (On 50...Rf8 there would be 51.Kd5)
White to move
 |
| Analysis diagram |
b1) 51.a4 51...f4 52.a5 (Or 52.Rg2 Rf8 53.a5 f3 54.Rxg3 f2-+) 52...f3 53.a6 f2 54.a7 Rf8
White to move
 |
| Analysis diagram |
55.b8Q f1Q 56.a8Q Qh1+ (Lasker)
b2) 51.Kc7 Rxb7+ 52.Kxb7 Now the white king is too far away. 52...f4 53.Rg2 Kf7
b2) 51.Kc7 Rxb7+ 52.Kxb7 Now the white king is too far away. 52...f4 53.Rg2 Kf7
White to move
 |
| Analysis diagram |
54.a4
(not 54.Kc6 Ke6 55.Kc5 Ke5 56.Re2+ Kf5 57.Kd4 f3 if the Black king comes into action more strongly than the White, White must be very content to get a draw.)
54...g5 55.a5 g4 56.a6 f3 "Black retains the preponderance." (Lasker)
Stockfish says the position is equal.
(not 54.Kc6 Ke6 55.Kc5 Ke5 56.Re2+ Kf5 57.Kd4 f3 if the Black king comes into action more strongly than the White, White must be very content to get a draw.)
54...g5 55.a5 g4 56.a6 f3 "Black retains the preponderance." (Lasker)
Stockfish says the position is equal.
Play Against Stockfish
42.Kc5 Rd3 43.Rf2 a5
(43...g4 Thomas 44.fxg4 Rxg3 45.Kb6 Rxg4 46.Kxa6)
44.Kb6 Rd5
White to move
 |
| Analysis diagram |
45.a4
On the fourth try, I found a promising idea.
45...Kg7 46.b4! axb4 47.a5
Breakthrough
47...g4
White to move
 |
| Analysis board |
48.a6 Rd6+ 49.Kb7 Rd7+ 50.Kc6
(50.Kb8 Rd8+ 51.Kc7 is better)
50...Re7 51.f4 b3
White to move
 |
| Analysis diagram |
52.Rb2 Re6+ 53.Kb5 Re7 54.Rxb3 g5 55.f5
Stockfish resigned here, which I thought was premature.
55...Kf6 56.Kb6 (56.Ka5 Kxf5 57.Rb7 is better) 56...Kxf5
White to move
 |
| Analysis diagram |
57.Rb4!
I tried 57.a7 Rxa7 58.Kxa7, and then quit as it seems similar to Lasker's analysis that led to a draw.
57...Ke5 58.Rxg4 Re6+ 59.Kb5 Re8 60.Rxg5+ Kd6 61.Kb6 Rb8+
White to move
 |
| Analysis diagram |
62.Ka5
(62.Ka7 Rb3 63.Rf5 Rxg3 64.Rxf7=)
62...Re8 63.Rb5 Kc7 64.Rb7+ Kc8 65.Rxf7
(62.Ka7 Rb3 63.Rf5 Rxg3 64.Rxf7=)
62...Re8 63.Rb5 Kc7 64.Rb7+ Kc8 65.Rxf7
Black to move
 |
| Analysis diagram |
After a check, I started walking my king towards the kingside, eventually reaching a Lucena position.
I conclude that Capablanca had a technical win, but was probably correct to avoid the risk that he perceived and keep the draw in hand.
Return to the Game
Black to move

42...Re6+ 43.Kf2 Rd6 44.g4 Rd1
White to move

45.Ke2
"45.Ke3 was the right move. It was perhaps the only chance White had to win, or at least come near it" (Capablanca).
45...Ra1 46.Kd3
"Had the King been at e3 he could go to d4, which would have gained a very important move" (Capablanca).
46...Kg7 47.b4 Rf1
"Best. Black, however, would have accomplished nothing with this move, had the White King been at d4" (Capablanca)
White to move
48.Ke3
"The remainder of the game needs no comments" (Capablanca).
48...Rb1 49.Rc6 Rxb4 50.Rxa6 Rb2 ½-½
Capablanca 2:44 - Lasker 2:35
"After fifty moves in all had been recorded, the draw, which was pretty generally anticipated, was agreed upon." "Lasker-Capablanca Match at Havana", American Chess Bulletin, 18, no. 3 (March 1921), 45.
I do not find that the press does justice to the complexity of Capablanca's decision at move 42. Set up that position and train from it.


Great chess set in the picture, is it yours? What is the history and age of that design?
ReplyDeleteThe set in the banner was a gift about fifteen years ago from relatives who bought it during a Panama Canal cruise. I've seen similar sets on eBay.
Delete