31 January 2017

Missed Chance

Baskaran Adhiban won the challengers group in the 2016 Tata Steel Chess Tournament, earning a position in the top section this year. He stood one place above last after four rounds, having lost two games and drawn two. The commentators were beginning to discuss how the winner of the challengers group often gets clobbered when they move up to the top group.

In round five, Adhiban put an end to this conversation. He beat Sergey Karjakin! He did not lose another game through the rest of the tournament and finished tied for third place with Wei Yi and Levon Aronian.

He might have finished even stronger. In round eleven, he reached this position against Magnus Carlsen, who finished the tournament in second place.

Black to move

The game ended in a draw. Can you find the combination that Adhiban missed?

Hat tip to Daniel King's PowerPlayChess video on this game.

30 January 2017

Researching a Rook Ending

A rook ending that came up in Chess Mentor on Chess.com sent me to the books. The first two moves were easy, but then I lost my way. Once I absorbed the basic idea and found the correct answer within Mentor, I tried it again against Stockfish on the iPad. I went down several blind alleys before finding the correct route.

After learning to win the position easily against the computer, I went in search of additional instruction on this ending in my books. I pored through ten endgame books, including three that are entirely about rook endings, and did not find the position.

It does not appear in Grigory Levenfish, and Vasily Smyslov, Rook Endings (1971 [1957]); in Nikolay Minev, A Practical Guide to Rook Endgames (2004); nor in John Nunn, Nunn's Chess Endings, vol. 2 (2010). I also checked endgame books by Yuri Averbakh, Mark Dvoretsky, Reuben Fine, Mikhail Shereshevsky, and Jeremy Silman. In addition, I checked Smyslov, Vasily Smyslov: Endgame Virtuoso (1997); and Karsten Mueller, and Frank Lamprecht, Fundamental Chess Endings (2001). The last of these had the nearest equivalent, a version of the Kan ending below, but with more work to be done by the stronger side as the pawn behind the rook has not yet moved. That position is from Ivanchuk -- Yusupov, Horgen 1995 (Mueller, and Lamprecht, 198). The solution, however, is completely different due to the exigencies of the position.

The position in Chess Mentor purportedly comes from a game Smyslov lost to Mikhail Botvinnik in their 1954 World Championship match. The first match game, Smyslov -- Botvinnik, Moscow 1954 reached this position after 52...Ra3.

White to move

Smyslov played 53.Kh3 and resigned five moves later.

Had play continued instead 53.Kf2 a4 54.Kg2 Ra1 55.Ra5 a3 56.Ra7, the game would have reached the position that I found in Chess Mentor. This lesson appears in "Rook and Other Endgames", a course created by Jeremy Silman. From the position in the photograph above, the student is presented with these directions.
This endgame would be confusing to most players, however a good understanding of Variations One and Two immediately tells you the dream positions that you would like to achieve. This shows that a working knowledge of basic situations allows you to easily solve otherwise difficult problems. In the position in question, Black must decide when to take on g5 and when to push his a-pawn to a2.
Silman, "Rook and Other Endgames," Chess Mentor, Chess.com
Silman's assertion that Botvinnik played this ending is thus somewhat misleading. That it did not occur in an actual game also serves to explain its absence from textbooks.

Some of the pitfalls that White must avoid are easily found in books. For example, after many moves, Black might threaten a skewer. Minev, A Practical Guide to Rook Endgames presents this position almost at the very beginning of the book (12).

White to move

In my database, I found another game played in the Soviet Union a few years before Smyslov -- Botvinnik that reached a final position where White could no longer avoid this skewer.

White to move
After 65...f4
In Rabinovich -- Kan, Moscow 1935, White resigned in this position. Silman's course offers several exercises almost identical to this position that guides the student to understanding why White chose to resign. White either blockades the pawn with 66.Kf3, allowing 66...Rf1+ and promotion of the pawn, or permits the skewer after 66.Kf2.

I did not initially see a final position like that in Kan's game from the position in Chess Mentor, but nonetheless understood that advancing the a-pawn first created such threats.

Chess Mentor Screenshot
After a couple of correct moves, Silman points out that Black has moved his king towards the center. His note refers the user to "Variation Five", a perplexing reference (see comments on Chess Mentor below). In any case, I was able to discern through trial and error the correct plan and complete the lesson. Then, I played it out against Stockfish with colors reversed.

Stripes,J -- Stockfish
30.01.2017

1.h7 Rh3+ (in Silman's lesson, White shuffled the king between a7 and b7) 2.Kxb4 Rh4 3.Kc3 Rh1 4.Kd3 Rh2 5.c5! bxc5 6.c4

Black to move

This position is "a well known theoretical win," according to Silman. Naturally, I thought it must be in some of my endgame books. In my battle with Stockfish, I tried getting my king to b5, which was possible. However, Black simply sticks the rook on h5 and shuffles the king between a7 and b7. I discovered that I needed to walk the other way.

In my second game against Stockfish, I set up the position with the colors as they are in the lesson.

Stockfish -- Stripes.J
30.01.2017

1...a2 2.Ra6+ Kxg5 3.Ra5 Kf6 4.Ra3 Ke6 5.Ra5 Kd6

This time I headed in the right direction even prior to advancing my f-pawn, a slight inaccuracy it would seem from Silman's lesson, but one that did not matter against Stockfish.

6.Ra8 f4 7.gxf4 f5 8.Ra5 Kc6 9.Ra8 Kb5 10.Ra3

Black to move

10...Kc4 11.Kh2 Kd4 12.Kg2 Ke4 13.Ra5

I unnecessarily expended time worrying about 13.Ra4+, thinking the rook could stay there. But, then I realized that White cannot plant the rook and shuffle the king because I can play Kf3 either forcing the rook to abandon protection of the pawn or walking into checkmate with Ka3.

13...Kxf4 14.Ra8 Ke5 15.Re8+ Kd6 16.Rd8+ Ke7 17.Rd2 f4 18.Rf2

Black to move


18...Rg1+ 19.Kxg1 a1Q+ 20.Kg2 Qc1 21.Ra2 Qe3 22.Rf2 Kf6 23.Rf3 Qe4 24.Kf2 Kf5 25.Rh3 

Black to move

At this point matters are quite simple. The exercise is over. However, Stockfish is not set to resign, so I play until checkmate or abandon the game. The rest of the game required only a few seconds.

25...Kg4 26.Rh8 Qd4+ 27.Ke1 Qxh8 28.Kd2 f3 29.Kc2 f2 30.Kb1 f1Q+ 31.Kc2 Qd4 32.Kb3 Qb1+ 33.Ka3 Qdb4# 0–1


Some Thoughts on Chess Mentor

Chess Mentor was developed several years ago as stand alone software. It remains available as such through their website. In addition, at some point several years ago, the owners of Chess.com purchased the rights to this product. The entire package is embedded within Chess.com's "Chess Lessons" (version three), where it was called "Chess Mentor" under versions one and two. It is available to premium members.

Embedding stand alone software into a web-based format was not accomplished seamlessly. Comments such as Silman's reference to "Variation Five" do not reference anything that can be found under that name in the web version. Sometimes, as in this particular exercise, the carefully crafted teaching modules of Chess Mentor break down.

The original Chess Mentor also offers a "hint" feature, but Chess.com's site design does not implement this feature.

In general, the lessons in Chess Mentor are well designed. I am finding it useful to go through elementary level lessons in search of ideas to use in my teaching, and more challenging lessons as an aid to my own improvement. The lack of an embedded hint feature often leads to blind trial and error until I stumble across the correct move. That groping in the dark can provoke frustration.

Chess.com also gives users a "Lessons" rating. One would not expect to gain rating points from a lesson rated far below one's current rating. However, I have made every correct move in dozens of easy lessons only to discover that I scored 94% and suffered a rating loss of 10 points. I care little enough for the rating, but the logic of 94% for a string of correct moves mystifies me.

It seems to me that Chess.com could invest some of the money it collects from premium users to hire people who can edit the comments to remove references that lead no where and to debug the rating and evaluation system. On the other hand, maybe the technical difficulties of such a task are overwhelming.

The "Lessons" on Chess.com are useful with a few caveats.

28 January 2017

Breaking Bad Habits

Against the London System with the Black pieces, I frequently find myself in this position.

White to move

My opponents have tried several moves. Generally, my score is very good, unless they let me take the b-pawn.

5.Nc3 Qxb2?

Or sometimes 5.Nc3 cxd4 6.exd4 Qxb2?

In both lines, I fail to anticipate White's reply Nb5.

This habit of snatching the poisoned pawn should always be punished, but sometimes my opponents also err. A couple of days ago, I won a short game from this position because my opponent answered my errors his own. The result is an instructive miniature that might be termed more appropriately a blunderfest. Neither player's moves should be emulated.

Internet Opponent (1993) -- Stripes.J (1966) [A46]
Live Chess Chess.com, 26.01.2017

1.d4 e6 2.Nf3 Nf6 3.Bf4 c5 4.e3 Qb6 5.Nc3 cxd4 6.exd4 Qxb2?

6...Nc6
6...Be7

7.Nb5 Bb4+

Realizing that I had blown it once again, I lashed out desperately.

White to move

8.c3?

8.Bd2 Bxd2+ 9.Nxd2 0–0 10.a3 a6 11.Rb1 Qa2 12.Bc4 Qxb1 13.Qxb1 and White has a clear edge.

8...Bxc3+ 9.Bd2 Bxd2+ 

9...Qa1 favors Black

10.Nxd2 Na6?

10...O-O was necessary

11.Rb1

11.a3 was also possible.

11...Qxa2 12.Ra1 Qb2

White to move

13.Rxa6?

There was no reason to give up a rook to win a rook. 13.Qa4 leaves White with a superior game.

13... bxa6 14.Nc7+ Ke7 15.Nxa8 Bb7 16.Nc7 Rc8 17.Nxa6 Rc1 0–1

When my opponents fail to punish errors, these errors may be repeated in future games. Over time, bad moves become habits that can be difficult to alter in similar positions. When such errors are punished the first time they are played, or when every game in carefully analyzed with an eye for the refutation of dubious looking moves, these bad habits are less likely to develop.

Once established, however, bad habits can become the cause of many painful losses. I must stop eating the poisoned pawn.


27 January 2017

Solve This

Round two of the Spokane Chess Club Winter Championship brought me another victory, but only because my opponent miscalculated at the critical moment. I was objectively lost, but when he misplayed the attack, my fortunes turned in a hurry. A few moves later, I was up a piece and he graciously resigned.

White to move

He saw the correct move here, but missed the second move of the combination. As a consequence, he did not play the correct move. I showed him the solution during postgame analysis, although I, too, missed the shot during the game.

26 January 2017

Lesson of the Week

I presented a variation from Mayet -- Andersson (1851?)* to my students this week. Although this variation begins with a Black move that is superior to that played in the game, White's drawing (or even winning) chances are better than in the famous miniature.

Mayet,Carl - Anderssen,Adolf [C64]
London London, 1851?

1.e4 e5 2.Nf3 Nc6 3.Bb5 Bc5 4.c3 Nf6 5.Bxc6?!

This move strikes me as anti-positional. It is never played by strong masters today. Mayet -- Anderssen is the only instance of this position having been played by masters. White's idea with such a capture in other lines of the Spanish is to remove the defender. The advanced club spent some time trying to work out a refutation of 6.Nxe5 after the move played in the game. The line seems playable for both sides. Hence, while anti-positional, it does not fail tactically. However, White should be playing for an advantage and this move squanders that opportunity.

Better moves for White are 5.d3, 5.d4, or 5.0–0.

5...dxc6 6.0–0 Bg4 7.h3 h5!?

The fishing pole.

7...Bxf3 is better.

8.hxg4

8.d4 Bxf3 9.Qxf3 exd4 10.Rd1 leaves White with a slight advantage.

8...hxg4 9.Nxe5?

9.d4 Nxe4 10.g3 gives White the edge. We did not look at this position.

9...Nxe4!

This move marks the beginning of our variation, which leads to a forcing sequence at the end of which Black seems to have the edge.

9...g3? was played in the game.

White to move

10.Qxg4

10.d4 Qh4 and checkmate follows.

10...Bxf2+ 11.Rxf2 Rh1+

The critical decoy.

12.Kxh1 Nxf2+ 13.Kg1 Nxg4 14.Nxg4 Qd3

The computer prefers 14...Qh4 15.Nf2 0–0–0. I have played the Black side of this position against the computer and lost, but have won against the same engine from the position after 14...Qd3, so I prefer it.

I showed this much to the beginning students and then gave them the worksheet Beginning Tactics 2. The advanced students played out this position against Stockfish on my iPad. We made the moves on the demo board and played there.

White to move

Playing set positions from the side that has an advantage is an excellent way to train with a computer. You start with the knowledge that you have a good position and then seek to convert the advantage against resourceful defense. As often happens, errors will be punished.
White's fifteenth move is move one below.

Stockfish -- Advanced Club
28.01.2017

1.Na3 0–0–0 2.Ne3 Rh8

See below for 2...f5

3.Nac4 Qh7

The computer likes 3...Rh5. Such a move, improving the mobility of the rook, is not so easy for my students to find.

4.d4 Qh1+ 5.Kf2 Qh4+ 6.Ke2 f5 7.Nf1 g5 8.Ne5 f4

8...c5! was not considered by my students. They realize that White will soon have all four pieces in the game, so they play for checkmate. Alas, they do not see how to bring this about. What else can they do? Removing a weakness--doubled pawns--in one option.

9.dxc5 would be a blunder in the light of 9...Qe4+ forking knight and king.

9.Bd2

Black to move

9...Re8

Not certain how to proceed, the students opted to pin the knight.

10.b4

After the computer played this move, I pointed out that Black was threatening c6-c5.

10...Qh5+ 11.Kf2 g4?

11...Rf8 prepares this move.

12.Bxf4

One of the pawns lost for no reason.

12...Rf8 13.g3

Black to move

According to the engine, the position is now equal. However, White will continue to improve piece mobility, while Black's position has become difficult to play.

13...Qf5

13...a5 strikes at White's pawns. In general, when playing with a queen against a player that has none, but has other pieces of equivalent value, the player with the queen should seek to open up the position to create tactical opportunities for the queen. That is what I din in the game below, although it was only good enough for a draw.

14.Ne3 Qh5 15.N3xg4 Qf5 16.Ne3 Qh5 17.Re1 Qh2+ 18.Ng2 Qh5 19.g4 Qh3 20.Ng6 Rf6 21.Re8+ Kd7 22.Re3

Black to move

Black's position obviously has deteriorated. Perhaps during some future lesson, we will go through the previous eight moves to see where Black might improve.

22...Qxg4??

Steps into a a tactical opportunity for White.

Black remains worse after 22...Qh6 23.Ne5+ Kc8 24.Kg3 Qf8. However, this line is better than in the game.

23.Ne5+ Kd6

23...Kd8 at least does not step into a forced checkmate.

24.Nxg4+ Kd5 25.Re5+ Kc4 26.Rc5+ Kd3 27.Ne1+ Ke4 28.Nxf6+ Kxf4 29.Ng2# 1–0

After I returned home, I played another rapid game against my iPad from this position. I did not do as well as I had from the same position as a few years ago (see link below).

Stockfish -- Stripes,J
28.01.2017

1.Na3 0–0–0 2.Ne3 f5 3.Nec2 a5

3...g5 is better. When the computer thinks long enough, it finds an even better move. Black has a forced checkmate in eleven. See if you can find this sequence.

4.Ne1 Qe2 5.Nac2 Re8 6.d3 Qd1 7.Be3 Qh5 8.Nf3 g5?

I also gave away a pawn, but my plane was to exchange my rook for two minor pieces. Unfortunately, this decision substantially reduces my winning chances.

8...f4 9.Bxf4 Qb4 exchanges the f-pawn for one of White's pawns on the queenside. It also leads to a position where the mobility of Black's queen increases.

9.Bxg5 Rg8 10.Re1 Rxg5 11.Nxg5 Qxg5 12.Re8+ Kd7 13.Re2 c5 14.Ne1 b5 15.Nf3 Qc1+ 16.Kf2 Kd6 17.Ne5 Qf4+ 18.Nf3 a4 19.Re1

Black to move

19...b4 20.a3 bxc3 21.bxc3 Qg4 22.Re2 Qg7 23.Ne5 Qg8 24.Ke1 Qb3 25.Nc4+ Kd7 26.Kd2 Qa2+ 27.Kd1 Qb1+ 28.Kd2 Qa2+ 29.Kd1

29.Ke3 f4+ 30.Kf3 Qb3 and more pawns will come off the board. Maybe Black has a slight advantage.

29...Qb1+ 30.Kd2 Qa2+ ½–½


*See "Training with Anderssen" for a historical note that highlights ambiguities concerning when and where this game was played. In that link, there is also another variation played against a computer.

24 January 2017

Blitz is Hard

My Chess.com blitz rating has risen to dangerous heights, making a fall inevitable. When that fall comes, my self-discipline will be tested. Will I continue to limit myself to a small number of games each day and analyze them afterwards? Will I resume poor habits that reveal my blitz addiction?

Last Tuesday, I finally surpassed my own personal best blitz rating of 2005 from February 2016, rising to 2015. The next day. I lost my first game, then won two and quit. My rating lifted to 2015. Thursday, I achieved the third new peak in three days--2041--again with one loss, followed by two wins. I played two games on Friday, none Saturday, and two on Sunday and my rating remained at 2041. Yesterday, I lost two, but then played two more and won both, achieving a fourth peak in seven days--2043.

The crash occurred today with four straight losses. The fourth game was difficult. I was certain that I was winning during the messy finish. After my opponent's blunder, 39.Rdd2??, I had this position.

Black to move

39...Qb3+ was obvious enough. 40.Kb5 and now what. I have 25 seconds and my opponent 21. There is no increment.

I went on to lose this game. When I analyzed it later, I started with this position (engines off) and immediately thought that 40...Kh2 might have been better. 41.c6 seems a viable try when 41...Rd5+ is met with 42.Rc5 and Black does not have a checkmate in sight.

Turning on the engine revealed that the best move was 40...Rd5, but also that my move was good enough to maintain a decisive advantage.

41...c6+ Kb6

Black to move

The game concluded 41...Rxd4?? 42.Qe8+ Bd8+ 43.Qxd8+ Rxd8 and I resigned before my opponent could play 44.Rxd8#.

Bringing the bishop to d8 was the correct idea, but there was no reason to open the d-file for my opponent's rook. With enough time to calculate, I might have found 41...Rd3!! This move frees the d8 square for the bishop, while also protecting the bishop on its current square.

However, if White snatches the rook, it also seems to offer his king escape.

42.cxd6 Bd8+ 43.Kc5 and now Ka7

White to move
Analysis after 43...Ka7
44.Qxc6 is White's only way to avoid checkmate.

44...Bb6# was threatened. If White tries to provide an escape route for the king with 44.d7, then 44.Be7+ deflects the queen 45.Qxe7 Qd5#.

I had nineteen seconds remaining when I played 41...Rxd4. That was not enough for me to work out the correct plan.

I played one more game after this loss, which I won. Then, I quit for the day. At least my current rating of 2021 is higher than it was last Tuesday.

20 January 2017

Fiddling with the London System

In the first round of the Winter Championship at the Spokane Chess Club last night, I played an opponent who has been difficult for me. We first played forty years ago in a match between our respective high schools. There may have been some other games after that, but the oldest game in my database is from my first USCF tournament, which was March 1996. I had White, played the King's Gambit, gained a slightly better position, and then lost.

Although I have been higher rated than him for most of the past twenty years, we have a nearly equal score. I believed last night when the game began that I was at +1, but a check of the US Chess Federation's website reveals that I am +2 until last night's game is rated.

My struggle against this opponent is a struggle with myself. My weakness in chess tournaments is playing to the level of my competition. Instead of playing the board and finding the best moves, no matter who is sitting across from me, I take unnecessary risks against weak players. Players in C Class seem weak to me now that I have risen well above that level, but they are strong enough to exploit stupidity.

Patrick Kirlin's excessive nervousness at the chess board compounds my tendency to play the player, rather than the board. Indeed, I credit my compassion for his time trouble and panic as the cause of letting a slightly better position deteriorate rapidly in that game in 1996. It is fine to be friendly with opponents before and after the game, and to be polite at the board, but compassion has no place in competition during the battle. I need the focus of my friend John Julian who looks at me as if I am his most hated enemy when we play each other (see "City Championship, Game One").

Last night, I had White. After thinking about various opening plans, I opted for the London System. I have been playing this opening a bit in online blitz lately, but I think this was my first game in the system in over the board play at standard time controls. The London System is not particularly ambitious for securing an advantage from the opening with the White pieces, but may suit my interest in playing for a long endgame--a strategy that often produces success against players at all levels in our local pool.

Simon Williams, in one of his YouTube videos advertising a DVD characterizes the London System, "a great opening for the lazy players out there." Dejan Bojkov, in a video about an instructive miniature in the London, offers another view: "Whenever you play the London System, you expect people to fight for a very long time." Indeed, this long fight is why players like Vladimir Kramnik, Gata Kamsky, and even Magnus Carlsen have played it. Carlsen's play, in particular, inspired me to give it a try.

Stripes,James (1791) - Kirlin,Patrick (1410) [A48]
SCC Winter Championship Spokane (1), 19.01.2017

1.Nf3 Nf6 2.d4 g6 3.Bf4

3.c4 might be more sensible than trying to force every game into a cookie cutter London System, but this was my initial foray with the London.

3...Bg7 4.Nbd2

White's scoring percentage is poor after this move. Looking back, I do not comprehend why I played it.

4.e3 is the normal move.

5.e4

I was thinking about my teaching of children and how often I tell them, "if your opponent lets you put two pawns on e4 and d4, you should do so." This teaching compelled me to play this move, grabbing space. However, both 5.c3 and 5.e3 is more in keeping with the needs of the position. White must prepare the e4 push. In this respect, the London System bears similarities with the Colle System.

5...d6 6.Bd3

6.c4 was my move when I had the same position in a blitz game in October 2016. I won that game quickly.

6...Nh5

Given who I was playing this move was expected. Although I more or less invited it, I also may have underestimated it.

6...c5 7.c3 cxd4 8.cxd4 e5 should give Black a slight edge.

7.Be3

At this point in the game, I recalled that often in Paul Morphy's games he would have all of his minor pieces in play while his opponent had but two or three. After this move, my opponent left the board seemingly in a panic. His behavior at the tournament director's table seemed to indicate that he was in search of a different writing instrument. I learned about ten minutes later that his intention was to create a distraction. He wrote the name of America's worst mistake on his forehead, and then made certain that I looked at his forehead when he returned to the board. He said, "it is to psych you out."

I have engaged in a few behaviors that have irritated him in years past, albeit never with such explicit intent. For instance, once I came to chess club with some apple juice in a whiskey flask. It had no effect on my opponent that night, a former US Army Ranger. However, when Pat walked into club and saw the flask, his distraction could be read on his face. I also routinely place a captured pawn behind the clock to stymie the calculation of those who do their material count off the board.

I told the tournament director that my opponent's behavior was a violation of the rules, but did not press the matter. Spokane tournament chess is friendly competition. A few bad behaviors are tolerated within reason. A cell phone rang later in the round and the player on the other side of the board declared loudly, "you just forfeited." However, the threats to forfeit those whose phones ring during play is mostly talk. It was the first instance for this particular player. Another regular at club has a ringing cell phone nearly every event. We make it a point to remind him before round one of weekend Swiss events, when there are many players from out of town.

7.Bg3 did not seem like a good idea.
7.Bg5 merits consideration. 7...h6 8.Be3.
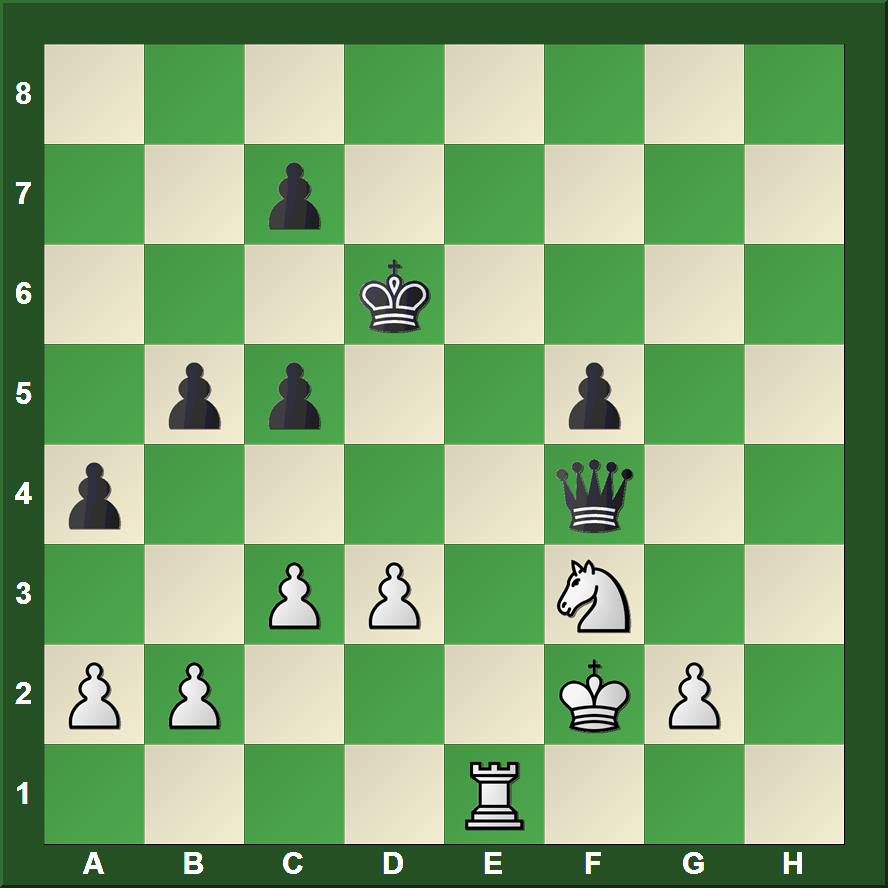
Black to move

7...e5 8.c3?

After brushing off the explicit effort to distract me as of no consequence (I said, "I've made my peace with the coming apocalypse"), my first move upon my opponent's return to the board was an error.

8...Nf4 9.Bf1

My intention was to play g3 after preparation, perhaps h3 or h4. Unfortunately I looked at the knight going back to h5, overlooking the value of the e6 square as a posting for the knight. This oversight became more serious a few moves later.

9.Bxf4 exf4 occupied my thoughts for several minutes. I preferred to avoid both giving up the bishop pair and creating a phalanx of pawns for my opponent on the kingside. In retrospect, I should have snapped off the knight.

9...b6

I started thinking that my opponent was planning to help me secure the h3 square so that I could play g3.

10.Qc2 Ba6 11.c4?

My move severely weakens the d4 square. Failing to notice such things stems from short-term tactical responses without considering long-term positional consequences. Playing to the level of my opponent is one cause of these mental errors. Playing too much online blitz is another (see "Good Blitz, Bad Blitz").

11.Bxf4 is probably still a move that I should have considered more seriously.

11...c5 12.dxe5?

12.d5 is objectively better. I considered that having more space could be useful, but did not like closing the center. It was probably a better decision to close the center and remove Black's knight.

12...dxe5 13.0–0–0

I hoped to play Nb1–c3-d5 after castling, but quickly realized that my opponent would need to make a few terribly weak moves to facilitate this maneuver.

13...Nc6

White to move

14.Bxf4 exf4

14...Nb4 15.Qb3 exf4 16.a3 Nc6 17.Nb1 Qc7 18.Nc3 seems to give Black the edge.

15.Nb3 Nd4

With 15...Qf6 Black has a clear advantage, when neither 16.a3 nor 16.Kb1 are fully adequate.

16.Nbxd4 cxd4 

16...Bxd4 17.Nxd4 cxd4 18.Bd3 gives White equality and long-term prospects of winning the isolated d-pawn in the endgame.

17.Bd3 

Black to move

It is clear that my position is worse. My king is vulnerable to attacks along the c-file as well as the diagonals that begin at b1 and c1.

17...f5?

Now that the game is over, I can feel compassion for Patrick for throwing the game away with this move.

17...Re8 18.Rhe1 Bb7 19.Qd2 Qc7 20.Kb1 should retain the advantage for Black and keep me suffering for my early missteps.

18.exf5

Now I have a clear advantage

18...Bb7

18...gxf5 19.Bxf5 Bxc4 could have been effective if not for the response being check. 20.Qxc4+ Kh8 and White is clearly better.

19.fxg6+- h5

19...hxg6 20.Bxg6

20.Be4 Rb8

20...Bxe4 21.Qxe4 Qd6 (21...Qc7 22.b3 Rae8 23.Qd3)

21.Rhe1

My game has become comfortable and my moves easy.

21...Bc8

My opponent keeps finding ways to help me.

22.Bd5+ Kh8 23.Ne5 

I considered 23.Nxd4 Qf6 24.f3

Black to move

23...Bxe5

23...Bf5 was Black's last chance to stay in the battle 24.Be4 Bxe5 (24...Bxe4 25.Qxe4) 25.Bxf5 Bg7

24.Rxe5 Qf6 

24...Kg7 was forced, but Black is lost anyway.

25.Rxh5+ 1–0

Playing anything less than the best moves, no matter who I'm playing against, is a behavior that must be exorcised if I am to make progress back into A Class and up. I won last night because my opponent played worse, not because I played well. I cannot blame the London System, but can blame the way I handled it with move order errors, ambition (the premature e4 push), tactical oversights, and shallow positional thinking.

18 January 2017

Blowing the Ending

This morning on Chess.com, I beat NM Farzad Abdi in a three minute game. However, I completely blew the ending and won only because my opponent ran out of time in a dead drawn pawn ending.

Black to move

I played 55...Ra3+ and swapped rooks, which produced a pawn ending where my opponent easily seized the opposition and a dead draw. However, at this point I had 46 seconds remaining to his 11 seconds. I played against his clock and prevailed.

I was happy to get another blitz win against a titled player, but then spent a fair bit of time playing positions from earlier in the game against Stockfish 7. I learned that at three minute time controls, and even with a little more time to think, this ending is not a simple win.

55...Kf7 keeps winning chances alive.

A few moves earlier, I had an easier win.

Black to move

My 52...Rf2+, played after 4.6 seconds thought, did little to secure the win.

52...g5 advances the second pawn without allowing White's king to interfere.

A few moves earlier, I looked at and rejected the strongest move, using a mere 1.4 seconds. At the time, I had 1:03 to my opponent's 0:25.

Black to move

I played 48...h3.

Better was 48...g6+ 49.Ke4 h3 and then the feared checks lead only to 50.Ra7+ Kg8 51.Ra8+ Kg7 52.Ra7+ Kh6

Analysis Diagram
After 52...Kh6
Threatening the h-pawn with 53.Ra3 does not help White because Black has 53...Rg4+ 54.Ke5 Rh4 and with the rook behind the h-pawn, White's rook must take up a passive position on h1. Alternately, White can play 54.Kf3 and Black can exchange the rook for a new queen with 54...h2!

Going back earlier in the game, I had this position and the move.

Black to move

Play proceeded 38...Ke6 Ra7, and I thought that 39...g5 would be an error in the light of 40.Ra6+ Kxe5 41.Rxh6. My assessment was incorrect. White's king is too far away. White will be forced to give up the rook for the pawn.

After playing several other positions against the computer with mixed results, I found this one remarkably simple.

Analysis Diagram
After 41...Rxh6
41...g4 42.Rg6 Kf4 43.Rf6 Kg3 44.Kb3 Kg2 45.Kc4 g3 46.Kd3 Re8 47.Rg6 Kf2 48.Rf6+ Kg1 49.Rg6 g2 50.Rh6

Analysis Diagram
After 50.Rh6
And having reached a textbook Lucena, I built a bridge.

50...Re5 51.Rh7 Kf2 52.Rf7+ Kg3 53.Rc7 Rg5 54.Rc1 Kh2 55.Ke4 g1Q 56.Rxg1 Kxg1 and mate in fifteen.

It was nice to get the win, even from a dead drawn position. It is more important to learn how to win such positions more easily. My opponent misplayed the opening to give me an easy and comfortable middle game, but then I overlooked some of his resources in the endgame.

16 January 2017

Lessons with Yasser

Yasser Seirawan is giving me free chess lessons, but they are not exclusive. Once again, he is the host in the broadcast booth for the Tata Steel Chess Tournament in Wijk aan Zee. I have been enjoying Seirawan's commentary during Grand Master tournaments since the early '00s. Many event were broadcast on the Playchess server before the introduction of broadcast technologies that offer live video of the playing room combined with the analysis board.

This morning (it is afternoon in the Netherlands), while drinking my morning coffee, Seirawan spent a few minutes on a position that arose in Wei -- Nepomniachtchi. He said that he would need several hours looking at the position, followed by analysis with a strong computer in order to understand what is going on.


Wei, Yi -- Nepomniachtchi, Ian B96
Tata Steel Masters, Wijk aan Zee 2017

1.e4 c5 2.Nf3 d6 3.d4 cxd4 4.Nxd4 Nf6 5.Nc3 a6 6.Bg5 e6 7.f4 h6 8.Bh4 Qb6 9.a3 Nbd7 10.Be2 e5 11.Nf5 g6 12.Bf2 Nc5 13.b4 gxf5

White to move

White obviously must capture the knight on c5, but as it is pinned, the capture can be deferred a few moves. What should White do in the meantime.

Seirawan showed a few quick variations, some very bad for White.

His advice:

Spend time with this position analyzing without a computer. Only check your analysis with the computer after a lot of time exploring the position without assistance,

Several moves were played while I created this post. The game is going on. It behooves the serious chess student to black out the game in progress and study this position. There are many other games in progress. Can I ignore this one?

13 January 2017

Teaching Endgames

My advanced group and a few from the beginning group met together this week becuase of a schedule change for another after school activity. They struggled to find the moves in a game played by Alexander Alekhine when he was a young man. A few recognized the zugzwang theme, but could not put all the elements together correctly.

White to move
From Alekhine -- Yates, Hamburg 1910

43.e4

Alekhine's move is the only one that wins.

My students went for the pawn race, queening first.

43.Kc3 Ke7

It seems that a few recognized why 43...Ke6 loses due to 44.Kd4.

44.Kb4 Ke6 45.Kxb5 Kxe5 46.Kxa4 Ke4 47.b4 Kxe3 48.b5 f4 49.b6 f3 50.b7 f2 51.b8Q f1Q

White to move
Analysis diagram after 51...f1Q
As long as Black avoids trading queens unless his king is in front of the a-pawn, this position should be drawn.

We spent a lot of time with this variation, finding a few cases where even Black could win after a blunder that allows a skewer. With careful play, however, neither side can make progress.

Before going into this pawn race, a student found Alekhine's first few moves.

43...f4

Most of the students knew how to win after 43...Ke6 44.exf5+ Kxf5 45.Kd4. One of them event named the idea, "fox in the chicken coop" (see "Fox in the Chicken Coop").

44.Ke2 Ke6

White to move

After making it this far, the young player blundered with 45.Kf3, and after 45...Kxe5 went on to lose. We came back to this position after exhausting every one's ideas to try to extract a win for White from the pawn race described above.

45.Kf2!

Alekhine played the correct move.

45...Kxe5 46.Kf3

Black is in zugzwang.

Once we had seen how Alekhine won, we examined this elementary position.

Black to move

Black is also in zugzwang here, and must lose the pawn. However, in this case, the loss of the pawn does not mean loss of the game. For most of the students, defending the Black side here was simple.

11 January 2017

Patterns: Some Evidence

Working through a lesson series called "Advanced Tactics" on Chess.com, I came across this problem.

Black to move

The diagram is upside down (Black on bottom).

This lesson series was created for Chess Mentor by Thomas Wolski. It contains many lessons from the games of Wilhelm Steinitz. In addition to enjoying the tactics practice, I am becoming impressed with Wolski's ability to extract lessons from Steinitz's play. I am beginning to think that a more sustained study of the first official World Champion's games might be in my future.

I spotted the first several moves of this combination in one second, that is, instantly. This instant recognition of most of the solution, and the confidence that the rest would be forthcoming stemmed from having seen essentially the same ideas in two other problems that I put in front of youth players in the past two weeks. See "Carlsen's Queen Sacrifice," problems 3 and 6.

This instant recognition strikes me as evidence of pattern recognition as an element in the development of chess skill (see "Patterns and Calculation").

10 January 2017

Alekhine -- Levenfish 1912

Reading Alexander Alekhine's Best Games (1996) this morning, I became caught up studying a miniature. Alekhine -- Levenfish, St. Petersburg 1912 was decided in nineteen moves. Naturally, Levenfish's errors merit attention for anyone who plays the Benoni Defense, and perhaps also for players of the Modern.

After 14...Qxb2
Alekhine,Alexander -- Levenfish,Grigory [A43]
St Petersburg Winter-B St Petersburg, 1912

1.d4 c5

Alekhine criticizes this move, claiming, "White at once obtains a great positional advantage by simply advancing the centre pawns."

2.d5 Nf6 3.Nc3 d6 4.e4 g6 5.f4 Nbd7?!

5...Bg7 is the normal move.

6.Nf3 a6?!

With this move, this game becomes unique in the database.

6...Bg7 7.e5 dxe5 8.fxe5 Ng4 9.e6 fxe6 has been played at least eleven times. Alekhine gives this line to 9.e6, but then has 9...Nde5 10.Bb5+. His line has been played at least twelve times with ten White wins. It seems that 9...fxe6 may be better, although here, too, White has done well.

White to move

7.e5

White already has a clear advantage, according to Branko Tadic, and Goran Arsovic, Encyclopedia of Chess Miniatures (2015), where this game is number 166. Irving Chernev, The 1000 Best Short Games of Chess (1955) has it as well, but the annotations are limited to the last two moves. Tadic and Arsovic mark Black's fifth and sixth moves as dubious. Anyone seeking to play this line as Black would be well to note the urgency of playing Bg7 straight away.

7...dxe5 8.fxe5 Ng4 9.e6

Searching positions with 6...Bg7 in the ChessBase database this morning brought up several games that reached the position via a move order from the Modern Defense. White did well in those games, too, and this e5-e6 thrust was frequently played in those games.

9...Nde5 10.Bf4

Black to move

10...Nxf3+

Black might have tried 10...Bg7. Here Tadic and Arsovic offer 11.Nxe5 Nxe5 12.Qe2 with advantage for White. For his part, Alekhine offers 11.Qe2 Nxf3+ 12.gxf3 Nf6 13.exf7+ Kxf7 14.O-O-O "with an overwhelming advantage for White." John Nunn, who converted Alekhine's games to algebraic and culled from the two volumes of My Best Games to produce Alexander Alekhine's Best Games, suggests an improvement for Black in the line Alekhine gives. Instead of 12...Nf6, Nunn recommends 12...Bxc3+ 13.bxc3 Qxd5 as "more testing". But even here, White gets a strong attack with 14.fxg4! Qxh1 15.O-O-O Qc6 16.exf7+ Kxf7 17.Bg2.

11.gxf3 Nf6 12.Bc4 fxe6

While my coffee was still hot this morning, I spent a little time looking at 12...b5 13.Nxb5 axb5 14.Bxb5+. White ends up a pawn ahead with a strong position.

13.dxe6

Black to move

13...Qb6

Alekhine presents the alternative 13...Qxd1+ 14.Rxd1 Bg7 15.Bc7 O-O 16.Bb6, where, "White wins a pawn, at the same time maintaining all his pressure."

13...Qa5 might be playable, although White still has an edge.

The computer likes Black's move until it sees Alekhine's brilliant fifteenth move.

14.Qe2! Qxb2?

Tadic and Arsovic give 14...Bg7 15.O-O-O with a clear advantage for White. Certainly, Black's last chance was to resist the poisoned pawn.

15.Nb5!!+-

Black to move

Alekhine's double rook sacrifice had to be calculated before playing 14.Qe2. Black, too, needed to see the consequences in order to avoid 13...Qb6

15... Qxa1+

Perhaps Black can survive with 15...Bg7 16.O-O-O O-O 17.Bd6!

Now, we have finish that is reminiscent of Anderssen's Immortal Game.

16.Kf2 Qxh1 17.Nc7+ Kd8 18.Qd2+ Bd7 19.exd7 1–0

Black can delay, but no longer prevent checkmate.

08 January 2017

Worksheets

Much of my time preparing chess lessons for young students is invested in the creation of worksheets. These can be photocopied and distributed to groups of students at minimal cost. The young chess players can then work on their own or with others to find the correct answers. During a paper and pencil worksheet session, students bring partly or fully completed worksheets to me for correction. I can then tell them how many they have correct, which ones are wrong, or give other tips. My practice varies from day-to-day.

This week my beginning students completed the Beginning Tactics 1 worksheet. They had previously seen three of the problems from that worksheet two months ago (see "Patterns of Contacts"). Their memory of positions seen previously has not developed yet, so the positions seemed new. Even so, these problems are elementary and they needed only a little guidance.

My advanced students were presented with the worksheet I created for chess camp last week (see "Carlsen's Queen Sacrifice") and two additional problems on the demo board.

White to move

From Bogoljubow -- Mueller, Triberg 1934

The second position on the demo board was challenging and we did not complete our analysis. The first move, of course, is already known because all of the problems have the same first move.

White to move

From Keres -- Kurajica, Kapfenberg 1970

I made the point to the students that knowing the first move of a combination puts them in a position of struggling to calculate the entire sequence. In several positions, there is a simple checkmate in two if the defender accepts the sacrifice, but other moves are possible. The second move of the combination proved difficult in several cases.

03 January 2017

The Restricted Center

Dutch versus the English

My interest in the English Opening has been revived lately. As a consequence, I've been looking at some games in Anatoly Karpov, How to Play the English Opening (2007); Vladimir Kramnik, and Iakov Damsky, Kramnik: My Life and Games (2000); and S. Tartakower, and J. DuMont, 500 Master Games of Chess (1952). There are a handful of Kramnik's instructive games in both his book and Karpov's. These merit study. Tartakower and Dumont offer a mere seven games with the English Opening.

The first of these seven in Tartakower and DuMont is Staunton -- Horwitz, London 1851. As Staunton's endorsement of 1.c4 is the reason the opening bears the name English, it is a fitting beginning. The authors describe this game as "a methodical blockade" (626). Staunton's systematic exploitation of weaknesses in Black's position and Horwitz's reduction to spectator status because of the passivity of his position probably merits more study than I have given it so far. I ran through the game and annotations yesterday. On the second pass through this morning, I found myself caught up in the opening.

There was clearly something wrong with Horwitz's effort to transpose into a Dutch Defense against Staunton's English, but it is less clear that his opening moves were fatal.

Staunton,H -- Horwitz,B
London 1851

1.c4 e6

There have been times, especially in 2016, when I have advocated that Black can play 1...e6 against any first move by White. One of my own former students beat me badly in a tournament game a few months ago that began 1.d4 e6. I was White. He played a Dutch Defense. My effort to deploy the Raphael variation blew up in my face.

2.Nc3 f5

Tartakower and DuMont comment:
Trying to revert to the Dutch Defence. But White, instead of playing 3.P-Q4, decides on a restricted centre (5.P-Q3), with action on the wings. (626)
This restricted center is more commonly known today as a small center. According to Hooper and Whyld, The Oxford Companion to Chess, 2nd ed. (1996), "[a]s a strategic weapon for White the small centre was pioneered by Staunton" (375).

3.g3 Nf6 4.Bg2 c6

It is this offbeat move that removes most reference games while looking through this game with a database open.* It certainly appears that Black is making too many pawn moves. However, I found an interesting reference game that reveals another way that Black might have proceeded (see below).

5.d3

Black to move

5...Na6

5...d5 would transpose to my recommended reference game, Gashimov -- Moskalenko, Internet 2006. That game began 1.c4 f5 2.Nc3 Nf6 3.g3 e6 4.Bg2 d5 (playing this move before c7-c6 could have served Horwitz a little better) 5.d3 c6 6.Nf3 dxc4! 7.dxc4 Qxd1 8.Nxd1 and was drawn after 58 moves. Moskalenko's idea to eliminate the queens early worked well for him in this blitz game and might be worth considering should a player find him- or herself in a similar position.

6.a3 Be7 7.e3

"The restricted centre" (Tartakower and Dumont).

7...O-O 8.Nge2

In most games that resemble this one even slightly, this knight goes to f3. Perhaps, however, Staunton anticipates a need to support e3-e4 with the bishop.

8...Nc7 9.O-O d5

Black has been preparing this move.

10.b3

It is clear that Staunton had seen Moskalenko's game and had no wish to exchange queens.**

Black to move

10...Qe8

Tartakower and DuMont condemn this move as "aimless". They recommend e6-e5 "after due preparation." Annotations by Raymond Keene at Chessgames.com urge 10...e5 immediately.

While studying this opening and the rest of the game, I wonder whether the Dutch Defense is a viable way of meeting the English Opening. According to Tartakower and DuMont, the idea is flawed because White is not obligated to play d4. On the other hand, Black's f7-f5 was not the flaw in his opening. After ten moves, it is clear that Black's pieces are less mobile than White's even though White has made more pawn moves.


*I played through this game on the dining room table with Tartakower and DuMont open, but then went to my computer for further work on the opening. Thanks to a now defunct website, I have all of this book's games in a separate database.

**This nonsensical statement should be understood as irony.

01 January 2017

Empty Promises

Year in Review

2016 was a rough year that dropped my USCF standard rating to 2009 levels. In 2007, my rating climbed over 1700 for the first time, albeit briefly. In 2008, it appeared that I would keep it over 1700, but then in the first event of 2009, it fell again to 1698. Then, five months later, I hit 1800! My rating continued to rise, reaching a peak of 1982 in mid-2012. After that height, it was up and down, but mostly slowly dropping. I fell under 1900 a couple of times, but then brought it back up through 2014. In 2015, it fell to 1847, but then I won a weekend Swiss and it popped back up to 1902 (see "Winning an Open"). The last event in 2015 end every event in 2016, except the last, dropped my rating further. In October, I fell to a six year low of 1750.

Later in October, my play seemed better. I won a quick event at the Spokane Chess Club four days after winning an online USCF rated tournament (see "Winning"). Then, in November, I placed second in the Spokane Game 10 and won my section of the Turkey Quads 3-0, lifting my rating to 1791. I have become a B Class player, but the year seems to end on a positive note.

In late December, I managed to lift my Chess.com tactics trainer rating over 2000 for the first time since the early years of the site when such ratings seemed grossly inflated (I have a peak of 2400).

Resolutions

Chess Skills has documented many New Year's Resolutions aimed at chess improvement. None were kept all year, although several lasted into the summer. 2013 was a particularly ambitions year (see "A Time for Reflection"). My goal was to make expert (USCF 2000+), but the resolutions were training oriented. Well into the summer, I posted monthly spread sheets showing my tactics training progress with the accompanying narrative assessing the other goals--whole games, pawn endings, and weight loss. I admitted failure in November.

My resolutions each year since then have been less ambitious, and yet remained unfulfilled (see "Year in Review 2015").

A Fool's Errand

With such a fabulous track record, my resolution for 2017 should be to avoid setting any goals. Stubbornness gets in the way, however. I want to set a goal.

My attitude changed a bit after my abysmal performance in the Eastern Washington Open. I started making time for study again. The main behavioral change was that I started using Chess Mentor and the videos on Chess.com with some regularity. These resources are the reason that I pay for Diamond level membership. It would make sense to set some goal regarding regular use of these resources. For example, I might set out to complete a certain number of lessons each week, or watch a particular series of videos each month.

I need to focus on thinking. I need to look at the position in front of me when I am playing, slow down, and calculate. Tactics training can help. So, can chess mentor.

But, I need a resolution that I can keep.

In 2017, I will set up a chess board on my dining room table and play through games from a printed book. I will perform this task at least once each week.


I make no promises to myself to complete any particular book, but I do plan to make use of several in a manner that balances classic games with contemporary. Hence, I will read portions of Tartakower and DuMont, 500 Master Games of Chess (1952) as well as the latest issue of Chess Informant.