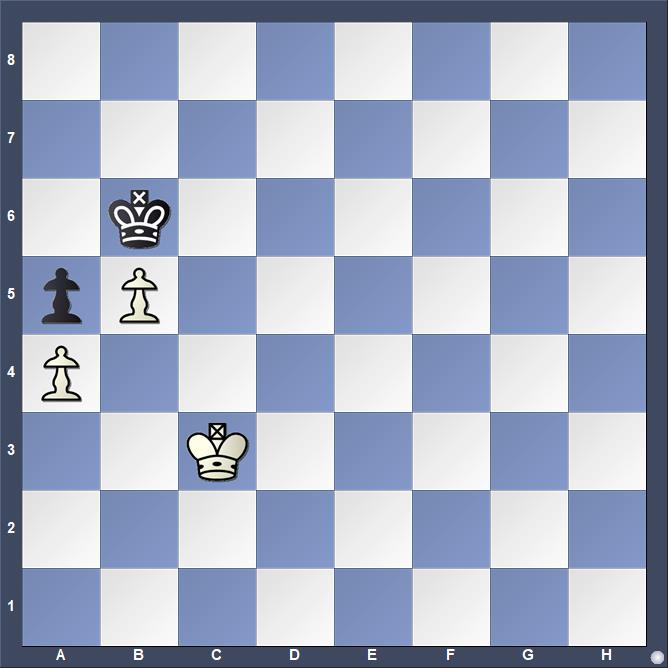
Two pawns against one when the stronger side has one that is both passed and protected is generally a win. There are exceptions when the pawns are too close to the edge of the board with one of the pawns (stronger or weaker side) on its starting square. Having a pawn on a rook file also limits the stronger side's chances. The position of the kings often proves critical.
This position, ending no. 107 in
Pandolfini's Endgame Course (1988), also arises while playing through examples 8 and 9 in José R. Capablanca,
Chess Fundamentals (1921). Josef Kling and Bernhard Horwitz,
Chess Studies, or the Endings of Games (1851) presents a study that reaches this position after the first two moves.
White to move
Sacrificing the forward pawn allows White to win Black's pawn after a few moves using opposition and outflanking maneuvers, resulting in a standard position that Bruce Pandolfini covers earlier in the book (endgames 60-62).
The diagram position is important enough in Lev Alburt's view that it appears in
Chess Training Pocket Book: 300 Most Important Positions and Ideas (1997). Alburt writes that to become a strong tournament player one needs to know only 12 key pawn endings, promising that the right 12 are in the book (9). A similar position appears in Rashid Ziyatdinov,
GM-RAM: Essential Grandmaster Knowledge (2000), but did not make the cut for Thomas Engqvist,
300 Most Important Chess Positions (2018).
Lest there be any doubt about the practical value of understanding how White should play, consider the ending from Polgar,I.--Ciocaltea,V., Baja 1971, which is presented in C.G. Van Perlo,
Van Perlo's Endgame Tactics, new, improved and expanded edition (2014).
White to move
54.Kg354.Kg5 fails to make progress, Van Perlo notes.
54...Kf7 55.Kf3 Ke7 56.Ke3 Kd7 57.Ke4 Ke6White to move
Flip the side to move, remove White's f-pawn and place a Black pawn on f6, and the position is identical to one that appeared at the Spokane Chess Club in April 2005 between two of the group's strongest players. Black pushed the unopposed pawn and the game was dead drawn, yet the game continued for many moves more because the weaker side has very little time left on the clock.
58.g5!"Depriving the black king of some vital squares in the tempo battle" (Van Perlo 25).
58...Kd6 59.f5 Ke7 60.f6+Now White has a passed pawn.
60...Kf7 61.Ke5 Kf8We have reached the position at the top of this post.
62.f7Black resigned.
We can move the initial position right or left, up or down. In most cases, the stronger side has an easy win. Sacrifice of the forward pawn is the easiest method when the blocked pawn is on the fifth rank, but this fails when the pawn is further back.
Two key positions are analyzed in Johann Berger,
Theorie und Praxis der Endspiele (1890), referencing the earlier work of George Walker,
A New Treatise on Chess (1841).
No. 483
 |
| Das Spiel ist leicht zu gewinnen |
It is an easy win, regardless of who has the move, Berger explains.
No. 484
 |
Weiss gewinnt nur mit dem Zuge.
|
White wins only with the move.
Mark Dvoretsky,
Dvoretsky's Endgame Manual, 5th ed. (2020) offers one full page of analysis with one winning and two drawing positions, plus a well-known 1921 study by Nikolai Grigoriev earlier in the chapter. Grigoriev's study, "underscore[s] that a system of corresponding squares certainly does not have to always be 'straight line', as with the opposition. Each case demands concrete analysis" (23). Alex Fishbein,
King and Pawn Endings (1993) offers two positions, both of which are Grigoriev compositions. Reuben Fine,
Basic Chess Endings (1941) has seven diagrams over a little more than three pages. Karsten Müller and Frank Lamprecht,
Fundamental Chess Endings (2001) offer two positions from games, one winning and one drawing. Comparable positions do not appear in Jeremy Silman,
Silman's Complete Endgame Course (2007), unfortunately.
Paul Keres,
Practical Chess Endings (1974) offers the most thorough discussion with 11 diagrams over six pages. He begins with Berger's no. 483 (see above).
After nine moves in Keres' analysis, the following position is reached.
White to move

"White would spoil everything with 10.b6?" Keres notes (34).
10.Kd5! Kc7 11.Ke6 Kb6 12.Kd6This outflanking idea is another standard technique.
12...Kb7 13.Kc5Keres then turns to the most important technique for endgame book authors: shifting the position. Shift everything up on rank and White can no longer win because of the same stalemate threat noted after 10.b6? Shift one square down, and White still wins. Two squares down and it matters who has the move. White must have the move to win.
Moving the position one file to the right and one rank up, White wins, even when Black has the move.
Black to move
1...Kd6 2.Ke4 Ke6 3.Kf4 Kd6 4.Kf5 Kc7 5.Ke6 Kc8White to move
6.c7!The pawn must be sacrificed, as we should know from Capablanca and Pandolfini.
Continuing the shift to the right and this time down a rank, Keres sets the kings in a manner optimal for Black. After a few moves, the following position is reached.
White to move
To secure the win, White must use threats of moving to either side of the mass of pawns to perform the opposition and outflanking maneuvers.
6.Kc1!Working out the rest is good training. Keres book is helpful, too. It was when I reached this position in my reading yesterday morning that I started playing against Stockfish from this position and then many other variations with the same arrangement of pawns across the range of possibilities.
Shift the starting position one rank down and this resource no longer exists for White.
Knowing a position well is knowing an arrangement of pieces that may be, in fact, many hundreds of possible positions. Some of these have arisen in my games in the past and can be expected to do so again.