24 June 2022

Outpost

The concept of an outpost square in chess varies somewhat in chess literature. Aron Nimzowitsch often gets credit for introducing the  concept in My System (1925).* For Nimzowitsch, outposts are connected to play on open files. He presents the following position.

White to move
The key move, Nimzowitsch writes, is Nd5, "and the knight here placed we call the outpost; by which we mean a piece, usually a knight, established in an open file in enemy territory, and protected (of course by a pawn)" (32). This move provokes black to drive the knight back with c6, a move which weakens the d-pawn.

A contrasting definition of outpost is given by David Hooper and Kenneth Whyld in The Oxford Companion to Chess (1992). In their definition, an outpost is a square, "guarded by a pawn but cannot be attacked by an enemy pawn, especially such a square on an open file" (285). That the square cannot be assailed by an enemy pawn is central to Peter Romanovsky's description of the "eternal knight". In Chess Middlegame Planning, trans. Jimmy Adams (1990), Romanovsky suggests conditions when a piece might be placed permanently on a weak point in the opponent's position:
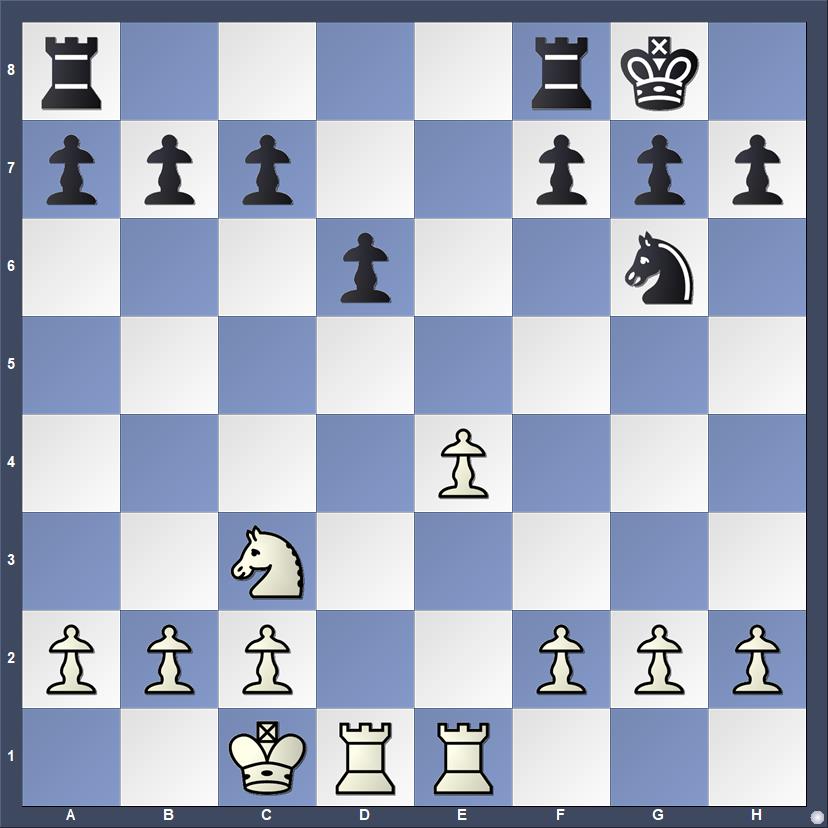
And so the potential weakness of a square arises as a result of the impossibility of attacking it with pawns. However, such a square should only be considered a real weakness when an enemy piece, which it will not be possible to drive away or eliminate by an exchange, threatens to take up a position. (37)
Such a position was reached in a game presented by Romanovsky, Izmailov -- Kasparian, Moscow 1931. After 25...Nd4, Black's knight is unassailable.

White to move
The knight does not sit on an open file, as Nimzowitsch's definition would lead us to expect. Romanovsky does not employ the term outpost, but highlights the concept through "weak squares" and the "eternal knight".

Hooper and Whyld also refer readers to their entry on the concept of "hole", "a square on a player's third rank or beyond that cannot be guarded by a pawn" (175). The concept, they state originates from the writing of Wilhelm Steinitz. He writes in The Modern Chess Instructor (1889) that he first used the term in The International Chess Magazine (November 1886). In Steinitz, we find the concept of an outpost square, albeit without the term later used by Nimzowitsch:
...not alone the weakness on one single pawn but also that of one single square into which any hostile man can be planted with commanding effect, will cause great trouble, and often the loss of the game, and that by proper management of the pawns such points of vantage need not be opened for the opponent. (xxxix)
Steinitz gives the opening moves 1.e4 e5 2.c4 as creating permanent weaknesses for White on d3 and d4, even anticipating Nimzowitsch's focus on open files: "A hole or a weak square are still more troublesome when the opponent is enabled to open the file on which they are situated for his queens and rooks" (xxxix).

The Lesson

Several of my students this past week were presented a lesson concerning outposts that I extracted from Michael Stean, Simple Chess (1978). Stean offers a nuanced definition: "a square at the forefront of your position which you can readily support and from where you can control or contest squares in the heart of the enemy camp," mentioning both a supporting pawn and that the opponent cannot attack the position with pawns (13). He offers five illustrative games with informative annotations. I selected one position from each game, presented the position to my students, and we played from there. Then we looked at the game as played.

In Stean's first illustrative game, Tal -- Bronstein, Tbilisi 1959, Black contested White's efforts to establish a knight on d5. When the knight went there anyway, it provoked a series of exchanges that led to a superior endgame for Tal. The second game, Benko -- Najdorf, Los Angeles 1963, offers a well-placed forward knight on f5 and an open h-file for White's heavy pieces.

White to move
Benko opened a line for the queen to join the rooks on the h-file with 24.f4! Najdorf resigned a couple of moves later. A couple of my students tried 24.Rh7, and one was able to beat me in a queen and pawn ending after quite a few moves.

Stean's selection shows a range of tactical opportunities that were facilitated through battles focused on outposts and concludes with Unzicker -- Fischer, Varna 1962 where Fischer successfully prevented Unzicker's efforts to deploy a knight to a d5 outpost.


*I am using the 1947 David McKay edition, translated by Philip Hereford and revised by Fred Reinfeld.

17 June 2022

First Impulse

Of course, analysis can sometimes give more accurate results than intuition but usually it’s just a lot of work. I normally do what my intuition tells me to do. Most of the time spent thinking is just to double-check.
Magnus Carlsen

How is this intuition guided by factors external to the chess position itself?

White to move
Had I reached this position in a blitz game, my first impulse might be Ke4, forking rook and pawn. After the moves 1...Rh3 2.Rxg6 f3, a draw might seem likely.

When I did encounter this position in tactics training on Chess.com, my first thought was to threaten checkmate with 1.Kc4. My intuition was influenced by the knowledge that there was a tactical opportunity. I quickly deduced that some sort of rook sacrifice to deflect Black's rook from the h-file was the intent of the exercise. After examining a line or two that begins with the mate threat, I spent a minute (or less) on Ke4, too.

Try it yourself at Puzzle 42645.

13 June 2022

Classic Bishop Sacrifice Before Greco

In Chess Gems: 1,000 Combinations You Should Know (2007), Igor Sukhin presents this position which he credits to an 1594 manuscript produced by Giulio Cesare Polerio.

White to move
Polerio's Ordini MS is dated 1594 in the dedication to an unnamed lord. In "Part II. Openings and Games of the Classical Era of Modern Chess" of The Classical Era of Modern Chess (2014), Peter J. Monté presents a game opening from this MS that concludes with the classic bishop sacrifice (519), which sometimes is called Greco's Sacrifice or the Greek Gift.

Polerio,G.C.
Ordini MS 1594

1.e4 e6 2.d4 Bb4+ 3.c3 Ba5 4.f4

Rapid advance of the c- and f-pawns was advised by Polerio against closed positions "gioco stretto" (see Monté, 236).

4...Nf6 5.Bd3 O-O 6.Nf3 d5 7.e5 Ne8

White to move
8.Bxh7+

9.Ng5 and Qh5 will follow.

This position differs in a few particulars from the one presented by Sukhin. The line that leads to Sukhin's position appears in the Doazan MS. I discussed this game and the Doazan MS at the end of March in "Classic Bishop Sacrifice: Early History". As noted there, the manuscript is of uncertain authorship and date. Monté includes it in the grouping he labels the Polerio-complex. Its contents have much in common with other MSS more clearly the work of Polerio.

Two earlier Polerio MSS offer another variation leading to the classic bishop sacrifice. The first was acquired by J.A. Leon, who presented its contents in British Chess Magazine (August 1894) and then later that year in a small book, Forty-Six Games of Chess by Giulio Cesare Polerio. Based on the handwriting, Monté believes, it is "the work of an anonymous writer who could copy Polerio's notes at leisure" (222). This Leon MS may have preceded one presented to Giacomo Buoncompagno, named Boncompagno MS No. 2 by Monté. The dedication addresses Giacomo as the Duke of Sora, a title he assumed 12 March 1580. In October 1583 acquired an additional title not in the dedication, suggesting the MS must have been presented sometime 1580-1583.

This version appears to be the earliest known example of the classic bishop sacrifice. It is the work of Polerio a full decade prior to the date given by Sukhin.

Polerio,G.C.
Leon MS 1583

1.e4 e6 2.d4 Nf6 3.Bd3 Bb4+ 4.c3 Ba5 5.Nf3 O-O 6.e5 Nd5

White to move
7.Bxh7+

Before Greco

As I mentioned in my article in March, there have been those who credited nineteenth century chess masters with what many today call Greco's Sacrifice. Greco certainly deserves credit for demonstrating the conduct of the game all the way to the end, but the sacrifice itself was known earlier. There are at least four versions that precede Greco.

1) Polerio's earliest, appearing in the Leon and Boncompagno-2 MSS from the early 1580s.
2) Polerio's second, appearing in the Ordini MS, 1594
3) The Doazan MS version, possibly connected to Polerio. Probably early seventeenth century.
4) Salvio's version, published in Trattato dell' Inventione et Arte Liberale del Gioco Degli Scacchi (1604).

Greco may have seen Polerio's early version, but Salvio's version is the one that he developed in his own manuscripts.


10 June 2022

A Study Position

How does a position reached in a game played many years ago become an important study position?

Consider a position from Euwe -- Smyslov, Moscow 1948. The game was played in the fourteenth round of the five-player world chess championship to determine the successor to Alexander Alekhine. Max Euwe finished in last place, winning only this single game.

White to move
In Paul Keres, World Chess Championship 1948 (1949), the author criticizes Euwe's move from this position, 27.Qe3. Euwe's position is so strong that this move "assures him of an easy win." But, "he misses the worthy finishing combination ... which would immediately have forced Black to resign" (332).

This position appears as number 1 in Thomas Engqvist, 300 Most Important Tactical Positions (2020). The first 27 positions in the book highlight five basic tactical ideas--"tricks" is Engqvist's term. The first three positions, the writer tells us, are "from top level chess where one highly qualified player missed a fork at a certain point. It pays to study positions where a strong player missed a tactical solution" (13).

Engqvist mentions that Keres gave the move played in the game a question mark, offers Keres' improvement, and also discusses a second alternative to the text move.

05 June 2022

Corresponding Squares

When I was studying a position from Paul Keres, Practical Chess Endings, trans. John Littlewood (1974) this morning, it was familiar. I thought the winning idea was rooted in understanding corresponding squares, especially because Keres placed it in that section of the book (he uses the term "related squares"). Nonetheless, I struggled to calculate the solution without working out all critical cases of correspondence, and only through trial and error against Stockfish did I discover the correspondence between a5 (Black) and d2 (White), highlighted in red below.

White to move
I solved the exercise before reading Keres' solution and discussion of related squares, but could not avoid seeing the paragraph below the diagram: "White's task is made extremely difficult by the fact that his passed pawn is on the rook's file and that he has no manoeuvring space for his king to the left of this pawn" (28). Hence, the general idea was clear from the outset if I did not already know that.

Initially, I thought triangulation would allow me to reach the same position, but with Black to move, calculating 1.Ka3 Kb6 2.Kb2 (distant opposition). But if Black plays 1...Ka6, do I still go to b2? This scenario did not occur in my play against Stockfish. Keres notes, as I learned later, that when the Black king is on a6 or b6, White's king can move to c1, c2, or c3 because all three squares allow Kd2 should Black play Ka5.

My play against Stockfish on the iPad follows.

1.Ka3 Kb6 2.Kb2 Ka5 3.Kb3

Already, I have successfully reached the diagram position above with Black to move.

3...Kb6 4.Kc3 Ka5

White to move
An advantage of playing against the computer is that you can learn immediately when you have gone astray. If the engine suddenly shows an evaluation of 0.00, it is clear that an error has been made. Here, 5.Kd3 seems tempting because after 5...Kb4, White has the resource 6.a3. However, it takes little calculation to see that 7.Ke5 fails because Black has 7...Kb3 8.Kd5 Kb4 and suddenly Black is winning.

I may have tried it anyway, but I do recall that I tried 5.Kc2 and watched the evaluation hit 0.00. What then? Going back to the b-file clearly makes no progress. Hence, there is only one move and I would have found it sooner had I more thoroughly considered all sets of corresponding squares instead of trying to see everything through brute force calculation.

5.Kd2! Kb6 6.Ke3

6.Kd3 is as good. Both squares lead to e4.

6...Kc6 7.Ke4

Tablebases indicate that 7.a3 and 7.Kf4 are both equally good, but taking the opposition in such positions is practically routine.

Black to move
7...Kd6 8.Kf5

This simple outflanking maneuver is not superior to 8.a3. However, it is easier to understand. I am reminded of Vladimir Kramnik's words in the Foreword to the 5th edition of Dvoretsky's Endgame Manual (2020): "it is impossible to attain real endgame mastery by just working with a computer. An explanation of why an endgame is winning, ... described in words and in language that a person understands (as opposed to computer variations), is needed" (12).

8...Kd7 9.Ke5 Kc6 10.Ke6

Continuing with moves that alternate between taking the opposition and outflanking is relatively simple and something I've done hundreds of times. Nevertheless, I spent a fair amount of additional time with this exercise after completing it. 

From the starting position, Stockfish notes that it is checkmate in 26 moves. My first effort following the discovery of 5.Kd2 led to checkmate with two queens on the 28th move. I knew that I could do better.

Where else have I seen this position?

I thought that the diagram Keres presents was familiar, but do not find it in Dvoretsky's Endgame Manual. Dvoretsky does have a similar position as a diagram that reaches a nearly identical position after three plies. it is a variation stemming from inaccurate play from a composition by Franz Sackmann (1913).

Black to move
After 10...Kb7 11.Kb4 Ka6, the position in the diagram from Keres is reached one square up the board. The solution follows the same process. Dvoretsky discusses it in the section on mined squares, noting that the d4 square is mined.

Perhaps this derivative from Sackmann's study was sufficiently lodged in my memory to recognize it, especially if I played out Dvoretsky's analysis.

I did find the original position in Alex Fishbein, King and Pawn Endings (1993), where it is no. 126 and credited to George Walker. However, I bought this book with unrealized intentions and have spent very little time studying it. Walker, A New Treatise on Chess (1841) has the position, which Walker states came up in a game that he observed. It is interesting that in Walker, the position is reached with black to move, but White did not know how to play it. Nor did Walker find the correct way. According to Johann Berger, Theorie und Praxis der Endspiele (1890), it was Josef Kling who pointed out the correct manner of play.

From Walker, A New Treatise on Chess
Walker's line follows.

White to move
1.Ka3 Kb6 2.Kb2 Ka5 3.Kb3

Here, we have the diagram at the top of this post, but with Black to move. It is the position I had to produce via triangulation.

3...Ka6 4.Kc3 Ka5 5.a3?

Walker does not give this move the question mark, I do. My memory fades on whether this was one of my errors this morning. I know I certainly considered it.

5...Ka4 6.Kd3 Kxa3 7.Ke4

Can we call this an example if hope chess? Even if Black plays 7...Ka4, the best White gets is a draw.

Black to move
7...Kb3

Now, White must fight for a draw. To Walker's credit (and the player of the White pieces), the drawing method is demonstrated.

8.Kd3

"Best", according to Walker. These days, the move gets a box--only move.

8...Kb4 9.Kd2 Kxc4 10.Kc2 

White draws by holding the opposition, as noted by Walker.