Showing posts with label tablebases. Show all posts

20 December 2024

Rook vs. Three Connected Passed Pawns

This position arose in a game that I played Wednesday morning online. It is a technical draw, but my opponent erred along the way.

White to move
Several moves earlier, I could have reached a favorable ending with the same material, except that my  understanding of rook vs. three connected passed pawns was deficient. 

Black to move
In haste to eliminate the passed b-pawn, I played 54...Rb1

54...Rd3 is better, as it prepares to get behind the b-pawn while also protecting the h-pawn with a threat on the f-pawn. 

55.Kxh3

Black to move
Tablebases reveal that Black has two winning moves here, but they do not explain the reasoning. I've spent a bit of time playing through tablebase lines in search of understanding.

I started looking through the 65 endgame books on my shelf. Few books are helpful. Reuben Fine, Basic Chess Endings has three pages on rook vs. three pawns, but these have limited application to the position before me. Ilya Rabinovich, The Russian Endgame Handbook has a page and a half with some of the same illustrative positions found in Fine. I have this book both in a print version and in the Forward Chess app.

Some useful analysis appears in Sam Shankland, Theoretical Rook Endgames.

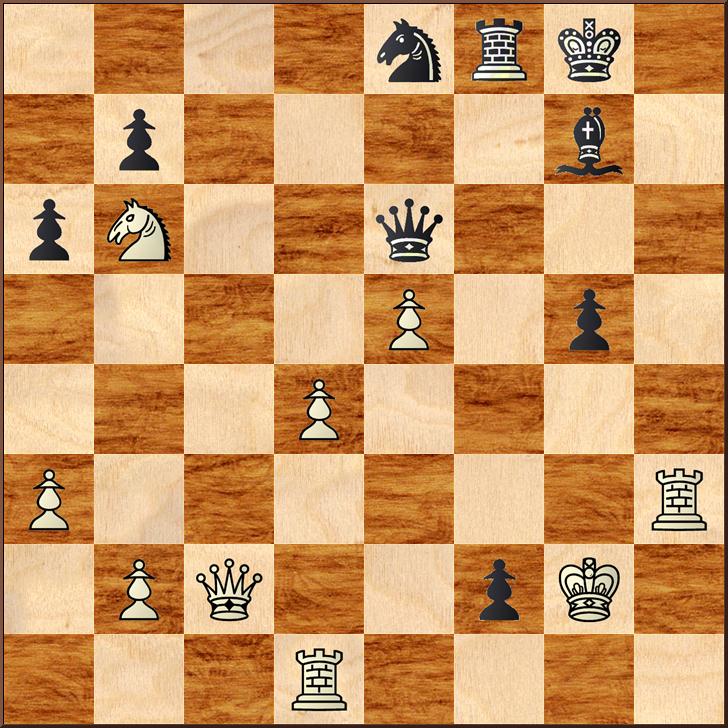
In the game, I played 55...Rxb4?? 56.Kg3 Kg7 to reach the diagram at the top of the page. After several more moves, we reached this position.

White to move
My opponent's move here was the decisive error, but it took me quite a few more moves to find the winning idea.

65.Ke4??

Either 65.Kf2 or 65.Kg2 holds the draw.

Shankland has this position.

Black to move
Shankland points out that the king needs to step back and shuffle the king between g7 and h7. The h-pawn is secure because otherwise Black's other two pawns became a serious threat, although White can hold the draw. Shankland does not analyze this line in detail, stating only, "White is lucky not to be lost" after snatching the h-pawn (373). When I played the White side against two students on Thursday, I failed to hold the draw after snatching the pawn.

Shankland's position differs from that in my game, but the idea of shuffling the king back and forth on the second rank could have been known to my opponent from Theoretical Rook Endgames.

How Could I Win?


Back to the position after 55.Kxh3. My haste to eliminate the b-pawn was an error. Instead, there were two winning moves that I could have played. Lines following from either move require me to centralize my king.

a) 55...Kg7!

The best move, according to Stockfish.

After 56.Kg3, only one move wins.

Black to move
56...Kf6! 57.h4 Ke5!

Again, there was only one winning move.

58.f4+ Ke4!

Another only move.

White to move
After 59.b5, 59...Rg1+ is the shortest distance to mate.

59.g5 is the longest distance to mate, and now Black has 59...Kf5.

b) 55...Rg1 was also winning.

56.b5 Kg7! 57.b6 Kf6 58.f4

Black to move
58...Ke6!

The only winning move.

59.b7 Rb1

At this point, not earlier, it is necessary to stop the passed b-pawn. Afterwards, Black's king will move to d5 and then e4. For example, 60.Kg3 Rxb7 61.Kh3 Rb3+ 62.Kg2 Kd5 63.h3 Ke4 64.f5

Black to move
The pawn chain is vulnerable because of the placement of Black's pieces. Shankland's defensive idea fails here because the pawns all need to advance one square further.

In two games this week, I prevailed with a rook against three pawns. Analysis of these games showed that there is much that I can learn about these endings, which can often lead to interesting positions demanding precise play. 22 years ago, I chose to exchange my last rook for one of my opponent's rooks, reaching a ending where I had three connected passed pawns against a rook. I drew that game, but only because my opponent missed the right idea in a critical position. That is the subject of tomorrow's post, “Endgame Gambit”.


13 May 2022

The Critical Position

In "Surprisingly Strong Move", I briefly described a situation where a move I played in desperation proved winning in all lines. The opportunity was made possible by an error in an equal position. As we had both been shuffling rooks and kings for twenty moves, it was not an easy matter for my opponent to discern that a critical position had been reached.

Black to move
Black played 52...Kd6.

Both 52...Rg1 and 52...Rh1 leave White with an advantage so slight that the game should end as a draw.

a) 52...Rg1 53.f3

Alternately, 53.Ra5+ Kd6 54.f3 seems about the same. 

53...Rb1 54.Ra6 Re1 55.Rb6 and Stockfish thinks 55...Ra1 is best.

b) 52...Rh1 seems slightly worse than Rg1 in the initial engine evaluation. But, the main line continues 53.Ra5 Kd6 54.d5 (else matters don't change) 54...Rh2 55.f3 exd5 56.Rxa6 Kd7 57.Kxf5 and the tablebases indicate draw.

Black to move
Tablebase Draw


17 December 2021

Seeking Understanding

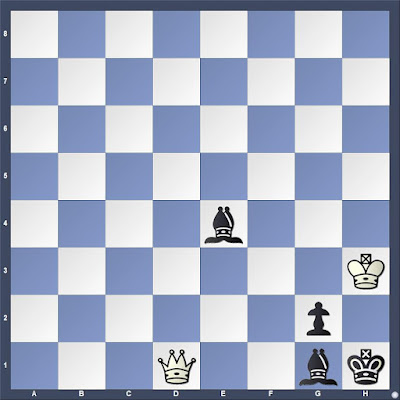
Five years ago, I posted "Two Endgame Compositions", giving only the solution to the second. This week I was asked to provide the solution to the first, an 1888 composition by Johann Berger that was first published in Columbia Chess Chronicle. The past two mornings, I have been studying the solution with an aim to understand every move. Although the maneuvers appear complex, they are based on some simple ideas.

White to move
J. Berger, 1888
1.Qb8

The only winning move, according to the tablebases. It forces the light-squared bishop to move because of the checkmate threat Qh2#.

1...Bc4

Threatens Be6+, followed by Bf2+ (or Bh2+).

Other moves lose more quickly.

1...Be2 2.Qf4 (see at move 4 below)
1...Bd3 2.Qf4
1...Bb5 2.Qxb5 Ba7 3.Qd5
1...Ba6 2.Qg8 Bb7 3.Qh7 Bc8+ (3...Bf2 4.Qxb7) 4.Kg3+

2.Qe5

Prevents the check while keeping the dark-squared bishop immobile.

2.Qd6 is one move slower. This move is presented as a "cook" in Harold van der Heijden's Endgame Study Database with a line leading to underpromotion of Black's pawn. It is an instructive alternative.

2...Ba6

Threatens Bc8+

2...Bd3 3.Qg5 threatens Qxg2#. 3...Be4 4.Qh4 Bf5+ (4...Bf2 5.Qxe4) 5.Kg3+
2...Be2 3.Qxe2
2...Bb5 3.Qxb5

3.Qc7

Prevents the check while keeping alive the Qh2 threat.

3.Qe1 is one move slower according to tablebases.

3...Bd3

3...Bb5 allows 4.Qg7
(4.Qc1 Is given ! in Genrikh Moiseyevich Kasparian, 888 Miniature Studies [2010]. Pins the dark-squared bishop so a check can be met by Kg3 and then Qh6+ 4...Bf1 5.Qf4 Ba6 6.Qg4; 4.Qb7)
4...Bc6 5.Qh6 Bd7+ (5...Bf2 6.Qxc6; 5...Be3 6.Qxc6) 6.Kg3+
3...Be2 is second best 4.Qg7 Bf3 5.Qa1 Be2 6.Kg3

4.Qf4

Threatening to move to g4 where checks along the c8-h3 diagonal are blocked and Qxg2 is threatened. This move forces the light-squared bishop onto the a8-h1 diagonal.

Black to move

4...Bb5 5.Qg4

Shields the king from check and threatens Qxg2#

5...Bc6

Defends g2

6.Qd1

Pins the dark-squared bishop and prepares Kg3

6...Be4

White to move

7.Kg3

Threatens Qh5+. The complex battle between White's queen and Black's light-squared bishop has concluded. Now, White threatens checks on the h-file, which Black can delay briefly.

7...Bg6

Guards h5

8.Qc1

Threatens Qh6+

8...Bh5

Prevents the check

9.Qa1

Forces the bishop off the h-file.

Black to move

The rest is easy.

9...Be2 10.Qh8+ Bh5 11.Qxh5+ Bh2+ 12.Qxh2#

09 February 2017

A Technical Win?

The annotations in Chess Informant 44/672 by Oscar Panno indicate that Black is in zugzwang. The game was Panno -- Leskovar, Buenos Aires 1987.

Black to move
After 57.Rc1
Even so, it is hard to see how White made significant progress over the next 22 moves. I get that the bishop is forced to move, which allows White to maneuver his king to h4. That would make it possible to exchange rook for bishop should the minor piece again come to rest on g4, but White cannot force it there.

57...Be6 58.Kf3 Bd5+ 59.Kf4 Be6 60.Rc3 Bg4 61.Kg5 Kg2 62.Kh4

Black to move

62...Kf2?

Panno asserts that this move is an error, but it is not easy to see why. He offers two moves that are equal.

62...Kg1! 63.Rc4 Bf3 64.Kh3 Bg2+=

62...Bf3!=

In the second case, it is easy to see that exchanging rook for bishop draws. In the first case, White cannot make progress. As the course of the game from this point reveals, White's plan was to evict the Black king from the corner so that his own king can move there.

Six-piece tablebases reveal that Black has four moves that draw from the diagram and that 62...Kf2 loses in 66 moves. Panno's annotations were written before these tablebases existed. Panno's annotations also do more to help the student gain an appreciation of the ideas in this ending.

Panno's line after 62...Kh1 resembles positions found in books that point out the handful of exceptions when rook versus bishop is not drawn in a pawnless ending. 63.Rc4 Bf3 64.g4!! White wins a pawn or quickly checkmates Black.

63.Rc4 Bf3 64.Kh3± Bg2+ 65.Kh2 Bf3 66.Rf4

Black to move

66...Ke2 67.Kg1

The six-piece tablebases indicate that this move is best, but my engines prefer 67.Kh3. Stockfish cannot access the tablebases. Hiarcs can, but I only have up to the five-piece on my computer. My external hard drive has sufficient space for the six-piece, but I have not downloaded them. I am not even certain they are available for download anywhere.

67...Ke3 68.Ra4 Ke2 69.Ra2+ Ke3 70.Kf1 Bg4 71.Ra3+ Ke4 72.Kf2

So, the point was not to occupy the corner, but rather to chase the Black king from his fortress.

72...Kd4 73.Re3

Black to move

73...Bd1

Black's king is cut off from the kingside, but Black's bishop makes the advance of White's king difficult.

74.Re8 Bg4 75.Ke1 Kd3 76.Re7 Bh3 77.Ra7 

The advance of White's king is necessary, not keeping the Black king away from the queenside.

Black to move

77...Bg2

Hiarcs prefers 77...Bg4 78.Kf2 Ke4 79.Ra4 Kd3 80.Rb4 Bd1 81.Rf4 Be2 82.Rf5 Bg4 83.Rb5 Kd4 84.Rb4+ Kd3 85.Ra4 Bd1 86.Ra7 and to my eyes, White is making no progress.

The tablebases may claim this as a win, but if White does not win the pawn by move 104, the game will be drawn by the fifty move rule (see "Max Judd's Draw Claim").

However, after 77...Bg2, Hiarcs declares that White has a forced checkmate in 37 moves.

78.Kf2 Bh3 79.Ra3+ Ke4 80.Ra4 1-0

It appears that Leskovar lost on time.

The game might have continued: 80... Kf5 81.Ra5+ Kg4 82.Rc5!+- (Panno's annotations).

Black to move

Black must move either bishop or pawn, losing whichever one moves. Moving the pawn leads to 83.Rc4+ and 84.Rxh4. I could win the resulting position in a time scramble against a computer. Moving the bishop leads to an elementary checkmate.

Perhaps by studying Panno's annotations to this game, I might have absorbed some ideas about how the weaker side might construct a fortress, or how the stronger might play for an advantage. In practical play, I suspect this ending would usually end as a draw despite the assurance tablebases give us that it is a technical win.

01 May 2014

Philidor Position: Historical Note

The Philidor Position in rook endings is one where the weaker side's king stands in front of stronger side's pawn, on or near the promotion square, and in which the weaker side is able to prevent the stronger's king from advancing to the sixth (or third) rank. Dvoretsky's Endgame Manual (2003) offers a typical example (145).* The position is so-named because François-André Danican Philidor was the first to demonstrate the defense in his Analysis of the Game of Chess (1777), 275-282.


With Black on move, moving the rook to almost any square along the b-file holds the draw. 1...Rb6 is the clearest and easiest demonstration of the technique. Philidor noted, "By keeping that line with his rook, he hinders your king from advancing" (275).

Mark Dvoretsky notes that Philidor thought that White could win if he were on move, but later analysis has revealed that he is wrong on this point. In Philidor's position, White is on move, but his initial setting differs in one important respect from Dvoretsky's diagram. The pawn has advanced to the fifth rank in Dvoretsky.

Philidor presents the following position.

White to move

After the moves 1.e5 Rb6 2.Ra7, the position is almost identical to Dvoretsky's with only the Black rook on a different square. With Black on the move, Dvoretsky's key move creates the position in Philidor's analysis, but in Philidor Black is still on move. In some positions, such a transfer of the side to move proves critical, but here it is not so.

Philidor gives 2...Rc6 with the comment: "He ought not to depart from this line with his rook, but at the very instant when you push your pawn" (277).

3.e6 Rc1

"If he had given check, he would have lost the game" (Philidor).

4.Kf6 Rf1+

Philidor asserts, "He must continue to give you check, in order to drive you away from your pawn; and at the very moment when your king falls upon his rook, he will attack and take your pawn" (277).

Philidor's Back-Game**

Philidor's analysis of the position where he asserts that White may win begins from his diagram and offers Black moving first, 1...Ra1.

White to move

We see the essential elements here are the same as in Dvoretsky's position with White to move.

2.Kf6 Rf1+ 3.Ke6 Kf8 4.Rh8+ Kg7 5.Re8

Philidor states that this move is the only one that "can insure the game" (279). Checking the position with tablebases confirms that Philidor was in error, as noted by Dvoretsky.

5...Re1 6.Kd7

Black to move

6...Kf7

This move is the key error. Philidor offers an alternative in the notes: 6...Rd1+ 7.Ke7, but he misses the key defensive idea that was discovered by later analysis, 7...Ra1!

7.e6+ Kg7 8.Ke7

Here, White missed the winning 8.Ra8 (also Rb8, Rd8, and Rc8).

8...Re2+-

8...Ra1 draws, again.

The rest of Philidor's analysis is a good illustration of a winning technique that works in some Lucena positions, but differing from the orthodox bridge building on the fourth rank.


*Other books offer slightly different positions. Silman's Complete Endgame Course (2007) has 6R1/4k2r/8/3KP3/8/8/8/8 (126). Fundamental Chess Endings (2001) by Karsten Muller and Frank Lamprecht has 1r3k2/R7/8/5PK1/8/8/8/8 (177). Grigory Levenfish and Vasily Smyslov, Rook Endings, trans. by Philip J. Booth (1971) has a partial mirror image of the position in Philidor's text: the White king is flipped to the other side of the pawn and the rooks have swapped rook files. It is 4k3/R7/7r/3K4/4P3/8/8/8 (15). Reuben Fine, Basic Chess Endings (1941) is almost identical to Philidor's with only the Black rook one square to the right (287).

**Back-game was the term employed for variations in seventeenth and eighteenth century chess texts.

28 March 2014

Chess at the Science Fair

How does chess connect to science?

A little over a month ago, I received an email soliciting my participation in an elementary school science fair. The email had been sent to the president of the Spokane Chess Club and he forwarded it to me. Without a clear sense of what I should do, I said that I could help.

The school started using the First Move curriculum this year. One of the teachers thought that having chess would be a nice addition to the science fair. Initially, I thought that I would set up a table with a chess set and answer questions. The day before the event, some ideas for a poster popped into my head. I made the poster in two hours that night.

During the fair itself, I played chess with a succession of children. Most of them were second and third graders who learn chess in their classrooms on Fridays. A few were older children and one adult wanted to play near the end of the evening. None of them were strong chess players, but only one seemed unclear on how the pieces move. The children knew how to set up the chessboard. The only error in set-up stemmed from having the White pieces on the first and second rank of a board with coordinates printed around the edges. "Queen goes on diamond," the student said, meaning the d-file. I told her the board's notation was misprinted and suggested "queen on color" as a more reliable guide.

While playing, I noticed a few people looking at my poster. The poster itself was text heavy. The text was small--12 and 14 point mostly. I included four chess diagrams connected to problems.

Yesterday's Chess Skills post was something I created for the poster. I also had:

White checkmates in two moves (three solutions)


White checkmates in ten moves (twenty-two optimal first moves)

Black checkmates in six moves (one solution)

My poster claimed chess has implications for science, math, and computing. First Move identifies other areas of the curriculum as well, such as reading.

I offered a few bullet points relating to math and computing, as well as a short statement concerning the science of memory.
Scientists who study human memory often study chess players. They have learned that eidetic memory (photographic memory) is of minimal value for chess players, but that pattern recognition is a strength of chess masters. World Champion Magnus Carlsen claims to remember the ideas (patterns) from 10,000 complete games that he has studied. 
Much of education psychology (what teachers must learn to learn to teach) is rooted in work that grew out of study of chess players.
Several bullets concerning math and computing highlighted tablebases.
Solving Chess
Every possible position with seven or fewer pieces have been solved by computers. These solutions are stored in files called tablebases.
1980s Three and four piece tablebases
1990s Five piece tablebases
2005 Six piece tablebases
2012 Seven piece 
Eight piece tablebases may be many years away. 
Tablebase Storage Problems
3-4 piece require 30 Megabytes
5 piece require 7.05 Gigabytes
6 piece require 1.2 Terabytes
7 piece require 140 Terabytes
If you were designing a poster for an elementary science fair or similar public presentation, what would you highlight?

15 November 2013

Carlsen -- Anand 2013, Game 5

Magnus understands chess much better than the commentators ever will.
Damon Smith, Chess.com Forum
Magnus Carlsen won today. He gained an advantage with the White pieces for the first time in this match, employing the Marshall Gambit against the Semi-Slav.* The challenger's advantage out of the opening was that his position was not worse. He also gained a lasting imbalance in the pawn structure that assured it would always remain possible to keep playing.

This World Chess Championship match is developing into one of the most exciting matches in history. Chess enthusiasts around the globe are following the games live. In my time zone that requires either staying awake all through the night or arising just over an hour after midnight. I am not following the openings live, but usually catch the ending. This morning I checked on the game at 3:00 am, saw an equal and unbalanced position, and returned to sleep. When I awoke again much later than my usual time, the game was near the finish and Carlsen had a clear advantage.

I read the commentary on a Chess.com forum that permitted me to observe changing perceptions of the battle as it developed. For much of the game, matters appeared equal. Even the tablebases asserted that the position was drawn at one point, someone reported.** However, Carlsen had won a pawn early in the endgame (or late in the middlegame--such lines are not clearly marked), and this material advantage put Anand under intense pressure.

At least some commentators following the game seemed to think that Carlsen's play with the White pieces offered him too little. However, it was pointed out in the Chess.com forums, "Magnus knows much better than the commentators what he needs to win" (IM Panayotis Frendzas). Mr Smith, who is quoted in my epigraph, later asserted that those were the words he was seeking when he offered his more strident criticism of the commentators.

Magnus Carlsen thrives with a minuscule advantage in a long game. Not only does he have the advantage of youth against Viswanathan Anand, but his style against those his own age is to make them play a long time. Players often will falter when they must find one accurate move after another in an unbalanced, but theoretically equal position. Today, the World Champion faltered.

Carlsen,Magnus (2870) -- Anand,Viswanathan (2775) [D31]
FWCM 2013 Chennai (5), 15.11.2013

1.c4 e6 2.d4 d5 3.Nc3 c6 4.e4

Black to move

Both players employed move order nuances to keep the other guessing, and then Carlsen offered a move that has been played a handful of times before the critical line made its appearance in 1902. Frank Marshall introduced the move 6.Bd2 at Monte Carlo 1902.

4...dxe4 5.Nxe4 Bb4+ 6.Nc3

6.Bd2 gives up the d-pawn, but White often strands the Black king in the center by covering f8 with a bishop. Correspondence players following the percentages would note that the gambit scores 57% for White and is played more than four times as often as the safe line Carlsen chose. The safe line scores 49% for White, well-below average.

For most players, a below average scoring percentage in a safe position serves to deter the adventure. However, White already has a queenside pawn majority and the assurance of a lasting pawn imbalance. Carlsen's opening strategy suits his style.

Black to move

ChessBase Online contains 404 games with this position.

6...c5 7.a3 Ba5 8.Nf3

Carlsen's move scores best, but with only 63 games in the databases, these statistics lack significance. 8.Be3 has been played nearly twice as often (34-18) as Carlsen's choice. 8.dxc5 has been played by the highest rated players who have found themselves in this position: Kiril Georgiev and Alexander Yermolinsky. Yermolinsky has also played 8.Nf3.

8...Nf6

Marshall had the position after move 5 twice in 1902. In one of these, he chose the safe line. Here Anand deviates from the play of Richard Teichmann, Marshall's opponent.

Reference Game:

Marshall,Frank James -- Teichmann,Richard [D31]
London m3 London (5), 1902
1.d4 d5 2.c4 e6 3.Nc3 c6 4.e4 dxe4 5.Nxe4 Bb4+ 6.Nc3 c5 7.a3 Ba5 8.Nf3 cxd4 9.Qxd4 Qxd4 10.Nxd4 Bxc3+ 11.bxc3 a6 12.Bf4 f6 13.Bd6 e5 14.Nc2 Ne7 15.Ne3 Nbc6 16.Nd5 Nxd5 17.cxd5 Ne7 18.c4 Bf5 19.Be2 Kd7 20.Bb4 a5 21.Bxe7 Kxe7 22.0–0 b6 23.f4 exf4 24.Rxf4 Bg6 25.Ra2 Kd6 26.Rb2 Rab8 27.Rf3 Bh5 28.Rfb3 Bxe2 29.Rxe2 Kc5 30.Re4 Rhd8 31.Rb5+ Kd6 32.Re6+ Kc7 33.Rc6+ 1–0

9.Be3

Black to move

Commentators Lawrence Trent and Tania Sachdev grew excited as they learned that fellow commentator Susan Polgar had played this position a number of years ago. Indeed, she has played both sides. In 1992, she had Black against Boris Gulko; the next year, she had White against Lajos Portisch.

Reference Games:

Gulko,Boris F (2560) -- Polgar,Zsuzsa (2530) [D31]
Aruba (2), 1992
1.c4 e6 2.d4 d5 3.Nc3 c6 4.e4 dxe4 5.Nxe4 Bb4+ 6.Nc3 c5 7.a3 Ba5 8.Nf3 Nf6 9.Be3 cxd4 10.Nxd4 Ne4 11.b4 Nxc3 12.Qc2 Bc7 13.Qxc3 Be5 14.f4 Bf6 15.Rd1 0–0 16.Qc2 Qe7 17.Nf3 b6 18.Bd3 g6 19.0–0 Bb7 20.Be4 Rc8 21.Ne5 Bg7 22.c5 bxc5 23.Bxc5 Qc7 24.Bxb7 Qxb7 25.Nc4 Qc6 26.Ne5 Qb7 27.Nc4 Qc6 28.Ne5 ½–½

Polgar,Zsuzsa (2560) -- Portisch,Lajos (2580) [D31]
Budapest zt-B Budapest (8), 1993
1.d4 d5 2.c4 e6 3.Nc3 c6 4.e4 dxe4 5.Nxe4 Bb4+ 6.Nc3 c5 7.Nf3 Nf6 8.a3 Ba5 9.Be3 Nc6 10.dxc5 Bxc3+ 11.bxc3 Qa5 12.Qc2 Ng4 13.Qc1 0–0 14.Be2 Nxe3 15.Qxe3 Ne7 16.0–0 Nf5 17.Qe4 Qxc5 18.Rfd1 f6 19.Bd3 g6 20.h4 Ng7 21.Qd4 Qxd4 22.cxd4 Bd7 23.Be4 Rab8 24.Rab1 Rfc8 25.Bxb7 Rxc4 26.d5 Rc7 27.dxe6 Bxe6 28.Be4 Rxb1 29.Rxb1 Nf5 30.Rb8+ Kf7 31.a4 Nd6 32.Bd3 Rc8 33.Rb4 Rc3 34.Be2 Rb3 35.Rf4 Ke7 36.Nd4 Rb1+ 37.Kh2 Bd7 38.Nc2 a5 39.Bf3 Nf5 40.h5 g5 41.Rc4 Rc1 ½–½


9...Nc6 10.Qd3

For all practical purposes, this move is the game's novelty. It has appeared once prior in a game this past summer. White was untitled, rated slightly over 2000, and lost to a FIDE Master. Their game offers instructive material for class players such as myself reaching towards their level, but would not offer much to Carlsen and Anand preparing for this match.

10...cxd4 11.Nxd4 Ng4 12.0–0–0 Nxe3 13.fxe3

Black to move

Another pawn imbalance has been created: an isolated center pawn. Engine analysis and expert commentary both suggest this position is equal, but there is play. As it turned out, there was a lot of play. Both players battled for advantage and both found the other had excellent resources.

13...Bc7 14.Nxc6 bxc6 15.Qxd8+ Bxd8 16.Be2 Ke7 17.Bf3 Bd7

White to move

Black has the advantage of the bishop pair, but his light-squared bishop is not particularly active. White seems to have more space to maneuver. Both players have isolated pawns. White has a queenside majority; Black has a majority on the kingside. Both kings are near the center.

Readers of Jeremy Silman's books know well that imbalances are the heart of chess strategy. This World Championship match is producing games that improving players will be able to study for years to come.

18.Ne4 Bb6 19.c5 f5!

Anand decided that the bishop pair was not an advantage worth keeping, and even that further pawn weaknesses are preferable to letting Carlsen keep his centralized knight. I can easily imagine many chess coaches scolding their pupils for the sort of moves Anand has made here, and yet Stockfish 4 appears to agree with the World Champion.

General principles must be tempered with concrete analysis. The needs of the position outweigh abstract generalizations.

20.cxb6 fxe4 21.b7 Rab8

White to move

22.Bxe4 Rxb7

Everyone who has watched the film Searching For Bobby Fischer (1993) knows Bruce Pandolfini's instruction to young Josh Waitzkin to count the number of pawn islands. Does this simple technique offer a solid basis for considering Carlsen's position superior?

23.Rhf1

Both of Carlsen's rooks are posted on open files. Is chess really so simple? Chess engines see equality. General principles claim an advantage for White. Engines know only concrete analysis. Humans must calculate as well as possible, steer with general principles where useful, and continue to make moves under the pressure of less and less time left on the clock.

23...Rb5 24.Rf4 g5 25.Rf3 h5 26.Rdf1 Be8 27.Bc2 Rc5

White to move

As I am playing through this game, knowing the end result, it is tempting to seek fault with Anand's moves. Turning on an analysis engine offers another temptation to identify a series of small errors on both sides. But, engines are of limited use in complex strategic positions. This game is headed for a rook ending or a rook and bishop ending. Pawn structure and piece activity are the critical elements.

The clearest difference that I perceive in the game is that Anand seems continually faced with more complex decisions. Here Anand has pinned a bishop, and threatens to pile on with Bg6. White must either prevent this bishop move or step out of the pin.

28.Rf6 h4 29.e4 a5 30.Kd2 Rb5 31.b3 Bh5 32.Kc3 Rc5+ 33.Kb2 Rd8

White to move 

Anand continues to harrass the bishop with the threat of another pin. Carlsen needs only to determine which rook moves to f2.

34.R1f2 Rd4 35.Rh6 Bd1 36.Bb1 Rb5 37.Kc3 c5 38.Rb2 e5 39.Rg6 a4 40.Rxg5

Black to move

Just as he reaches the first time control, Carlsen has won a pawn. Anand restores the material imbalance for a move, and then Carlsen gains another to remain one pawn ahead.

Was this the decisive turning point in the game? It does not seem so, but the material imbalance should mean that Carlsen will continue playing for a win, while Anand seeks a draw. Who bears more psychological pressure?

40...Rxb3+ 41.Rxb3 Bxb3 42.Rxe5+ Kd6 43.Rh5 Rd1 44.e5+ Kd5 45.Bh7 

Black to move

45...Rc1+

My engine suggests 45...Ra1 as the only move here that maintains equality. However, that initial assessment may be misleading. I have heard it said that some masters ignore all computer evaluations of less than half or two-thirds of a pawn. I have observed in prior World Championship games and in my own training, that engine evaluations of 2 1/2 pawns can be off in certain endings. See, for example, my two posts "Anand - Kramnik: Game 7" and "Latent Patterns". Even an A Class player such as myself could see that game was a dead draw, but my chess engine had Anand ahead a full 1.5 pawns.

Was this move the decisive error, or did it come two moves later.

46.Kb2 Rg1 47.Bg8+

Black to move

47...Kc6

My initial analysis suggests that this move was the decisive mistake. Others may disagree, and more analysis than I have done today is necessary to be certain.

47...Kd4 looks promising for White, but after 48.Rxh4 Kd3 49.Bxb3 Rxg2+ 50.Kb1 axb3 the evaluation is equal. On the other hand, White may have improvements over 49.Bxb3.

48.Rh6+ Kd7 49.Bxb3 axb3 50.Kxb3 Rxg2 51.Rxh4 Ke6 52.a4 Kxe5 53.a5 Kd6 54.Rh7 Kd5 55.a6 c4+ 56.Kc3 Ra2 57.a7 Kc5 58.h4 1–0


*Is Marshall Gambit the correct term when White plays 6.Nc3, as did Carlsen today? No pawn was sacrificed.

**I must express skepticism on this point because the number of pieces remaining on the board when Carlsen gained a decisive advantage exceeds the capacity of existing tablebases, and will continue to do so for several more years in the future.

02 September 2013

Rook vs. Bishop

In pawnless endings, rook vs. bishop is a theoretical draw that should offer few difficulties for the weaker player when the stronger wants to press. Rook vs. bishop with pawns on the board is another matter entirely.

Chess Informant 113/10 presents such an endgame without commentary. Tablebases clarify that the moves by the stronger player did not extend the length of the game by more than a few moves, nor did poor play by the defender shorten the game to any significant extent. While neither player was perfect from a computer's point of view, both were quite close. Their play was as optimal as should be expected from humans.

The game is Vitiugov -- Morozevich, Reggio Emilia 2011. Nikita Vitiugov annotated the game for Informant. After 46...Bd3, White had a double attack that provoked Black to swap off the dark-squared bishops.

White to move

The game continued 47.Ra4 Be5 (Vitiugov mentions 47...Bf2 as an alternative that leads to a pawnless ending that is won for White). 48.Bxe5 Kxe5 49.Kg3 Be2

White to move

White's pawn cannot be touched, but neither can it advance without a sacrifice. The problem for White is that after the rook captures Black's pawn, leading to exchange of rook for bishop and pawn, White's king will be on f3, but the Black king will be able to move to f5--a drawn pawn ending.

White must drive the Black king back to the eighth rank. That requires rook and king in coordination. Occasionally, targeting Black's bishop helps force matters. Once the Black king has been driven back, the rook must confine it there while White's king returns to g4 or f4.

While looking through this game in Informant, I did not perceive that White could force matters. After going through the moves several times, however, and checking the play with tablebases, I began to see that White's play is relatively straightforward.

50.Kg4 Kf6

At first glance, this move appeared cooperative with White's plans. However, after 50...Bd1 51.Rb4, the effort to shuffle the bishop between e2 and d1 will alow White's rook to seize the e-file after the White king occupies g5. The consequence of Black's king being driven to the d-file will be that White's king can return to g4, the rook will snatch the pawn, and in the pawn ending the White king will outflank Black. (Readers not familiar will opposition and outflanking can watch my video, "Pawn Endings: First Steps.")

51.Kf4 Bd1 52.Ra6+ Kf7 53.Ke5 Be2 54.Rf6+

Black to move

54...Kg7

54...Ke7 is slightly more stubborn, but White has several methods to continue at his disposal, including 55.Rf4 Bd1 56.Rc4 and the Black king will be driven back.

55.Kf5 Bd3+ 56.Kg5 Be2 57.Rf4 Kg8

If 57...Bd1, 58.Rd4.

58.Kh6 Bd1

58...Kh8 59.Rf8#

White to move

The king has been driven to the eighth rank, now the second phase begins: confinement.

59.Rd4 Be2 60.Rd7 Kf8

And now the third phase: White's king returns to f4.

61.Kg5 Ke8 62.Ra7 Kf8 63.Kf4 Kg8

White to move

White is now able to seize the pawn because the Black king is too far back to reach a drawn pawn ending.

64.Ra3 Kf7 65.Rxf3 Bxf3 66.Kxf3

Black to move

White has the distant opposition, and so wins.

66...Kf6 67.Kf4 1-0


23 May 2013

Can White Win?

Can White win this position? Black appears to be near zugzwang, but how does White make progress?

White to move

24 February 2013

Tactical Failure

My second game in the 2013 Collyer Memorial chess tournament was a series of missed opportunities. I built up a strong position, and failed to deliver the knockout blow. In the end, my opponent blundered in time pressure in a drawn ending (that it was a draw was not clear to us, but is confirmed by the six-piece tablebases).

Perhaps my readers can do better than I did in a series of critical positions. In each of the positions below, I played a suboptimal move.

White to move

White to move

White to move 

White to move

I stopped recording the game when my opponent and I were both down to two minutes. We reached this position.

Black to move

My opponent made the worst possible move.