Showing posts with label triangulation. Show all posts

17 April 2023

Thomas Engqvist's Study Plan

"Less is more", writes Thomas Engqvist in 300 Most Important Chess Positions: Study Five a Week to be a Better Chess Player (2018). His 300 positions are more positionally oriented than the 300 in Lev Alburt, Chess Training Pocket Book: 300 Most Important Positions and Ideas, 2nd. ed. (2000) and also include a larger number of endgame positions. I wrote about the first position in this book the week after I acquired it in 2019 (see "A New Book and a Morphy Game"), but have not been following his recommendation to study five per week. Nor have I followed any other disciplined training regimen. Even so, Engqvist's book has been a frequent reference and valued.

Study by J. Hasek

Although Engqvist asserts, "the less you know the less you'll forget. ... it will be easier to remember 300 positional ideas rather than, let's say, 1000" (7), his 300 series now constitutes a trilogy and contains 900 positions. The motivation to select five per week for serious study has been growing for me.

The fourth endgame position in 300 Most Important Chess Exercises (2022) caught my interest last Friday and again this morning because I set it up incorrectly Saturday morning while trying to show the critical idea to some youth players at a chess tournament.

At first glance, White's task appears hopeless (see photo). Going straight for the a-pawn leads to stalemate. Going after the f-pawn leads to a trebuchet (a position lost for White). The draw is better than a loss, but I had the sense that White should win this with a technique I was missing. After some trial and error playing against Stockfish on the iPad, I found the win, posted on social media the position that arose after two moves, and mentally questioned a response that identified the solution as one of taking the opposition.

The exercise is a study composed by Josef Hasek and published in Deutsche Schachzeitung (1928). Engqvist identifies the themes as "triangulation and corresponding squares" (222). I think it also bears similarity to the famous Reti study in which White draws by attempting simultaneously to accomplish two impossible tasks (see "Endgame Calculation"). Such is the power of the double attack.

Stripes, J -- Stockfish
14.04.2023

1.Kc6 Ke5 2.Kc7 Kd5

White to move

3.Kd7!

Yes, this move seizes the opposition and prepares an outflanking maneuver. But triangulation is a more precise term for White's idea.

3...Ke5

If Black tries 3...Kc5, the diagonal opposition is best because it threatens the f-pawn. 4.Ke7! From the initial position, White cannot imagine going after the f-pawn, but now this threat is what makes it possible to gain the a-pawn without getting trapped on the a-file.

4.Kc6

Because of triangulation, the position that has been reached is the same as after the first move, except that it is Black's move.

4...Kxf5

White to move

5.Kb7

Other moves draw. Black's king is now too far away to trap White's king on the a-file and White's pawn promotes long before Black's can make any progress.

1-0

300 Most Important Chess Exercises is divided into four sections of 75 exercises each. The first two sections are opening and middlegames with tactics emphasized in the second set. The last two sections are endgames, again with tactics emphasized in the final set.

I could see myself developing some consistency with Engqvist's study plan of five positions per week if these five come from all three books, instead of always following only one of them. Coming up soon in Exercises is the following position, the sixth endgame exercise. 

White to move
I have seen this position in other books and have trained with this it on chess.com. I know the idea--corresponding squares. Nonetheless, this is an exercise that I find difficult. The cases of correspondence which must be worked out encompass more than half of the board.


12 July 2022

Coaching: Constructing a Lesson

I had been coaching youth chess for a couple of years when I decided to keep a clear record of what I did each week with the students at the elementary school where my youngest was no longer a student. While he was enrolled there, I was a parent volunteer helping with the after school chess club. When he moved on to another school, I returned to his old elementary as a paid chess coach. The year was 2004. Chess club started in late September.

I began the year with a position from a game I had played a day or two earlier on the Chessmaster Live server. Although Black had a one pawn advantage in a king and pawn endgame, it should be drawn with correct play.

White to move
My opponent erred with 46.Kc5?? We both promoted pawns, but then my opponent blundered theirs away. Had we continued in a queen ending, White might have held out long enough to run me short of time. Black was technically winning with QPP vs. QP and Black's king closer to the pawns.

Instead, play might have continued:

46.Ke4 Kf7 47.Ke5 Ke7 48.Kd4 Kd6 49.Ke4

Black to move
Here Black can err with the same flawed idea that White pursued in the game: 49...Kc5?? Correct play would be either 49...Kd7 or 49...Ke7 and a technical draw.

In the lesson, I sought to introduce to the students the concept of opposition in pawn endings. I followed this position from a recent game with a number of other positions, mostly composed, that had fewer pawns and presumably simpler continuations.

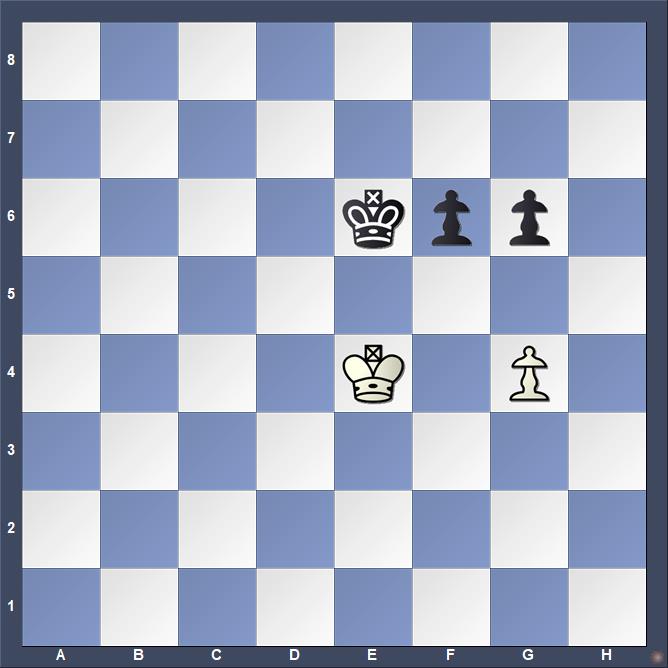
The school chess club ends the year with the Washington State Elementary Chess Championship in April. The last session before state, I showed the students a pawn ending that had been played at the Spokane Chess Club the week prior.

Black to move
After the game ended as a draw, I spent some time with others at the club, including the one who had Black, arguing about whether Black had a win. The next day, I checked some of our ideas on my computer. If we had the same argument today, someone would pull up Stockfish on their phone or a tablebase site and end the debate. My phone then was a RAZR flip phone. It's chess app was a version of Chessmaster that I could beat on its top level.

Had any of us read with sufficient comprehension José R. Capablanca, Chess Fundamentals (1921), we would have known how to use triangulation to secure the win after 1...g5. I had nearly forgotten this lesson until I was playing through an ending presented in C.G. Van Perlo, Van Perlo's Endgame Tactics, new, improved and expanded edition (2014). The ending came up in my study as I was comparing endgame books for "To Know a Position", which I wrote last weekend.

For the children headed to state, I hoped to reinforce some lessons I thought they should have absorbed in September. It is always hard to measure results, but both the elementary team (grades 1-5) and the sixth graders from the middle school brought home trophies--individual and team. School officials perceived me as a successful coach and I have continued to coach youth players.

The lessons I employed that first year as a chess professional at an elementary school were compiled into a booklet that I printed at the school and then had bound at Kinkos. I have learned a lot in the years since. My skills as a teacher have improved. My chess playing ability also rose. I have also learned to print my lessons through Amazon, where I get better quality binding at lower cost, and also am able to make them available to others.

05 June 2022

Corresponding Squares

When I was studying a position from Paul Keres, Practical Chess Endings, trans. John Littlewood (1974) this morning, it was familiar. I thought the winning idea was rooted in understanding corresponding squares, especially because Keres placed it in that section of the book (he uses the term "related squares"). Nonetheless, I struggled to calculate the solution without working out all critical cases of correspondence, and only through trial and error against Stockfish did I discover the correspondence between a5 (Black) and d2 (White), highlighted in red below.

White to move
I solved the exercise before reading Keres' solution and discussion of related squares, but could not avoid seeing the paragraph below the diagram: "White's task is made extremely difficult by the fact that his passed pawn is on the rook's file and that he has no manoeuvring space for his king to the left of this pawn" (28). Hence, the general idea was clear from the outset if I did not already know that.

Initially, I thought triangulation would allow me to reach the same position, but with Black to move, calculating 1.Ka3 Kb6 2.Kb2 (distant opposition). But if Black plays 1...Ka6, do I still go to b2? This scenario did not occur in my play against Stockfish. Keres notes, as I learned later, that when the Black king is on a6 or b6, White's king can move to c1, c2, or c3 because all three squares allow Kd2 should Black play Ka5.

My play against Stockfish on the iPad follows.

1.Ka3 Kb6 2.Kb2 Ka5 3.Kb3

Already, I have successfully reached the diagram position above with Black to move.

3...Kb6 4.Kc3 Ka5

White to move
An advantage of playing against the computer is that you can learn immediately when you have gone astray. If the engine suddenly shows an evaluation of 0.00, it is clear that an error has been made. Here, 5.Kd3 seems tempting because after 5...Kb4, White has the resource 6.a3. However, it takes little calculation to see that 7.Ke5 fails because Black has 7...Kb3 8.Kd5 Kb4 and suddenly Black is winning.

I may have tried it anyway, but I do recall that I tried 5.Kc2 and watched the evaluation hit 0.00. What then? Going back to the b-file clearly makes no progress. Hence, there is only one move and I would have found it sooner had I more thoroughly considered all sets of corresponding squares instead of trying to see everything through brute force calculation.

5.Kd2! Kb6 6.Ke3

6.Kd3 is as good. Both squares lead to e4.

6...Kc6 7.Ke4

Tablebases indicate that 7.a3 and 7.Kf4 are both equally good, but taking the opposition in such positions is practically routine.

Black to move
7...Kd6 8.Kf5

This simple outflanking maneuver is not superior to 8.a3. However, it is easier to understand. I am reminded of Vladimir Kramnik's words in the Foreword to the 5th edition of Dvoretsky's Endgame Manual (2020): "it is impossible to attain real endgame mastery by just working with a computer. An explanation of why an endgame is winning, ... described in words and in language that a person understands (as opposed to computer variations), is needed" (12).

8...Kd7 9.Ke5 Kc6 10.Ke6

Continuing with moves that alternate between taking the opposition and outflanking is relatively simple and something I've done hundreds of times. Nevertheless, I spent a fair amount of additional time with this exercise after completing it. 

From the starting position, Stockfish notes that it is checkmate in 26 moves. My first effort following the discovery of 5.Kd2 led to checkmate with two queens on the 28th move. I knew that I could do better.

Where else have I seen this position?

I thought that the diagram Keres presents was familiar, but do not find it in Dvoretsky's Endgame Manual. Dvoretsky does have a similar position as a diagram that reaches a nearly identical position after three plies. it is a variation stemming from inaccurate play from a composition by Franz Sackmann (1913).

Black to move
After 10...Kb7 11.Kb4 Ka6, the position in the diagram from Keres is reached one square up the board. The solution follows the same process. Dvoretsky discusses it in the section on mined squares, noting that the d4 square is mined.

Perhaps this derivative from Sackmann's study was sufficiently lodged in my memory to recognize it, especially if I played out Dvoretsky's analysis.

I did find the original position in Alex Fishbein, King and Pawn Endings (1993), where it is no. 126 and credited to George Walker. However, I bought this book with unrealized intentions and have spent very little time studying it. Walker, A New Treatise on Chess (1841) has the position, which Walker states came up in a game that he observed. It is interesting that in Walker, the position is reached with black to move, but White did not know how to play it. Nor did Walker find the correct way. According to Johann Berger, Theorie und Praxis der Endspiele (1890), it was Josef Kling who pointed out the correct manner of play.

From Walker, A New Treatise on Chess
Walker's line follows.

White to move
1.Ka3 Kb6 2.Kb2 Ka5 3.Kb3

Here, we have the diagram at the top of this post, but with Black to move. It is the position I had to produce via triangulation.

3...Ka6 4.Kc3 Ka5 5.a3?

Walker does not give this move the question mark, I do. My memory fades on whether this was one of my errors this morning. I know I certainly considered it.

5...Ka4 6.Kd3 Kxa3 7.Ke4

Can we call this an example if hope chess? Even if Black plays 7...Ka4, the best White gets is a draw.

Black to move
7...Kb3

Now, White must fight for a draw. To Walker's credit (and the player of the White pieces), the drawing method is demonstrated.

8.Kd3

"Best", according to Walker. These days, the move gets a box--only move.

8...Kb4 9.Kd2 Kxc4 10.Kc2 

White draws by holding the opposition, as noted by Walker.


04 December 2020

Textbook Ending

 In today's Morning Membership tournament on Chess.com, two players found themselves in a difficult pawn ending with under a minute remaining. The time control was game in five minutes with a two second increment (5+2). White had 18.5 seconds and Black had 38 when Chris started showing the game on Twitch. Chris Bird is the tournament director and streams these weekly events.


Both players shuffled their kings back and forth until a repetition occurred. When players are premoving, as they seemed to be doing, draw offers are often refused even as they are made. It was not clear from Chris's discussion whether he knew that White had a winning position.

In the screenshot, White has just played 51.Kd4.

There was an alternative.

51.Kb5 wins.

After 51.Kb5!

This move can be frightening with less than twenty seconds left, but it is the correct move. White has stepped out of the square of Black's pawn. If White fails to promote first, or set up a checkmate, Black will also promote.

After 51...Kc8, White has two ways to proceed.

52. Kc6, or 52.a6. I played the latter against Stockfish 11, which replied 52...e3.

White to move

Now, only one move wins for White. All others lose.

After 53.b6+, 53...Kc7! leaves White lost. However, 53...Kb8 allows 54.Kb6 and 55.a7#. In one of the textbook lines beginning with 51...Kb8, Black promotes the pawn just before getting checkmated.

53.a6 allows 53...Kb7 and White can make no further progress, while Black's e-pawn cannot be stopped.

53.Kc6! e2 54.b7+

Black to move

54...Kb8 55.Kb6 e1Q Black promotes first, but White checkmates with pawns. Stockfish chose a longer checkmate.

54...Kd8 55.b8Q+ Ke7 56.Qe5+ and White wins.

While watching the Twitch stream, I saw a familiar pattern. After the tournament, I out that my belief that White was winning was indeed correct. Although as a practical matter, with less that twenty seconds remaining, I, too, might have taken the draw.

The textbook position appears in Dvoretsky's Endgame Manual. Consequently, it is a position that I have played out several times with my students (see "Pawn Ending Flash Cards").

White to move

I know the technique through training with positions from Dvoretsky. Likely other books have the position as well, and it appears in Harold van der Heiden's Endgame Study Database. Heiden credits Reuben Fine, Basic Chess Endings (1941), while Dvoretsky credits the nineteenth century composers J. Kling and B. Horwitz.*

In any case, the first critical position is reached after the moves:

1.Kd4 Kg4 2.h4 Kh5 3.Ke3 Kg4 4.Ke4 Kh5 5.Kf4 Kg6 6.g4 Kg7

White to move

7.g5 is a mistake. White can move the king, but the way forward is 7.h5!

7...Kh6 8.Kf3

Heiden has 8.Ke4 here. Dvoretsky's solution is three moves longer, so seems to offer better defense by Black. Both 8.Kf3 and 8.Ke4 have the same number of moves to mate, according to my chess engine.

Dvoretsky points out the importance of triangulation for White.

8...Kg5 9.Ke4 Kh6 10.Kf4 Kh7 11.g5 Kg7 12.g6 (12.h6 loses) 12...Kf6 13.Ke4 Kg7 14.Kf3 Kf6 15.Kf4 Kg7

White to move

Now, White's confidence comes into play, as it is time to leave the square of Black's passed pawn.

16.Kg5 c3 17.h6+ Kg8 18.Kf6 (see the critical Kc6 in my analysis of what might have been above).

18...c2 (so close to becoming a queen!)

19.h7+ Kh8 

White to move

20.Kf7 c1Q

Black promotes, but White will promote with check.

21.g7+ Kxh7 22.g8Q+ Kh6 23.Qg6# 

This ending is worthy of study. Perhaps if your nerves are calm, you can win with a quarter minute and a two second increment should you find yourself is a comparable position.


*Fine, on my reading presents a similar position that is a draw. He does mention winning chances, though, if the pawns on the left are another row to the right of the position illustrated here. There seems some room for some historical research.

29 November 2020

Endgame Study Database

Harold van der Heiden has released the sixth edition of his definitive Endgame Study Database. The first version was released in 1991 and contained 23,358 studies. Subsequent expanded editions were released in 2000, 2005, 2010, and 2015. Keeping with this schedule, he plans a seventh edition in 2025. The sixth contains 93,839 studies. Each edition adds to the size, while also correcting errors found in previous editions.

More information is available on his website.

When I initiated the purchase process this morning, he sent me a PayPal invoice. Shortly after I paid the invoice, I received an email with download instructions. I installed it in ChessBase.

Poking around among the pawn endings brought this position to my notice.

White to move

M. Zinar 2020

The solution runs 77 moves, but in fact everything is quite simple.

Perhaps after I have used this resource extensively, I can write a full review. For now, I can say that I've read about it for many years, and have been on the cusp of purchasing it more than once. This morning when I saw the new edition had been released, I acted within minutes. I'm happy that I did.

22 April 2019

Textbook Ending: Historical Considerations

This position arose twice in Fiebig -- Tartakower, Barmen 1905. It was reached after 58...Kc8 and again after 60...Kc8, at which point the game was agreed drawn.

White to move

Historical questions arise. What were the rules in 1905 regarding draw by repetition or by triple occurrence of position? What endgame books that should be known by aspiring masters of the time explain the technique of triangulation?

Fiebig missed an elementary win that is a textbook ending. Today, it is in many textbooks, but was it as well-known more than a century ago?

In "Pawn Ending" in Edward Winter, A Chess Omnibus (2003), 42-43, this position is reached after the first move from a diagram presented there. Winter references Das Endspiel im Schach (1917) as a source, noting that the score of the game Fahrni--Alapin has not been found. Winter notes the position from Fiebig--Tartakower, and that the game appears in the Barmen tournament book. Winter's article also appears at "Edward Winter Presents: Unsolved Chess Mysteries (14)" (2007).

Wilhelm Steinitz, The Modern Chess Instructor (1889) presents the rules that had been approved by the British Chess Association and many chess congresses. "When both players persist in repeating the same moves," is given as one circumstance that produces a drawn game. There is no reference to the number of repetitions necessary. I have previously written about the development of the Fifty Move Rule at "Max Judd's Draw Claim" (2016). Perhaps a narrative concerning the development of rules regarding repetition can be found somewhere. Winter states the game was "agreed drawn" (42).

J. Berger, Theorie und Praxis der Endspiele (1890) discusses opposition in a separate section within the larger portion devoted to kings and pawns (28-34), but I do not see any reference to triangulation--neither process nor terminology. As far as I am aware, Berger's was the standard endgame book of the time.

As I was playing through Fiebig -- Tartakower, I was certain that White should be winning after Tartakower blocked a check with his rook.

White to move

The game continued:

51.Kd4 b6

Hiarcs, running tablebases, likes 51...Kc6 52.b5+ Kc7 53.Rxd6 Kxd6 54.a4+-

52.Ke5 Rxd5+ 53.Kxd5 Kc7 54.a4 a6

54...Kd7 is more stubborn

White to move

According to Hiarcs, it is checkmate in nineteen moves.

55.a5

The second best move. White wins more quickly with 55.Ke5 Kd7 56.c5 Kc6 57.cxb6 Kxb6 58.Kd6

55...bxa5 56.bxa5 Kd7 57.c5 Kc7 58.c6 Kc8

The game has reached the position at the top of the post. After seeing how the game concluded, I opened my playing software and continued from the diagram against Stockfish 10. I checkmated the engine in sixteen moves.

59.Kc4

59.Kd6 was played by Fiebig.
59.Kd4 is given by Winter from Fahrni's book.

59...Kb8 60.Kd4 Kc8 61.Kd5

The diagram at the top of the post has been reached again, but the position has changed. Now, it is Black to move.

The rest was easy.