Showing posts with label decoy. Show all posts

18 October 2023

Attraction

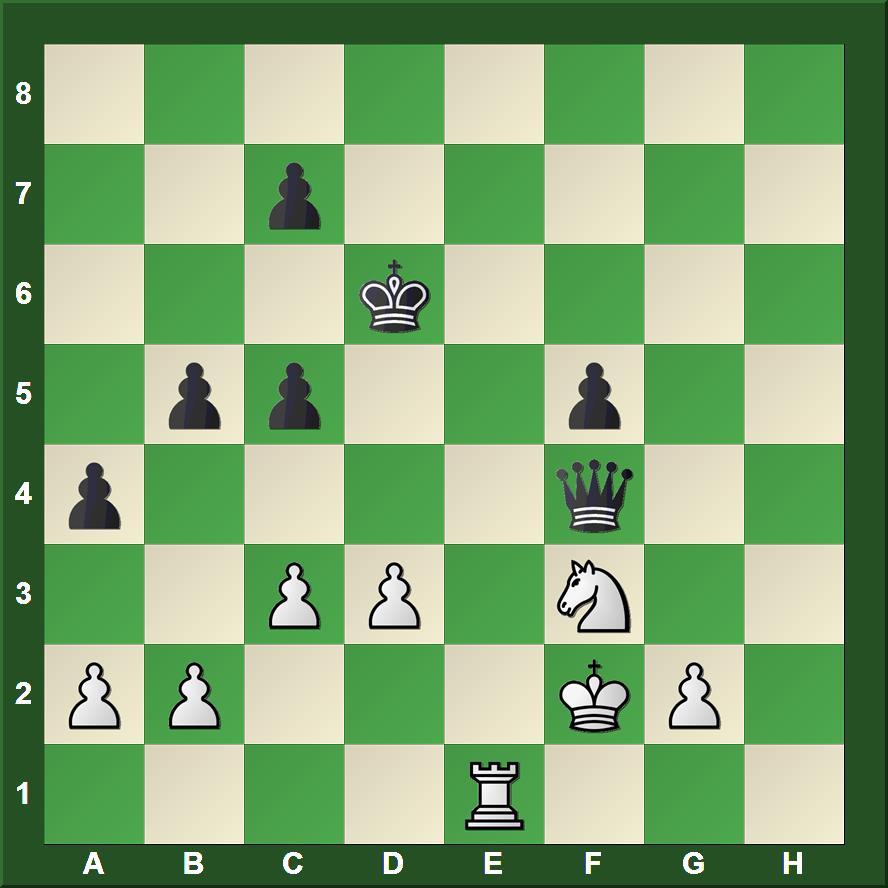
Decoys and deflections differ but share the idea of drawing an opponent’s piece where it would rather not go. Sometimes neither term fully articulates the manner in which the enemy king is drawn into a fatal trap. Two games I looked at this morning from Irving Chernev, The 1000 Best Short Games of Chess (1955) are worth remembering. Black’s king is drawn towards White’s forces until surrounded with no possibility of escape.

Since September 2022, I have been slowly working my way through this book. Some days, two or three games add flavor to my morning coffee. Other days, I read The Wall Street Journal.

About Mackenzie — Mason, Paris 1878, Chernev writes, “this queen sacrifice and the subsequent play of the minor pieces is now standard equipment for the master” (444).

White to move

Three moves prior to this position, White played 14.Raf1. I had thought until that moment that controlling the e-file with a rook was part of the planned mating net.

Prior to this game was Imbaud — Strumilo, a 1922 correspondence game. How much of White’s idea can you work out from this position?

White to move


20 February 2021

Knight vs. Pawns

 This position came up this afternoon in a youth tournament. Black won some material in the opening and exchanged into an ending that should have been won. Moreover, he did win the ending. However, here White might have made matters more difficult.

White to move


White played 43.Kb3 and his position became hopeless.

27 March 2019

Foresee the Threats

Black to move

What are the merits of 8...Qxd4?

The position comes from Luer -- Rattman, correspondence 1922 and published in Irving Chernev, The 1000 Best Short Games of Chess (1955).

21 January 2019

Exercise from Facebook

This exercise was posted in the LiChess Group on Facebook by Sim Sim, who found it through a mobile chess app.

White to move

I solved it, then played out my solution against Stockfish, revealing that it might be time to revisit an old post.

31 May 2018

08 July 2017

Three Tactics

A pin, decoy, and fork often work together to exploit an elementary error. Sometimes, exploitation of the error is complex, but it remains rooted in a fundamental pattern that should be well-known.

A few days ago in an online blitz game, I had this position.

White to move

I executed the pin. Rather than capturing my bishop (the decoy) and facing the resulting fork, my opponent resigned.

The pattern appeared in Greco.

White to move

Greco's game concludes: 12.Bb5 Qc5 13.Be3 Qxb5 14.Nxc7+ Kd8 15.Nxb5 1-0

This game deserves inclusion in all packages of instructive material to be used with beginners. My search of my largest database for positions with a White knight on d5, a Black queen on c6, and the move Bb5 (including all mirror positions with colors reversed) turned up well in excess of 400 games. Most led to defeat for the player whose queen was attacked, but not in every case.

I turned up this interesting position from the women's championship of France in 1931, the game Bastin -- Freeman, Paris 1931.

White to move

I posted this position in several fora on Facebook, but few responses identified the key move that begins the winning sequence.

9.b4 and the queen is trapped. 9...Qc6 10.Bb5 and Black resigned because 10...Qxb5 offer White the choice of capturing the queen--an error--or checkmating the Black king.

In Fries Nielsen -- Liersch, Germany 1980, White won Black's queen. However, Black gained more than sufficient material compensation for the queen and went on to win.

White to move

14.Bb5 axb5 15.axb5 Qxd5! 16.exd5 Rxa1 and Blkack has a rook and three minor pieces for a queen and two pawns.

03 May 2017

Breaking Down Tactics

Some tactics training sessions are long; others short. Yesterday morning, I attempted three problems on Tactic Trainer on my iPad. This app, which sells for $2.99, is one that I have used off and on for several years. As the database of problems are stored on my device, it is useful when I go off the grid--away from internet service. Using this app a few years ago on a fishing trip, I was able to spend three hours solving exercises while making coffee and breakfast for everyone. I reviewed this app in "Chess Tactics Training on the iPad" (February 2013).

I cut yesterday's training session short because it seemed necessary to review. I solved the first problem quickly and correctly. What did I do right? How did I see the combinations? It is worth breaking the problem down to understand what I saw and understood in a matter of seconds. I failed the second problem by choosing the wrong second move. My move was clearly winning, but there was a better move. Was I hasty or shallow in my thinking? The third problem was another success, but I thought that the twenty to thirty seconds I used was unreasonably long for such an easy problem. Why did I require so much time?

One drawback of this app, in contrast to ChessTempo, Chess.com's tactics, and similar training tools on several other websites, is that it does not record my solving time.

Black to move

1...Qxd3!

Instantly I saw that Black attacks the knight twice and White defends it twice. That alerted me to a possible tactic if the king could be driven away after an exchange on d3. It took a few seconds to see Black's control of d2 and e1 with the bishop, and also to see the possibilities of thrusting the f-pawn forward. Is the rook on f8 necessary to the combination? It is.

2.Qxd3 f3+ 3.Kf1

3.Qxf3 is also possible, and that reveals the importance of the rook on f8. 3...Rbxf3. I recall calculating also 3...Rfxf3 and observed that both the bishop and rook cover f8 to meet 4.Rc8+.

3...Rxd3

Black has won a bishop.

It seems that quickly recognizing the deflection tactic was the key to solving this exercise. Some calculation was necessary as well.

White to move

1.Nxf6+

The first move was obvious, as the exchange either decoys Black's queen into a pin or removes the defender of the knight.

1...Qxf6 2.gxf4

I chose 2.Nf3 and failed. I overlooked 2...h6, although then White is still winning and still has 3.gxf4, although 3.Rg1 is better. I saw one pin, but missed possible pins on the g-file.

Acoording to my computer, the best line continues 2...Qxf4 3.Bxg5 Qe4+ 4.f3. I do not know how far the exercise would have extended had I played 2.gxf4.

What causes me to see one pin and miss another? What causes me to overlook 2...h6? Distraction and haste could be factors. I solved this exercise quickly. Also, in the morning during coffee time, my wife and one or more dogs are with me in the living room. But, I think there is something else. Something curable through training.

Black to move

1...Rg1+ 2.Kxg1 Qh1#.

This problem was easy, and I solved it correctly. However, I first started calculating lines that begin 1...Qh3+ and also glanced at 1...Bh3+. It became clear that these lines did not produce checkmate quickly. Only when these lines appeared futile, did I see the correct solution. That may have been after twenty seconds, or it may have been as long as a minute.

As in the previous exercise, I saw a move that looked good and began to pursue it. In both cases, there was a better move. In the third exercise, I found the better move before making my move. In the second exercise, I played a good, but not the best move.

It is good to remember the adage frequently attributed to Emanual Lasker, and pushed back a few years by a reference on Wikipedia, "When you see a good move, look out for a better." As an historian, I must point out that Domenico Ponziani should be credited with the saying.
[I]t is necessary always to bear in mind these prudential rules, viz.: having a good move, to seek for a better; having a small but certain advantage, not to risk it for a greater but uncertain one. Dominico Ercole del Rio, The Incomparable Game of Chess, trans. J.S. Bingham (London 1820), 35-36.
Bingham incorrectly attributes this work by Ponziani to Ercole del Rio, as is pointed out in "Domenico Lorenzo Ponziani," The Chess World, vol 2 (1867), 327-336, an article reprinted from American Chess Monthly.

As a chess student, these historical forays chasing footnotes are less critical than the advice itself. Through three exercises yesterday, I have identified an area to work on: flexibility in calculation. Seeing one pattern, I need to remain alert to others. When I do my tactics exercises, I must slow down. Parts 3 and 4 of David Pruess's video series, "4 Exercises to Become a Tactical Genius," offer suggestions for exercises that specifically address these calculation errors.

21 April 2017

Tactics: Basic and Advanced

Lesson of the Week

Bobby Fischer has been my theme this week. Most of my students have seen various positions derived from his brilliant win against Donald Byrne at the Rosenwald Trophy Tournament in New York, 1956. The whole game is posted at "Byrne -- Fischer, New York 1956". The students in my advanced club did not have difficulty finding the smother checkmate that might have occurred, but struggled to work out the game's finish without moving the pieces.

Black to move
After 18.Bxe6 (not played)
 Black to move
After 36.Kf1
Fischer found a checkmate in six, but there was one in five. Either would be acceptable if my young students could describe the sequence in chess notation without moving the pieces.

Students in my clubs were also presented with the worksheets Essential Tactics 7-10. There was no expectation that they would complete all four, but only the suggestion that they spend fifteen minutes solving exercises before playing chess.

These exercises are extracted from my eBook, Essential Tactics: Building a Foundation for Chess Skill (2017). Originally created four years ago as the worksheets Beginning Tactics 1-18, I have revised them as Essential Tactics 1-25. The same 150 exercises are on the worksheet sets and in the book. However, the first set of worksheets used chess pieces in some of the diagrams that the students found confusing. I switched all to the pieces ChessBase calls Fritz (used in the diagrams in the post). The number of worksheets increased in the revised set because each sheet contains six exercises. In the original series, worksheets 5-18 had nine exercises each.

To my surprise, my top second grader struggled with this exercise.

White to move

A few of the exercises on Essential Tactics 10 get to the core of finding two move combinations.

White to move

White to move

09 March 2017

Oops

When I encountered this exercise at Chess.com's Tactics Trainer, I spent nearly a minute calculating the knight forks and threatened decoys and skewers in order to win the enemy queen. But, I overlooked a critical nuance.

White to move

Maybe you can do better.

16 February 2017

The Whole Board

This position has occurred in at least 21 games, including Ree,H -- Piket,J, Breda 2001, which appears in Encyclopedia of Chess Miniatures (2015).

White to move

The best move, which has been played in 19 of those 21 games, is quite elegant.

26 January 2017

Lesson of the Week

I presented a variation from Mayet -- Andersson (1851?)* to my students this week. Although this variation begins with a Black move that is superior to that played in the game, White's drawing (or even winning) chances are better than in the famous miniature.

Mayet,Carl - Anderssen,Adolf [C64]
London London, 1851?

1.e4 e5 2.Nf3 Nc6 3.Bb5 Bc5 4.c3 Nf6 5.Bxc6?!

This move strikes me as anti-positional. It is never played by strong masters today. Mayet -- Anderssen is the only instance of this position having been played by masters. White's idea with such a capture in other lines of the Spanish is to remove the defender. The advanced club spent some time trying to work out a refutation of 6.Nxe5 after the move played in the game. The line seems playable for both sides. Hence, while anti-positional, it does not fail tactically. However, White should be playing for an advantage and this move squanders that opportunity.

Better moves for White are 5.d3, 5.d4, or 5.0–0.

5...dxc6 6.0–0 Bg4 7.h3 h5!?

The fishing pole.

7...Bxf3 is better.

8.hxg4

8.d4 Bxf3 9.Qxf3 exd4 10.Rd1 leaves White with a slight advantage.

8...hxg4 9.Nxe5?

9.d4 Nxe4 10.g3 gives White the edge. We did not look at this position.

9...Nxe4!

This move marks the beginning of our variation, which leads to a forcing sequence at the end of which Black seems to have the edge.

9...g3? was played in the game.

White to move

10.Qxg4

10.d4 Qh4 and checkmate follows.

10...Bxf2+ 11.Rxf2 Rh1+

The critical decoy.

12.Kxh1 Nxf2+ 13.Kg1 Nxg4 14.Nxg4 Qd3

The computer prefers 14...Qh4 15.Nf2 0–0–0. I have played the Black side of this position against the computer and lost, but have won against the same engine from the position after 14...Qd3, so I prefer it.

I showed this much to the beginning students and then gave them the worksheet Beginning Tactics 2. The advanced students played out this position against Stockfish on my iPad. We made the moves on the demo board and played there.

White to move

Playing set positions from the side that has an advantage is an excellent way to train with a computer. You start with the knowledge that you have a good position and then seek to convert the advantage against resourceful defense. As often happens, errors will be punished.
White's fifteenth move is move one below.

Stockfish -- Advanced Club
28.01.2017

1.Na3 0–0–0 2.Ne3 Rh8

See below for 2...f5

3.Nac4 Qh7

The computer likes 3...Rh5. Such a move, improving the mobility of the rook, is not so easy for my students to find.

4.d4 Qh1+ 5.Kf2 Qh4+ 6.Ke2 f5 7.Nf1 g5 8.Ne5 f4

8...c5! was not considered by my students. They realize that White will soon have all four pieces in the game, so they play for checkmate. Alas, they do not see how to bring this about. What else can they do? Removing a weakness--doubled pawns--in one option.

9.dxc5 would be a blunder in the light of 9...Qe4+ forking knight and king.

9.Bd2

Black to move

9...Re8

Not certain how to proceed, the students opted to pin the knight.

10.b4

After the computer played this move, I pointed out that Black was threatening c6-c5.

10...Qh5+ 11.Kf2 g4?

11...Rf8 prepares this move.

12.Bxf4

One of the pawns lost for no reason.

12...Rf8 13.g3

Black to move

According to the engine, the position is now equal. However, White will continue to improve piece mobility, while Black's position has become difficult to play.

13...Qf5

13...a5 strikes at White's pawns. In general, when playing with a queen against a player that has none, but has other pieces of equivalent value, the player with the queen should seek to open up the position to create tactical opportunities for the queen. That is what I din in the game below, although it was only good enough for a draw.

14.Ne3 Qh5 15.N3xg4 Qf5 16.Ne3 Qh5 17.Re1 Qh2+ 18.Ng2 Qh5 19.g4 Qh3 20.Ng6 Rf6 21.Re8+ Kd7 22.Re3

Black to move

Black's position obviously has deteriorated. Perhaps during some future lesson, we will go through the previous eight moves to see where Black might improve.

22...Qxg4??

Steps into a a tactical opportunity for White.

Black remains worse after 22...Qh6 23.Ne5+ Kc8 24.Kg3 Qf8. However, this line is better than in the game.

23.Ne5+ Kd6

23...Kd8 at least does not step into a forced checkmate.

24.Nxg4+ Kd5 25.Re5+ Kc4 26.Rc5+ Kd3 27.Ne1+ Ke4 28.Nxf6+ Kxf4 29.Ng2# 1–0

After I returned home, I played another rapid game against my iPad from this position. I did not do as well as I had from the same position as a few years ago (see link below).

Stockfish -- Stripes,J
28.01.2017

1.Na3 0–0–0 2.Ne3 f5 3.Nec2 a5

3...g5 is better. When the computer thinks long enough, it finds an even better move. Black has a forced checkmate in eleven. See if you can find this sequence.

4.Ne1 Qe2 5.Nac2 Re8 6.d3 Qd1 7.Be3 Qh5 8.Nf3 g5?

I also gave away a pawn, but my plane was to exchange my rook for two minor pieces. Unfortunately, this decision substantially reduces my winning chances.

8...f4 9.Bxf4 Qb4 exchanges the f-pawn for one of White's pawns on the queenside. It also leads to a position where the mobility of Black's queen increases.

9.Bxg5 Rg8 10.Re1 Rxg5 11.Nxg5 Qxg5 12.Re8+ Kd7 13.Re2 c5 14.Ne1 b5 15.Nf3 Qc1+ 16.Kf2 Kd6 17.Ne5 Qf4+ 18.Nf3 a4 19.Re1

Black to move

19...b4 20.a3 bxc3 21.bxc3 Qg4 22.Re2 Qg7 23.Ne5 Qg8 24.Ke1 Qb3 25.Nc4+ Kd7 26.Kd2 Qa2+ 27.Kd1 Qb1+ 28.Kd2 Qa2+ 29.Kd1

29.Ke3 f4+ 30.Kf3 Qb3 and more pawns will come off the board. Maybe Black has a slight advantage.

29...Qb1+ 30.Kd2 Qa2+ ½–½


*See "Training with Anderssen" for a historical note that highlights ambiguities concerning when and where this game was played. In that link, there is also another variation played against a computer.

23 December 2016

Patterns and Calculation

There has been quite a bit of discussion concerning pattern recognition the past week on Chess.com. An article by a philosophy student,* "Pattern Recognition: Fact or Fiction?", provoked several dozen comments, many challenging the author's analysis. There is also a forum thread that spins off this article, "'Pattern Recognition' DEBUNKED", and another thread on the topic in a closed group for over the board players. The private group's thread started in August and inquires into the practicality of creating a pattern bank. Would it need 10,000 positions? More? I have contributed to all of these threads.

These discussions reveal an absence of a clear and accepted definition of patterns in chess. Are patterns a static arrangement of pieces that crop up with some regularity? Are patterns dynamic relationships, such as all pins constituting either single pattern or perhaps a specific category of patterns? What about typical pawn structures, such as the Caro-Kann structure that also commonly crops up in the Scandinavian Defense (see Panayotis Frendzas' review of Vassilios Kotronias, The Safest Scandinavian)?

These questions linger in the back of my mind, becoming active while reading a chess book, solving tactics problems, or playing. I am currently reading with an aim to reviewing Paul Powell, The Fighting Dragon: How to Defeat the Yugoslav Attack (2016). Powell makes pattern recognition central to his approach to opening study. My last youth lesson before the holidays focused on a simple checkmate combination that occurred in a blitz game and is part of my Knight Award tactics set (see "Pattern Training"). Next week at a chess camp, I am teaching a class on the Qh6+ sacrifice that ended this year's World Chess Championship match. Sam Copeland created a video on the topic for Chess.com. My work begins with his challenge to find more examples of this pattern.

This morning I solved two tactics problems on Chess.com's tactics trainer. The first one had a 2002 rating but took me a mere sixteen seconds. I had seen the same problem a few days ago and spent several minutes calculating before solving it successfully. When I saw it this morning, I recognized it after about ten seconds. Instantly, I knew that I had to attack the queen with my knight. A few seconds were needed to either remember or quickly recalculate the correct square among the two possibilities.

The second problem gave me more difficulty.

White to move

Naturally, I quickly looked at 1.Nxd1, rejecting it in the light of the fork of knight and pawn by 1...Rd4. It was clear that I needed to push my pawns, but experienced a good deal of confusion about how that was possible. Not only did it seem that the rook could stifle the ambitions of either pawn, but also I quickly saw that 2...Rxa8 or 2...Rxd8 would be checkmate. I spent some time calculating lines that begin with 1.Kg8 with the idea to support the d-pawn. These fail.

After about six minutes, I realized the rook was overworked and knew the first move.

Slowly a learned pattern emerged in my memory. Two connected passed pawns on the sixth rank are too much for a rook. But, my pawns are separated. Nonetheless, a solution dawned on me! 1.d7, pushing the pawn that the rook is not behind (as one would do if the pawns were connected). 1...Rd4 2.a7.

The rook cannot stop both pawns! But Black has another resource.

2...Bf3

White to move

Both promotion squares are guarded. Time to calculate further. Earlier, during my confusion, I had looked at Ng4+, seeing that it led nowhere. But, now, this move decoys the bishop from protection of the promotion square.

The decoy theme is certainly a dynamic pattern.

Of course, the king can move out of check, so the bishop will not be distracted so easily. In my calculation, I began to comprehend why the problem composer put a pawn on h4 (I'm assuming the problem is composed).

During my calculations, another pattern revealed itself: interference. 3.Ng4+ is the correct move! 3...Kh5 (3...Kg6 allows 4.Ne5+ forking king and bishop) 4.Nf6+ Kxh4 5.Nd5!

Black to move

If the bishop captures the knight, the rook no longer guards d8. If the rook captures the knight, the bishop no longer guards a8.

This problem could have been solved by pure calculation. That it took me more than ten minutes to solve, suggests that calculation was my best resource. Even so, along the way, patterns that were not instantly clear to me guided me and aided the calculation.

Because the problem took me so long, I gained only one point on my tactics rating. The average solving time is 2:34, but 2/3 of those who attempt the problem fail.


*He identifies himself as a teacher who was trained in philosophy. Readers of Plato understand that Socrates always thought of himself as a student, as a lover of wisdom who pursues knowledge and truth.

21 August 2016

An Ivanov Miniature

One of the ways that I am enjoying Tadic and Arsovic, Encyclopedia of Chess Miniatures (2015) is working through the games in which Black played the French Defense. The French is my primary response to 1.e4, so it behooves me to be well aware of the pitfalls. Last week, a miniature won by Alexander Ivanov in 2002 caught my eye.* His opponent was Jarod J. Bryan, who had been Maine State Champion in 1988 and 1998, and has won that title five more times since his quick loss to Ivanov at the 2002 Bradley Open.

In this miniature, Ivanov applied strong pressure after some slight inaccuracies by Bryan. Black's position collapsed quickly. The game is notable in the Encyclopedia for the presence of two diagrams. Most games have one.

Ivanov,Alexander (2645) -- Bryan,Jarod J (2218) [C00]
Windsor Bradley op 7th Windsor Locks (3), 20.07.2002

1.e4 c5 2.Nf3 e6 3.g3 Nf6 4.Qe2 d5 5.d3 Be7 6.Bg2 Nc6 7.0–0 0–0 8.e5 Nd7 9.c4

Black to move

Already, Black's position seems difficult. ChessBase database indicates that White scores over 70% in most lines.

9...dxc4

Tadic and Arsovic offer as better 9...d4 10.h4 b6 11.Bf4, but even here the statistics favor White by a significant margin.

The relatively untested 9...b5 offers hope for Black if statistics have merit. 10.cxb5 Na5.

10.dxc4 Qc7 11.Bf4 a6 12.Rd1

Black to move

12...Nb6?!

12...Rd8 13.Nc3 Nf8 is worth filing away for possible exploration later. The line appears untested, at least in the sort of games that work their way into the database.

13.Nc3

As I played through this game in the North Spokane Library repeatedly, I kept looking at this knight. First, it seems a little tardy to enter the action, and thus easy to overlook. Second, once it enters the battle, Black seems busted.

13...Rd8 14.Ne4 Nd4?

14...h6 is offered as an improvement in the Encyclopedia. Stockfish prefers 14...Bf8, which strikes me as sensible given the tactics centered on f6.

15.Nxd4 Rxd4

White to move

The Encyclopedia has this diagram.

16.Nf6+!+- Bxf6

16...gxf6 17.Rxd4 cxd4 18.Qg4+ Kf8 19.exf6+-.

17.exf6 Rxf4

17...Qd8 was the last chance to suffer longer.

The second diagram in the Encyclopedia appears here.

18.Qe5

18.Qe5 Qxe5 (18...Qd7 19.Rxd7 Nxd7 20.Qxf4+-) 19.Rd8#.

1–0


*Alexander Ivanov should not be confused with Boris Ivanov, who was banned from competition by the Bulgarian Chess Federation due to suspicions of cheating. Alexander Ivanov lives in Boston, Massachusetts and shared the 1995 U.S. Championship. He was awarded the Grand Master title in 1991.

04 August 2016

Defend Well

While looking for instructive miniatures for use in next week's chess camp, I came across this game: Letzelter -- Asmundsson, Buenos Aires 1978, Chess Informant 26/241.

Black to move

Black played a logical move, but it lost to a creative and instructive White attack. With a different move by Black, White's attack is unclear.

04 March 2016

Lesson of the Week

My beginning students continue to work on fundamental tactics. This week, the emphasis was on decoy. They worked through the problems on the worksheet Beginning Tactics 10 (reproduced at "Lesson of the Week [19 December 2012]"). They also saw the decoy tactic that I blundered into in my round two game last weekend (see "Don't Be Clever").

My advanced class drew one card from each of three packets: pawn ending cards, rook endings, middlegame positions (from GM-RAM). The first two are from Dvoretsky's Endgame Manual. We labored together to find the solutions with mixed success.

Black to move

Most of the students were convinced that White was winning the pawn ending. I played Black and slowly convinced the students of the truth of the position.

White to move/Black to move

The rook ending position is two positions--White to move and Black to move. We only looked at White. The students tried several schemes that failed, but with correct play, White can transfer the move to Black. Then, it becomes clear that Black is in zugzwang.

White to move

This position arose in Morphy -- De Riviere, Paris 1863. The students favored Morphy's move (18.g4), which may not be best. However, they struggled with my refutation (18...Rh7). De Riviere played 18...Rxh3, which is superior to 18...Rh7. The group saw 19.Bxf6 Nxf6, but not 20.Ng5!

28 February 2016

Don't Be Clever

"You can have all the knowledge in the world and still play crappy chess."
Cam Leslie
I had this position and a clear plan

White to move

The plan had been to swap knights when my opponent moved his to e4, and then play Rf1. Maybe I have enough play to seek an advantage in the endgame. When the moment arrived, however, I started looking deeply at the strategic implications of a tactical plan: he takes my rook, I take his rook with check, then my queen goes to g4.

23.Ng4?? Rh1+ 0-1

After the game, I showed my blunder to Cam Leslie, and showed him the variation to Mayet -- Anderssen (1851?) that I show young chess players regularly (see "Sacrificial Attack").

I am more or less assured that my rating will go down when the 24th Collyer Memorial Chess Tournament is rated. My opponent in round two was rated roughly 200 below me. But, at least I'm having fun and gaining more positions that I can show students.

12 December 2015

Outplay Chigorin

A Tough Position

I have shown this position to most of my chess students during the past two weeks. None have solved it, although several have seen checkmate patterns that look promising. The position arose in the thirteenth match game Schiffers -- Chigorin, St. Petersberg 1897.* It also appears in Encyclopedia of Chess Combinations, 5th edition (2014) as number 2386. It was brought to my attention two weeks ago via Renaud and Kahn, The Art of the Checkmate (1953).

Black to move

Mikhail Chigorin played 24...b6 and the game was drawn by repetition ten moves later. Renaud and Kahn point out that Chigorin missed a checkmate in five, and their solution is identical to that given in ECC. However, White has a defensive resource that delays checkmate one move, so it is actually a checkmate in six.

Knowing there is a forced checkmate, I was able to work out the five move solution in a few minutes. The computer showed me the additional defensive resource.

Several of my students found the first move easily, but because they could not find the second move, they revised their first move. Alas, all other first moves by Black allow White to unleash an attack.

I think the final checkmate pattern is hard to imagine from this position and that is why Chigorin and my students missed the combination. The solution was pointed out shortly after the game by R.J. Buckley, according to James Mason, The Art of Chess (1905), 210, where the position was represented by a diagram missing the c2 pawn (see Edward Winter, "Schiffers v Chigorin," Chess Notes 7932 [13 January 2013]).


*This game was Chigorin's foray with Damiano's Defense (see "Opening Disaster: Damiano's Defense").

02 October 2015

Expose the King!

In a recent correspondence game, I found a single reference game in which Black's play struck me as a bit timid.

Black to move

My database contains six games that reached this position, one with White to move. I only looked at those games played by masters (ratings above 2200). The highest rated Black player continued with 10...Ne5.

10...Bd6 was played in the other two games. White must address the threat to h2.

11.f4

My opponent threatened e5, following one of my reference games.

11.g3 was attempted in the other reference game. That did not go well for White. 11...Bxg3 12.hxg3 Qxg3 13.Kh1 Ne5 14.Nc5 Nfg4! 15.fxg4 Qh3+ 16.Kg1 Qxe3+ 17.Rf2 Qxc5 and White resigned after two more moves. Brynjarsson -- Bjornsson, Reykjavik 2009.

11...b4

I studied the remaining reference game, and noticed that Black gained an attack on the king. Black's attack faltered, but need not have done so. Initially, Black seems to sacrifice a knight but gains three pawns for the piece. Another sacrifice, however, this time for a single pawn fatally exposes the White king. This second sacrifice was not played in the reference game.

12.e5

The fork.

12...Nxe5

Beginning a tactical operation that exchanges a knight for three pawns and leaves the White king exposed.

13.fxe5 Bxe5 14.Nb1N

The reference game continued: 14.Na4 Bxh2+ 15.Kh1 Qg3 (15...Bxg2+! 16.Kxg2 Qg3+ 17.Kh1 Qh3 18.Rf2 Bf4+ 19.Kg1 Bxe3 and Black has recovered the material with interest.) 16.Bf3=  and the game was drawn in 42 moves. Toubale,T -- Villeneuve,A (2345), Cannes 1989.

14...Bxh2+ 15.Kh1 

Black to move

I had been aiming for this position.

15...Bxg2+! 

As seen in the reference above, 15...Qg3 gives White time to organize a defense.

16.Kxg2 Qg3+ 17.Kh1 Qh3

White to move

18.Rf3

18.Rf2 is better 18...Bf4+ 19.Kg1 Bxe3 20.Qf1 Qg3+ 21.Qg2 Bxf2+ 22.Kf1 Ne4–+.
18.Rxf6 fails. 18...Bg3+ 19.Kg1 Qh2+ 20.Kf1 Qh1+ 21.Bg1 Qh3#.

18...Bg3+ 19.Kg1 Qh2+ 20.Kf1 Qh1+ 21.Bg1 Qh3# 0–1

Finding the decisive blow was almost certainly helped by my having read earlier this summer several of Mihail Marin's recent columns for Chess Informant. In particular, for Informant 122 he wrote, "Is Chess a Matter of Memory? Lasker's Double Bishop Sacrifice."

10 April 2015

A Magnet Sacrifice

Chess vocabulary varies and can be colorful. This morning, as I was reading S. Tartakower and J. Du Mont, 500 Master Games of Chess (1975 [1952]), I came across an old term for the maneuver that is usually called decoy these days. The term attraction is also used by some, such as Chess Tempo.

White to move

This position came about in a miniature played by Henri Delaire against an opponent whose name was omitted from the records. It appears in the annotations to G. A. MacDonnell -- Anderssen, London 1862, which is my current Game of the Week.

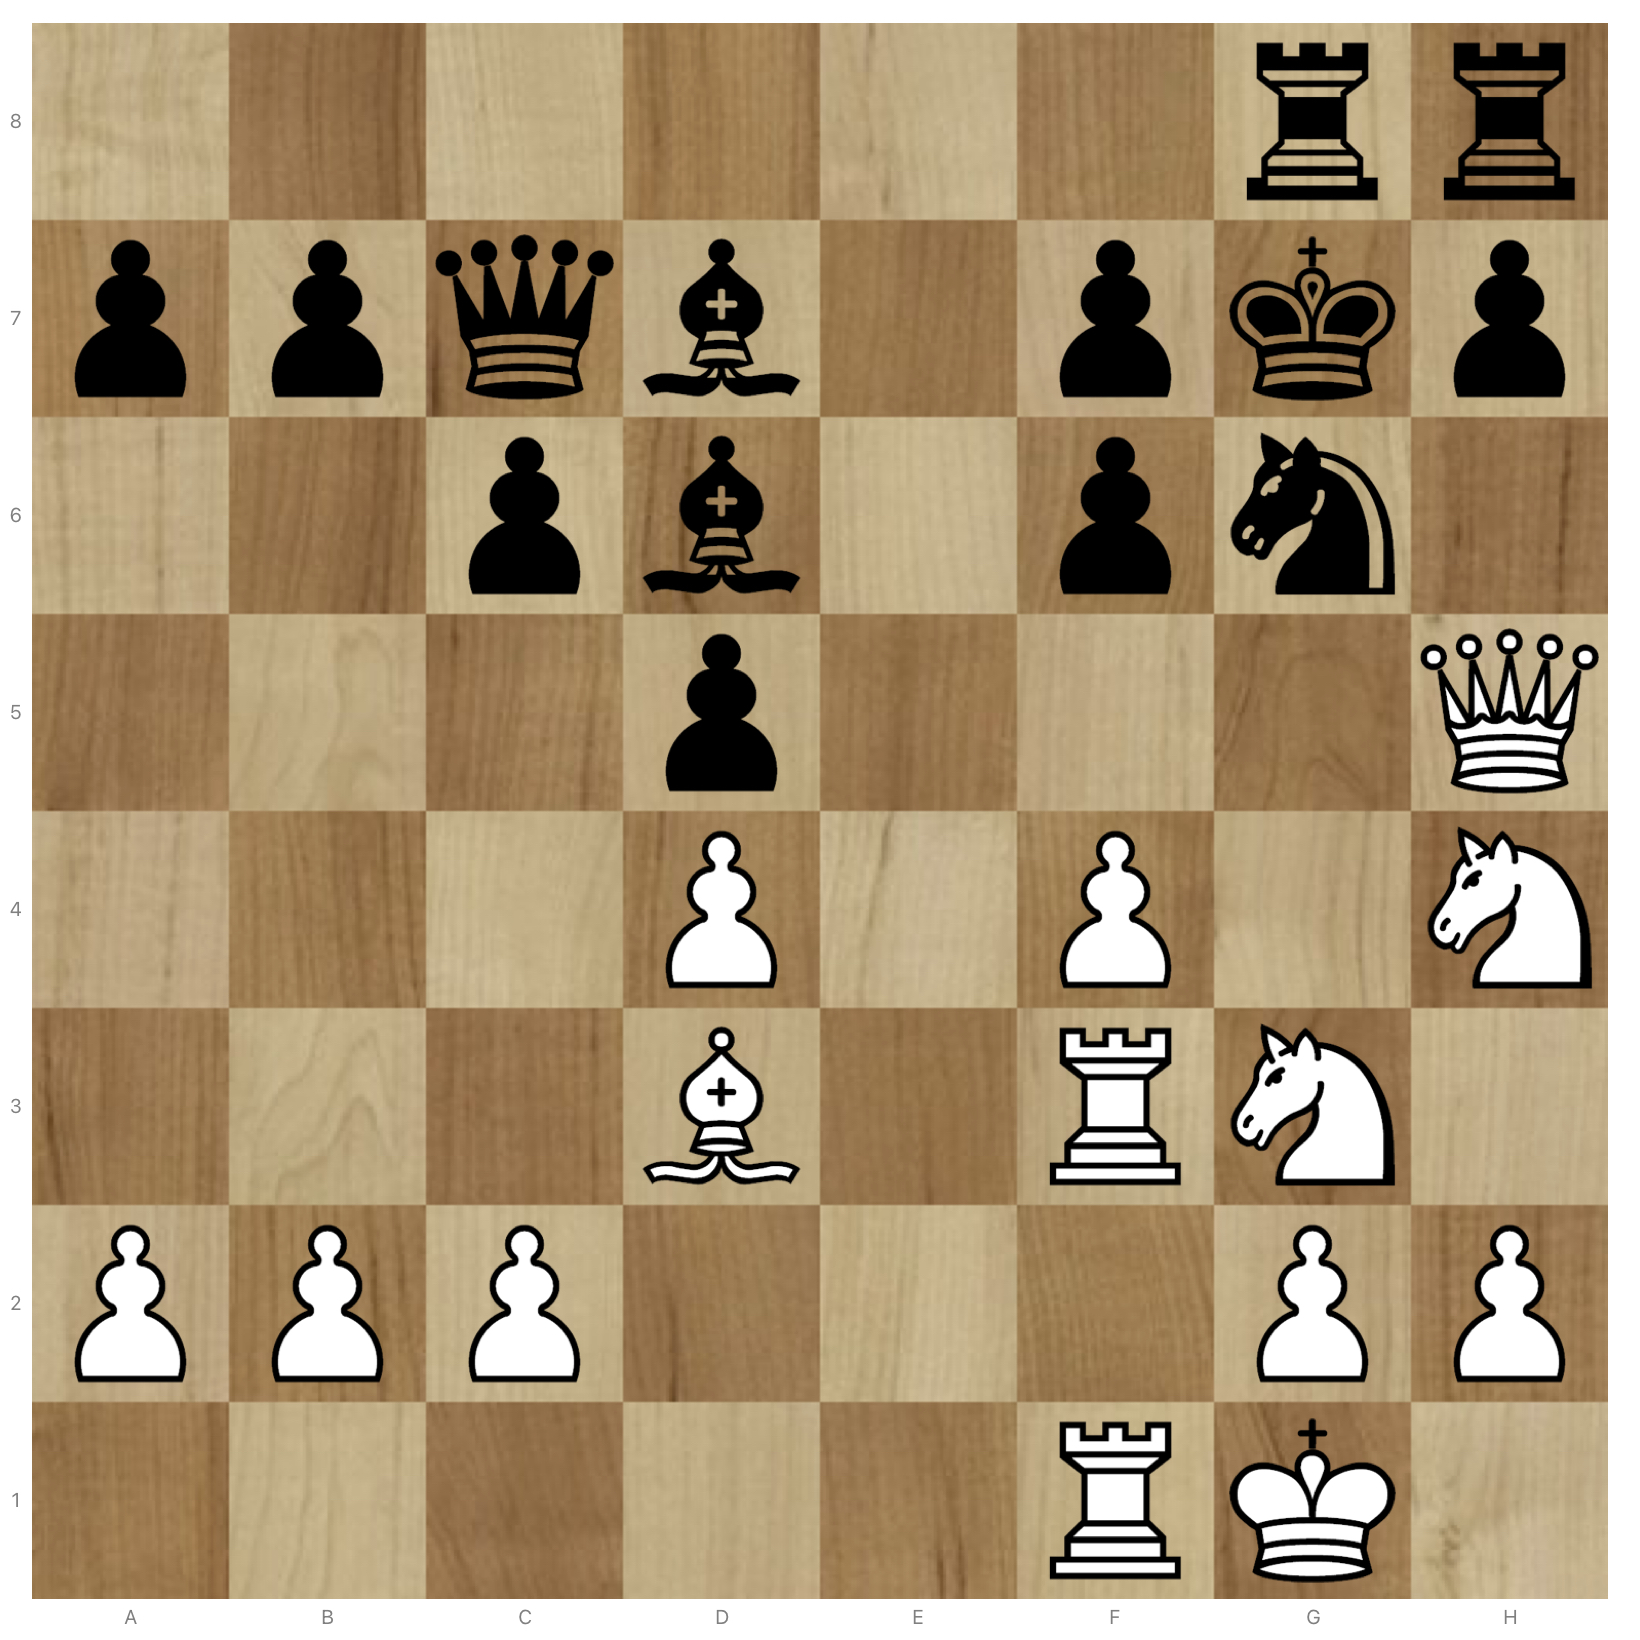
The move 14.Qxf5+! is called "a magnet sacrifice" by Tartakower and Du Mont. Black's king is lured or attracted to a vulnerable square where it suffers additional assaults. Accepting the sacrifice leads to checkmate.

30 March 2015

Assaulting the King

The Nature of Blitz

In a recent blitz game, I made an unsound sacrifice of a knight for two pawns to launch an attack on my opponent's king. Had he defended properly, my attack would have faltered. He failed. My attack, also, contained several inaccuracies. Such is the nature of blitz: blunders characterize the play of both sides.

White to move

Objectively best for White here is 15.Nc3 or 15.Qa5. In both cases, Black is somewhat better. However, I wanted to take the g5 pawn and create an open file in front of Black's king. I needed to decoy away one of the defenders of g5.

15.Nxd6!? 

An assault on the king begins with an unsound sacrifice.

15...Qxd6 16.Nxg5 Bg7?

The first important error by my opponent.

16.h6 18.Nh3 Kh7 and Black's king remains secure. White has nothing for the sacrifice.

17.Rc3?

Positionally, this move seemed sensible, but it fails.

17...Nf6??

17...h6 18.Rg3 Kh8 19.Nf3-+ and Black should prevail.

18.Rg3

18.h6 was best.

18...h6

White to move

19.Ne6

This second knight sacrifice is White's only chance.

19...Bxe6?

19...fxe6 20.Qxh6 Ne8 21.Qg5=

20.Qxh6+-

Now, White's attack cannot be stopped.

20...Ne8 21.Qg5 f6 22.Qh4

22.Qg6 is better.

Black to move

22...Bd7

22...Kf7 is objectively best, but still loses. 23.dxe6+ Qxe6 24.h6+-.

23.h6 Rf7 24.Bh5

24.hxg7 is better.

24.Re7 25.hxg7 Nxg7 26.Bg6

Black to move

1-0

Black ran out of time, but it is checkmate in three.