Showing posts with label piece coordination. Show all posts

16 November 2022

Decisive Advantage

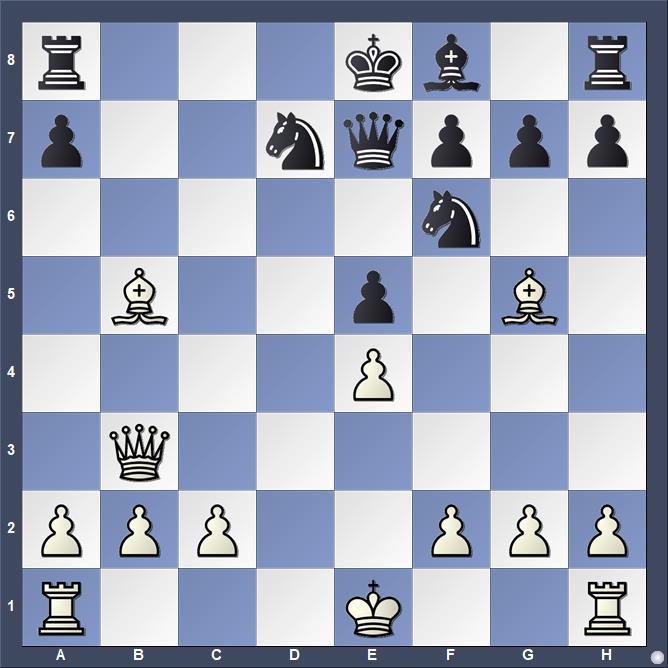
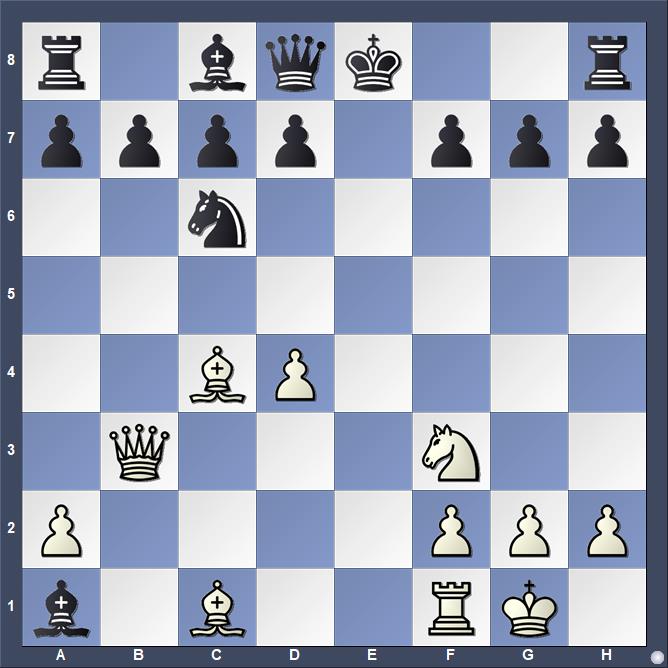
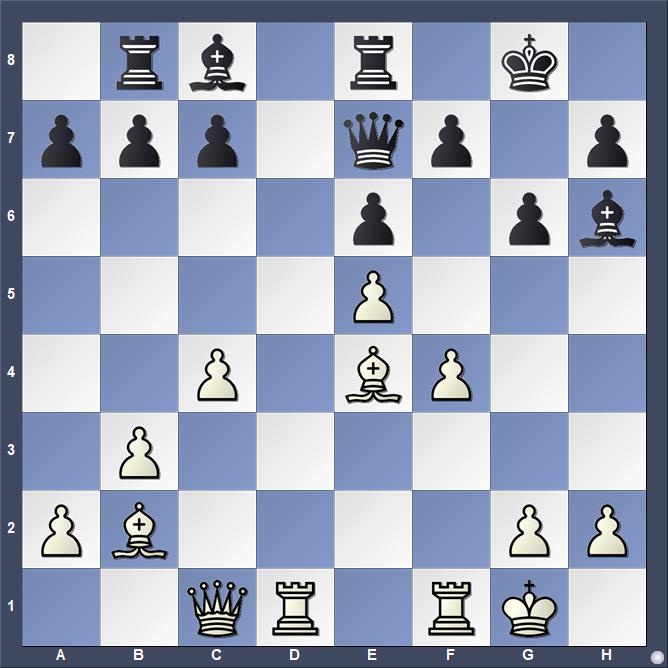
My students this week are seeing a series of positions in which White has a decisive advantage. Before suggesting moves, or seeing those that were played, I ask them to assess the position. What features account for White's substantial advantage?

The intent is for them to grow in their understanding that a player must use all their pieces in coordination. They should notice that in each position, White's pieces are more mobile, offer concrete threats, and work together. Students are also asked to understand the difference between the pieces on the board and the pieces in the battle. This dynamic imbalance is temporary unless the player wit the advantage acts with vigor.

I spent about an hour gathering 16 positions for these lessons, but no student so far has seen more than eight. The first two are from famous games that many of the students have seen before.

The first is from Paul Morphy's Opera Game.

White to move
The second is from Gioachino Greco's best known use of the Greco Attack (see "Cultivating Error"). I have had this position myself in at least 17 games, winning 16. The one loss was a bullet game where I inexplicably put a horse on a square earmarked for an elephant.

White to move
The third position highlights the relationship between space and mobility. It comes from a game that I played on Chess.com a few days ago.

White to move
Number four was presented at "Desperation". It highlights concrete checkmate threats. Number five is a textbook endgame exercise.

White to move
The sixth proves difficult for students to assess. It comes from a cyborg game played in a match organized by the International Correspondence Chess Association (ICCF). In this game, White used his intuition and a great deal of time on moves 13-15 to acquire mobile center pawns that confer a dynamic advantage.

White to move
Thomas Engqvist's analysis of Morphy,P. -- Morphy,A., New Orleans 1849 in 300 Most Important Chess Positions (2018) guided my selection of the seventh position (14-15).

White to move


17 November 2021

Textbook Coordination

Black has a problem in this position, which could appear as part of the position in a game.

Black to move
White threatens Qxh7#

White's four pieces are well-coordinated for the final assault on the king. A position like this one could arise with additional defensive resources that would tip the balance in Black's favor. Without them, Black is near lost.

I put this position on the demonstration board at the start of the lesson for my after school chess club on Tuesday, noting that White's light-squared bishop could be anywhere along the diagonal from a2 to d5. We looked at several possibilities for Black's defense and White's attack, most leading to either checkmate or the loss of Black's queen.

Then, I showed the students two games. The first appears in several of Gioachino Greco's manuscripts, and is well-known from its inclusion in the usual databases. David Levy and Kevin O'Connell, Oxford Encyclopedia of Chess Games, Volume 1 1485-1866 (1981) has this as Greco 11 (2).

Greco,Gioacchino -- NN [C53]
Greco Europe, 1620*

1.e4 e5 2.Nf3 Nc6 3.Bc4 Bc5 4.c3 d6 5.d4 exd4 6.cxd4 Bb4+ 7.Nc3 Nf6 8.0-0 Bxc3 9.bxc3 Nxe4 10.Re1 d5 11.Rxe4+ dxe4 12.Ng5 0-0 13.Qh5

Black to move
13...h6 14.Nxf7 Qf6

We also looked at 14...Rxf7, which is a better defense. This move and the subsequent 15.Bxf7 precede Greco, appearing in the Regole MS, which some scholars have credited to Giulio Cesare Polerio and dated to the late sixteenth century (see Peter J. Monté, The Classical Era of Modern Chess [2014], 158-160, 465.)

15.Nxh6+ Kh8

15...Kf8 was also examined by Greco, but is not so credited in the ChessBase database. The line appears as an annotation in Levy and O'Connell, as three variations appear in Professor Hoffman, The Games of Greco (1900). This line merits a separate post. It was not part of the lesson at the youth chess club.

16.Nf7+ Kg8 17.Qh8# 1-0

The second game had been played that morning.

Stripes,J -- Internet Opponent [C70]
Live Chess Chess.com, 16.11.2021

1.e4 e5 2.Nf3 Nc6 3.Bb5 a6 4.Ba4 b5 5.Bb3 Bb7 6.c3

Inaccurate?

6.0-0 Nf6 7.c3 Nxe4 8.d4 Na5 9.Bc2 is normal.

6...Bc5 

Probably a mistake.

7.0-0 Nf6 8.d4

Black to move
8...exd4

This move accelerates White's attack.

8...Bb6 9.Re1 d6 10.a4 0-0 has appeared in a game between masters.
8...Bd6 9.Bg5 is an engine suggestion.

9.cxd4 Bb6 10.e5 Nd5

Simply giving away the knight. Black's position is near hopeless already in any case.

10...Ng8 11.d5+-

11.Bxd5 0-0 12.Ng5 Bxd4

12...h6 may be the last chance.

13.Qh5

We arrive at the basic pattern from Greco and his predecessors.

Black to move

13...h6 14.Nxf7 1-0

My opponent resigned here.

The game might have continued 14...Rxf7 (14...Qe7 15.Nxh6+ Kh7 16.Nf5#) 15.Bxf7+ Kh8 16.Bxh6 and the engine points out that 16...Qg8 is the only move.


*The game appears in Greco's Godolphin manuscript, an undated MS from the London sojourn, so should be dated 1623. It also appears in several MSS 1624-1625 produced in France.

14 April 2019

Smith-Morra Sideline

In my online blitz junk, I often play an extreme version of the Smith-Morra Gambit that takes an idea from the Danish Gambit, offering a second pawn for rapid mobilization. It is unsound. The opening is for blitz only. The regular Smith-Morra, however, can be useful in standard rated over-the-board play and even in correspondence.

Black can decline White's sacrifice in the Smith-Morra Gambit. In a blitz game last night, my opponent did that. The game proved testing for a line that had been mostly successful for me.

Stripes,J. (1997) -- Internet Opponent (2042) [B21]
Live Chess Chess.com, 13.04.2019

1.e4 c5 2.d4 cxd4 3.c3 d3!?

Black's idea seems to point out that the pawn is not well-placed on c3.

White to move

4.f4!?

My innovation, played 18 times with 14 wins and 4 losses. Although I cannot claim to be the first who has played it.

4.Bxd3 is the normal move.

4...d5!

I have not seen this move often, but in retrospect, it seems the best way to make the argument that White's line of play may be poorly thought out.

5.exd5

5.e5!?

5...Qxd5 6.Qxd3 Nf6 7.Nf3 Nc6

White to move

8.Nbd2

8.Qxd5 Nxd5 9.Bc4 Nb6 10.Bb3 Bf5 11.Be3 e6 12.Nbd2 Bd6 13.0–0–0 0–0 was drawn in 45 moves, Papp,C (2128) -- Tamas,G (2164), Hungary 1999.

8...Bf5 9.Qxd5 Nxd5 10.Nc4 e6 11.Ne3 Bc5

White to move

The engine has the game as equal and both players are making top choices. Nonetheless, White seems to lag in the mobilization of his pieces, which also lack coordination. White's king is also more vulnerable.

White's position is much more difficult to play than Black's. In blitz, that alone can be decisive.

12.Nxd5?!

12.Nxf5 is still roughly equal.

12...exd5

Black has a better game.

13.Bd2

13.b4

13...0–0 14.0–0–0 d4 15.c4 d3

Black has the upper hand.

White to move

16.b3 Ba3+ 17.Kb1 Rfd8 18.h3 h5 19.Nh4

19.g3 Be4 20.Bg2 Nd4 21.Rhf1

19...Be4 20.Rg1?

20.Nf3

Black to move

20...Bc5–+ 21.Rh1 Nb4

21...a5

22.Re1

22.Nf3

22...f5?

Black lets White back into the game.

White to move

23.Nf3

23.Nxf5 Re8 (23...Bxf5 24.Re5 and White has an edge) 24.Rxe4 Rxe4 25.a3 Nc2 26.Bxd3=

23...Nc2 24.Rd1

24.Rc1

24...Na3+ 25.Kb2 b5 26.cxb5

26.Ne5

26...Nxb5

White to move

27.Ne5? White collapses.

27.a4

27...Bd4+ 28.Kb1 Na3+ 29.Kc1 Rac8+ 0–1

White struggled the whole game to mobilize his pieces without success. Black, meanwhile, was able to consistency apply pressure. White eventually collapsed from the pressure. Despite my nearly 75% scoring percentage with 4.f4, the line cannot be recommended.

16 September 2018

Knights before Bishops

Most chess players have heard the rule that one should deploy a knight towards the center before moving a bishop. The standard move order in the Spanish opening is a good example--for White, a center pawn, the king's knight, and then the king's bishop. The Italian opening follows the same sequence. Likewise, in many lines of the Queen's Gambit, White will deploy both knights before moving a bishop. In other lines one knight comes out and one bishop a move or two later, while the other minor pieces await developments that reveal their best square.

However, in the London System, White plays the queen's bishop on the second move, and may bring out both bishops before a knight moves. Likewise, Black's first minor piece to come out in the Caro-Kann is a bishop.

Erik Kislik states that knights before bishops, "is not a very useful rule" (27) in Applying Logic in Chess (2018). This rule is the first of ten that Kislik quotes from the work of some unnamed grandmaster, presented as rules for beginners. He makes an important point:
Rules in chess assume 'all else is equal',but all else rarely is equal, so we need to judge ideas based on specific circumstances. Most of the time, advice given to amateurs is in the form of rules. Chess is a concrete game though, and more often than not, this advice is too stereotypical to be of much applicable value.
Kislik, Applying Logic in Chess, 26.
Kislik runs through each of the ten rules, offering his views of how each develops principles in certain circumstances but falls short in others. His analysis is almost completely verbal, with few diagrams and analysis of specific positions.

The Review

John Hartmann sold me Kislik's book through his review in Chess Life ("Logical Ambition," CL, September 2018, 20-21). Hartmann calls Kislik's book "one of the most interesting titles to appear in recent years, ... also one of the most maddening" (20). Hartmann notes that the cover, with a flowchart for making decisions in chess, is "misleading": "There is nothing in the text that resembles a flowchart for thought" (21). Kislik's view of logic and reason is more modest.

Another book on my shelf offers flowcharts, Paata Gaprindashvili, Imagination in Chess: How to Think Creatively and Avoid Foolish Mistakes (2004). I reviewed it here on Chess Skills in February 2017. The core of that book is found in the quality and difficulty of the exercises. I have found the flowcharts marginally useful.

Hartmann's comments took me back forty years when some fellow undergraduates were taking a course on logic and making the efforts to systemize thought in terms like, "if p, then q". I did not find such an approach to logic any more useful for learning to think than studying semiotics for learning to read and write. The notion that seemed to represent this more modest view of logic, which Hartmann quotes from later in Kislik's book, that chess errors always can be explained clearly, was enough to interest me in the book.

Hartmann also notes that, "there are multi-page stretches unsullied by diagrams or analysis" (21).

Kislik's Assessment

After declaring the rule "not ... useful", Kislik highlights both its merits and shortcomings. He starts out noting that the corollary to the rules that, "developing bishops early on is suboptimal ... is definitely not true" (27). What matters, he suggests, are the reasons. Kislik highlights piece coordination, the principle of improving the worst-placed piece, and flexibility. The last is where the rule's merits become evident. The knight on g1 usually finds itself well-placed on f3 early in the game, but the optimal placement of the bishops is less certain.

His views on this rule and those that follow are thought provoking and worthy of attention. Nonetheless, his discussion seems incomplete. He laments the instruction methods for beginners that proclaim these rules without, "making sense of the principle or idea, or understanding where it came from" (26). My way of thinking about "where it came from" drives me towards historical explanations. Kislik does not offer any history of these rules.

In Common Sense in Chess (1917), Emanuel Lasker offers the text of lectures that he presented in London in 1895. In the first of these lectures, he develops four rules--including knights before bishops--through concrete analysis of several short model games. Five years ago, these rules and games, as well as a few others that I selected, comprised the core of my lessons for youth players over several sessions (see Lasker's Rules).

Rule Independence

Erik Kislik is not original in his suggestion that concrete analysis of specific positions should take precedence over abstract and universal rules. This idea was well-expressed in John Watson, Secrets of Modern Chess Strategy: Advances since Nimzowitsch (1998). Even so, strong Grandmasters who teach young players still promulgate these rules with the understanding that their pupils will need to learn how and when to violate them. I recall during a tournament broadcast a few years ago, hearing Peter Svidler discuss his struggle with both promoting and resisting the teaching of such rules. These rules have a purpose even though in the long-run they can retard development.

Consider the very common position after 1.e4 e5 2.Nf3 Nc6 3.Bc4 Bc5

White to move

Many youth players will not reach this position because they would have played 3.Nc3. While this move is not inherently bad, young players will make it by rote, often oblivious to the moves played by Black. They will often play it without thinking. Kislik's underlying notion, it seems to me, is that even at this early stage of the game, it is critical that reasoning must be part of every move. Whether one plays 3.Nc3, 3.Bc4, 3.Bb5, 3.d4, or some other move, it must be rooted in understanding.

From the diagram, most of the youth games that I have witnessed continue 4.Nc3. Master games, on the other hand, more often proceed with 4.d3 or 4.c3 (which violates one of Lasker's rules). In my play, I favor 4.c3 as more dynamic, and I usually will follow it with 5.d4. However, as more and more opponents fail to exhibit the greed that leads to disaster in the Greco Gambit, I am shifting towards 5.d3.

In my play and in my teaching, I teach students that it is okay to play 4.Nc3 (or 3.Nc3), even though I think there are stronger moves. What is critical, I urge is that these moves are made with thought and understanding, not simply played by rote. In the end, that's the point of these rules for development: they are guidelines that assist our thinking, not rules that direct our play. I think Kislik agrees.

25 December 2017

Holiday Cheer

I usually play a game or two of online blitz on holidays. These days are devoted to family time, but there are always a few moments when everyone else is sleeping or otherwise occupied, so I sneak in a game of chess. This morning, the investment of a knight gave me a nice position in a classical French.

White to move

My bishop is prepared to come to d7 with tempo, then the other rook can join the fray and all of my pieces will be aiming at White's royal family while his pawn storm is less threatening than the skiff of snow that fell on my deck overnight.

20.Nc3??

20.Qa3 seemed necessary.

20...Bd7 21.Qa3 Rfb8

My opponent realized the hopelessness of his position and wished me Happy Holidays!


23 February 2017

Cultivating Youth Skills

My chess students range from absolute beginners who have just learned how the pieces move and are beginning to discover forks and pins to some of the perennial trophy winners at local scholastic events. Students who meet with me one-on-one get tailored instruction that includes analysis of their tournament games. They also get a heavy dose of classic games.

This week, both students who meet one-one-one and my advanced after school club worked through some positions on my green cards. These cards have diagrams from Ziyatdinov, GM-RAM: Essential Grandmaster Knowledge (2000). One of these positions is from Schulten -- Morphy, New York 1857.

These positions are presented not merely as a tactical problem to solve, but also as a position to play. I emphasize, as does Ziyatidinov, finding the best plans for both sides. Yes, there is a tactical shot. But, there is also a need to cultivate the skill that converts the resulting advantage into a win.

Black to move

Having seen and learned Morphy's Opera Game last week, some students found the key move quickly after being told it is a Morphy game and we need to look at pins.

13...Rxe2 14.Nxe2 Nd4

In the game, Shulten played 15.Qb1.

We explored how Black might proceed after 15.Qe1. Together, we played both sides trying to find a win for Black and the stubborn defense for White.

One of the interesting lines continued: 15.Qe1 Bxe2+ 16.Kg1 Qb6 17.Be3 Ng4 18.Bf2 Re8 and we played on from here, taking back moves that seems to fail and looking for better tries.

We also looked at this position from one of my online games.

White to move

40.Rh7+ was played in the game, and it worked well because Black did not find 40...Kg6 41.Rxe7 Rxc5, which gives Black excellent drawing prospects.

40.Bxe7 is White's best move, leading to 40...Kg7 41.Bd6 Rc1 42.Be5+ Kg6 and White should win.

My beginning students completed the worksheet Beginning Tactics 3 after seeing an illustration of the power of pins from the game Portisch -- Berger, Amsterdam 1964.

White to move

16.Nxh7 Kxh7 17.Rh5+ Kg7 18.Be5+ f6 19.Rg5.

02 February 2017

Chess at the Opera

The chess games of Paul Morphy (1837-1884) offer exceptional material for teaching basic concepts of opening play, as well as material for stunning combinations leading to checkmate. Morphy is sometimes credited with inventing the concept of development, or at least understanding it better than anyone else before those who followed him began to articulate it in their books and articles.

Morphy showed promise as a chess player from a very young age. He seems to have learned the game from watching his father and uncle play. His relatives and their business associates were the leading players of New Orleans, Louisiana. Young Paul was already beating them by the time he was ten years old.

Morphy had a terrific memory and excelled in school. Before he reached the age of 21, he had finished all the schooling necessary to embark on a career in the practice of law, but he could not be admitted to legal practice until he reached adulthood. Hence, he took some time to play chess. He competed in the First American Chess Congress (1857), which he won, and then departed for Europe, hoping to play the leading masters there.

He won matches against several players in England, and also participated in chess exhibitions, such as simultaneous play where he played many games at once. His only disappointment was that Howard Staunton, England's top player, could find neither the time nor the will to arrange a match with Morphy.

Morphy then went to Paris, France. He intended to continue to Germany and Austria, but grew ill during the passage from England to France. He spent the fall 1858 in Paris, and then extended his stay through the winter on the advice of his physician. During the Christmas holiday, Adolf Anderssen traveled to Paris for the much anticipated match between Europe's top player and North America's. Morphy won the match.

A Scene at the Italian Opera, Paris 1856
During his stay in Paris, Morphy was a cynosure. Parties were hosted in his honor so the city's leading artists and intellectuals could interact with him. He was well-liked because he demonstrated good manners and comported himself well in conversation on many topics. Naturally, many people wanted to play chess with him.

Morphy loved music and was a frequent guest of the Duke of Brunswick at the Italian Opera. The Duke's private box was on the edge of stage. It was so close that when the Duke and his guests conversed too loudly, the actors thought the conversation there was part of the performance. The Duke kept a chess set there. When Morphy attended the opera, he was seated with his back to the stage so that the Duke and one or more of the Duke's other guests could consult in a chess game against the chess master while listening to the music. Morphy played several games in this manner, but the moves of only one such game has been preserved.*

The Lesson

Beside the demonstration chess board, I wrote:

Development

mobility
coordination
vulnerability

I asked students to repeat these words and to remember them. I explained that central to the idea of development was mobilizing your pieces. We discussed the relative mobility of a knight or bishop at the center of an empty board versus one on the edge of an empty board. A piece that can move to more squares is more mobile. I explained that good chess players labor to make their pieces work together in harmony while they are improving each piece's mobility from the limits of the starting position. Such piece coordination is necessary to exploit vulnerabilities in the opponent's position. It is important in the beginning of a chess game, and throughout, to attend to the security of one's king, and to avoid leaving pieces where they can be captured without consequence. Reducing one's own vulnerabilities is important, as is exploiting those vulnerabilities that might be created when an opponent fails to do the same.

We then proceeded to go through Morphy's game played at the opera against the Duke of Brunswick and Count Isouard. I suggested that there is no reason why young players could not memorize the entire game.

Morphy, P -- Duke and Count
Paris, 1858

1.e4

I urge young players to play this move with the White pieces at least one hundred times before they consider any other first move. This move stakes a claim to the center and increases the mobility of four White pieces, most notably the queen and bishop.

1...e5

This move is as good for Black as for White.

2.Nf3

Attacks Black's e-pawn, creating a problem for Black to solve.

2...d6

Philidor's Defense is one of several ways to address the threat of White's second move.

3.d4 Bg4

White struck at e5 a second time. Black opted to pin White's knight, indirectly protecting the vulnerable e-pawn. See "Lasker's Rules" for some caveats regarding Black's third move.

4.dxe5 Bxf3 5.Qxf3 dxe5

Black avoided losing a pawn by capturing the knight before recapturing on e5. White threatened to escape the pin with an exchange of queens.

6.Bc4

White threatens checkmate in one.

6...Nf6 7.Qb3 Qe7

This move not only defends against the loss of the f7 pawn, but also looks ahead tactically at White's threat to the rook on a8. However, it blocks the bishop on f8. Black's lack of kingside piece mobility will endure through the rest of the game. Being unable to mobilize the kingside also keeps Black's king in center where it is more vulnerable. Morphy exploits these weaknesses brilliantly.

8.Nc3!

Rather than taking the free pawn, which would permit Black to force the queens off the board and allow them to mobilize their kingside, Morphy increases the pressure on Black's position. Morphy's move aims at improving piece coordination rather than wantonly grabbing material.

8...c6

Black defends the b-pawn, but this move neither improves the mobility of Black's pieces, nor improves piece coordination.

9.Bg5

Morphy pins Black's knight against the queen.

9...b5

The Count and Duke seek to drive back one of White's pieces.

White to move

10.Nxb5!

It is much easier to sacrifice material when two of the opponent's pieces are mere spectators. It is possible that Morphy saw all the way to the end of the game from this position.

10...cxb5 11.Bb5+ Nbd7 12.O-O-O

Having pinned the second knight, Morphy attacks the knight on d7 a second time. Rd1 is less effective because it does not permit the other rook to come to d1 as rapidly. In addition, by castling, Morphy reduces the vulnerability of his king. Although, Black's pieces are tied down so thoroughly that there is little they would be able to accomplish exploiting vulnerabilities.

In this position, we see that almost all of White's pieces are working together harmoniously from active squares where they are mobile. Black's pieces are unable to move because they are hemmed in by other pieces, or they cannot move without disaster due to pins.

12...Rd8 13.Rxd7! 

Morphy sacrifices the exchange in order to maintain a pin on d7.

13...Rxd7 14.Rd1 Qe6

Black finally steps out of the pin on the queen.

15.Bxd7+ Nxd7

Black could have given up the queen to avoid checkmate.

White to move

16.Qb8+ Nxb8 17.Rd8#


*Preparing to write this blog post, last night I reread the relevant portions of Frederick Milnes Edge, Paul Morphy the Chess Champion (1859); Max Lange, Paul Morphy: A Sketch from the Chess World (1860); David Lawson, Paul Morphy: The Pride and Sorrow of Chess (1976); and Philip W. Sergeant, Morphy's Games of Chess (1957). In addition to these four books, I read again Edward Winter, "Morphy v the Duke and Count," Chess Notes (updated 20 March 2014); and my own previous blog post, "The Opera Game" (22 March 2015).

03 September 2016

Panic Mode

Effects of Bullet Chess

After playing too many bullet games over the past few days, I played instant moves during a critical phase of a rapid game. Although I had six or seven minutes left on the clock, I moved as if I was down to the last few seconds.

I played the opening slower, but it did not go as planned. My first few moves were a gambit that I have had success with not only in blitz, but also over the board and in correspondence chess. However, my opponent met my gambit with an unusual reply. If his plan was unsound, I failed to find the refutation. At least, that's how I felt about the game. After sacrificing a pawn, no attack materialized. Soon, Black picked up another pawn and seemed to have as much of an attack as I did.

Nonetheless, the dreaded knight fork of my two rooks was deferred and I was able to get some pressure on the kingside. Postgame analysis with an engine revealed that I was afraid of empty threats. My position was better than I thought. Meanwhile, Black's queenside remained undeveloped with neither bishop nor rook yet mobilized.

Black has just grabbed the second pawn.

White to move

White has a forced checkmate in six, but I did not know that. The first three moves were instantly perceived and instantly played. Then, three memorized patterns competed for my intuitive mode and I selected the least effective.

26.Qe7+ Rf7 27.Rh7+ Kxh7 28.Qxf7+ Kh8

White to move

I played 29.Rh1+, which is still winning, but served to bring Black's queenside bishop into play, albeit without a future.

During postgame analysis before turning on the engine, 29.Rxg6 suggested itself. This move threatens both Qg7# and Rh6#. Black cannot defend against both, but can delay for five moves. Alas, these non-checking moves, even when they force a result, are too easily overlooked when playing in panic mode. Such a move takes only a few seconds to spot, however. With more than six minutes left on the clock, I could have taken these few seconds to check for checkmate patterns.

Even better, and forcing, is the immediate sequence that begins with 29.Qe8+. This move, too, is part of a memorized pattern that I would often play when I am not distracted by the check on the h-file. Perhaps due to play in panic mode, I had subconsciously erased the undeployed bishop from my consciousness. Maybe I thought that Rh1+ was checkmate.

A few moves later, I had a forced draw by repetition while still down material. I played two moves of the repetition and set up my opponent to play the third. Perhaps he, too, overestimated his position. He avoided the draw. After a few moves more, I saw an opportunity to liquidate into an ending with a queen, bishop, and three pawns for me and a queen and four pawns for my opponent.

I won a long ending.

13 January 2016

Refuting a Beginner's Error

While running a youth chess tournament on Saturday, I played a short game with a young student. He opted for Damiano's Defense, a not uncommon beginner's error. Some of my students this week are gaining experience by playing both sides of the position after 1.e4 e5 2.Nf3 f6?! (see "Opening Disaster: Damiano's Defense").

White to move

For the beginning students, I asked them to play from this position for several minutes. Then, I showed them my game from Saturday, as well as a few alternative variations. After the instruction, they played from this position again, taking turns as White.

3.Nxe5! fxe5??

Black is only a little worse after 3...Qe7, a move once played by Mikhail Chigorin in a match (1850-1908), the great Russian master. That game was the source for a lesson in December (see "Outplay Chigorin").

4.Qh5+ Ke7

Black's other legal move, here, does offer prospects for counterplay if White's play lacks vigor.

4...g6 5.Qxe5+ Qe7 6.Qxh8 Qxe4+ 7.Kd1 Ne7 and White is technically winning, but not without problems. This position is a good one to practice against the computer.

5.Qxe5+ Kf7 6.Bc4+ Kg6?

6...d5 allows the bishop to cover f5.

White to move

7.h4?

7.Qf5+ was the correct move.

7...h5

7...d5 was still possible.

8.Qf5+ Kh6 9.d4+ g5 10.hxg5+ Kg7 11.Qf7#.

My beginning students need to learn to recognize immediate threats and two move tactics. Advanced students, too, may learn from this short game and from practice from the positions after Black's move two, White's third move, and the variation given after Black's better fourth move.

29 September 2015

Strategic Nuances

This position, which I came to via Karpov -- Timman, European Junior Championship, Groningen 1967-1968, has appeared on the board at least 119 times.

Black to move

Jan Timman played 5...Ba5.

Anatoly Karpov wrote:
The bishop is badly placed at a5, and the whole of White's subsequent play is built on exploiting this circumstance. I consider that Black should have taken the knight, and then played Nc6...d6...and e5.
Anatoly Karpov: Chess is My Life (1980), 28.
Karpov won this game and the championship. He had the Black side of this position against Victor Korchnoi in 1993 and played 5...Bxc3.

Timman's move has been more popular, having been played at least 86 times to 32 for 5...Bxc3. However, White's score against 5...Ba5 has been 67%, while White has scored 56% after 5...Bxc3.

Why is a5 such a poor spot for the bishop?

Karpov elucidates two resulting vulnerabilities in the ensuing comments. One, the presence of the bishop on a5 prevents Black from playing b6, and hence the c5 pawn is difficult to defend. Two, he offers some unplayed lines in which White either wins a piece through tactics, or White's central pawns become mobile at the cost of a pawn.

In the game itself, White's pieces became more active. Under the pressure of an inferior position, Timman blundered away a pawn.

11 February 2014

Understanding Threats

Lesson of the Week

Rezső Charousek (1873-1900) created deep combinations. In this position, his opponent Jakob Wollner has material superiority, but a vulnerable king.

Black to move

How should Black play?

In the game, Wollner played 18...Qg8.

How should White proceed?

26 January 2014

Aronian -- Van Wely, Tata Steel 2014

Bitten by the Dutch

When I awoke a little later than usual this morning, Levon Aronian had lost with White to Dutch player Loek Van Wely. Van Wely played the Dutch Defense and the game quickly reached an interesting position where both players seemed to have chances. In time pressure, Aronian missed something and lost.

Levon Aronian won the Tata Steel Grandmaster tournament in Wijk aan Zee with a convincing performance that included wins against Fabiano Caruana, Hikaru Nakamura, and Sergey Karjakin. Today's game did not matter for the final standings. Two games remain to finish as I am writing this post. Both of those games affect second place. Karjakin can finish in second alone with a win, or tie for second with a draw. Harikrishna can tie for second with a win.


Aronian,Levon (2812) -- Van Wely,Loek (2672) [A80]
Tata Steel Chess Wijk aan Zee (11), 26.01.2014

1.d4 f5 2.Nf3 Nf6 3.Bf4 

Aronian spent three minutes on this offbeat move. It is three times as popular as the Raphael Dutch that I played in my only draw against a FIDE Master. 3.g3 and 3.c4 account for the vast majority of games against the Dutch.

3...d6 4.e3 h6 5.h3 

Black to move

Already the players have nearly left previously trodden paths. Three games in the database have reached this position. Aronian has used more than ten minutes; Van Wely has used six.

5...g5 6.Bh2 Bg7 7.Nbd2

ChessBase Online finds two games in this position--both Black wins. The games were played in the 1990s among players of a far lower caliber than these two.

7...0–0 8.c3 Nc6 9.Bd3 Rb8 10.0–0 Qe8 11.Re1 Qh5

White to move

There are two questions that immediately crop up when I see this aggressive queen: Will she slay the White monarch? Can she be trapped?

Both players have used a lot of time. Aronian used 23m33s on his last move. Van Wely used 13m21s on this queen foray. Although I know the final result, and that both players were short on time near the end, I am going through this game unaided looking for critical points.

Analysis by Grandmasters and engine aided analysis almost certainly will differ in identification of the critical points of the game. This blog is a personal and public online journal of my development as a chess player and chess teacher. I am a USCF A Class Player hoping to break into Expert Class. If I continue to improve through my fifties, I may yet be a chess master before the inevitable decline of old age takes its toll. When I started this blog in November 2007, I was a weak B Class player.

Following Aronian's games is personal chess training.

12.Qc2 g4 13.hxg4 Nxg4 

Oh my!

White to move

Two attackers are not usually enough to crash through a defense, but Black's knight and queen will keep some of White's pieces tied down. Meanwhile, the Black king threw his pawn shield forward and stands naked. Unfortunately, there is no clear way for the White pieces to exploit this apparent vulnerability.

14.Bb5 Kh8

Van Wely spent twelve minutes on this move.

15.Qb3

The rook on b8 is a target, as is the knight. Had the king remained on g8, the check would have won the knight. The open diagonal is exploitable, it seems. But, Black's king is likely quite safe on h8.

15...Nd8 16.Bg3 e5 17.dxe5 dxe5

White to move

18.Qb4

The rook on f8 is vulnerable due to pressure on e5. White's knight and bishop that seemed consigned to defense against Black's aggressive queen and knight nonetheless have a role in attack, too. This game is sharp and instructive. There is a bit of chaos on the board, and both players are burning time negotiating the minefield.

18...Ne6

Protecting the rook.

19.Rad1

Seizing the open file. It is tempting to say that White has an edge in development, but piece coordination and vulnerability would seem more important than such abstractions.

19...c5

Black's pawns seem to be doing more than White's. Yesterday, I remarked that Aronian was giving lessons in Philidor's concept of the centrality of pawns. Today, Van Wely seems to be our teacher.

20.Qb3 Nc7 21.Be2 Be6 22.Bc4 Bd7 23.Be2

Black to move

Aronian would probably be happy to repeat the position, winning the tournament without a loss. The Dutch master, however has a nice position and seems in an aggressive mood.

23...f4!

Putting more pressure on White's defenses.

24.exf4 exf4 25.Bh4 Bc6 26.Be7 Rf7 27.Bc4 Nd5 28.Bh4

Black to move

White seemed to be attacking for a few moves.

28...Rf5

If White had a development advantage, it must be gone now. The Black rook on b8 is ready to swing into action. Most of Black's pieces seem to be bearing down on the kingside and there seems no way for the White pieces to get at the Black king.

Knowing the result of this game hinders objectivity, but I do like Black's position.

29.Bd3 Rff8 30.Bb1 Rbe8 31.Rxe8 Rxe8

Both players have a rook on an open file.

White to move

32.Ne4 Nde3

Van Wely finds a simple discovery that exchanges knights, but that also weakens the position of the White king. Black threw his king's pawn shield forward in attack. Now his pieces work to wreck the White king's shield.

33.fxe3 Bxe4 34.Bxe4 Rxe4 35.Qxb7

So often in Aronian wins a pawn when his opponent is under time pressure, then converts the win in the second time control. Here, however, both players are low on time.

35...Qg6

White to move

36.Rd8+

This weakening of the back rank may have been the decisive error.

36...Kh7 37.Qd5 Re6 38.exf4 Bd4+ 0–1

The bishop's interference is reminiscent of Aronian's loss to Anand in last year's Tata Steel Tournament.


19 July 2013

Choose Your Poison

Chess is a hard game. Even an opponent who blunders away a pawn in the opening will find a way to set problems in the way of victory. In this game, White went into a tableau, fianchettoing both bishops and developing his pawns to the third rank. Black impatiently thrust a pawn to e4, and lost a pawn in the process. Nonetheless, this pawn sacrifice* produced some disharmony in White's arrangement.

By move fifteen, Black had compensation for the pawn in slightly better piece coordination and the weakness of White's central pawns. Five moves later, Black regained the pawn with check and presented White with a choice. Where should White move his king?

White to move

21.Kg1 requires courage due to the threatened discovery, but it may have been a better choice. An interesting subsequent line leaves the White king safe behind shattered kingside and central pawns, and with a material advantage. 21...Ng4 22.Bh3 h5 23.Rxh5! Rxh5 24.Bxg4 b5 25.Bxh5 bxc4. Black never gets time for the discovered check.

21.Kf2 Nf4+ 22.Kf3 is interesting, but appears to offer Black too much play.

White played 21.Ke1, a move which only appears safe. Black soon gained a clear advantage.

21...Bf4+ 22.Kd1?

Now, 22.Kf2 was the best choice.

22...Bc3 23.Rb1

Now, Black might consider the security of his own king.

Black to move

Black chose to keep the pressure on White, rather than attending to his own security.

23...Ng4! 24.Nd6+ Ke7 25.Nxc8+ Rxc8 26.Rf3

White might have done better with 26.Kc1 because now he must give up his one remaining active piece.

26...Ne3+ 27.Rxe3 dxe3

White to move

Black has checkmate threats, which gives him a clear goal. White can parry these threats, of course, but will be forced to make concessions. In the game, White gave up material to stop a pawn from queening. However, another pawn was then able to march down the board unopposed.

The ending may be instructive.

28.b4 Rc6 29.Rb3 b5 30.a3 Bd2 31.Bf3 Rg6

White to move

Black has fantasies about putting his rook on g1 with checkmate.

32.g4

32.c3 is best, but still losing.

32...h5 33.c3?

Now, c3 is a mistake. White should have tried 33.g5.

33...hxg5-+ 34.Bg2 Rh6 35.Kc2 Rh2 36.Bf1

Black to move

36...Rf2

36...g3! was stronger.

37.Rb1 g3 38.Bh3 Kf6?

Overlooking the simple win of a pawn that blocks one potential queen. 38...Rxe2-+

39.Kd3 +/- Kg5 40.Rg1 Kh4 41.Bd7 g2 42.e5 Kg3 43.Bc6 Kh2

White to move

White must lose a piece to stop the pawn on g2, but there is another g-pawn waiting to begin its march.

44.Rxg2+ Rxg2 45.Bxg2 Kxg2 46.c4 bxc4+ 47.Kxc4 Kf2 48.Kd3 g5 49.b5 g4 50.a4 g3 0-1


*Blunder is a more accurate term.

01 May 2013

Better than Checkmate

While I was struggling for an advantage in a must-win game, my opponent became cooperative. He played 26.Kh1?? from the diagram position.

White to move

This error made possible the combination of my fantasies. 26.Nxe4 keeps the struggle alive.

26...Qg5!

I spent some time working out some possibilities:

If 27.g4 Qh4 28.Kg2 Rxg4+! 29.hxg4 Qxg4+

White to move

30...Nd2 will follow either 30.Kg2 or 30.Kg1, and White must lose the queen to avoid checkmate.

If 27.g3 Nxg3+! 28.fxg3 Qxg2 29.Qc2 Qxh3+ 30.Qh2 Rxe3 with plenty to show for the knight.

White to move

My opponent deprived me of the opportunity for playing these strong moves.

27.Rg1 Nxf2+ 28.Kh2 Qg3#

Checkmate, in this case, was a disappointing end to the game.

11 April 2013

Lesson of the Week

I varied the procedure this week. As usual, there was a chess position on the demonstration board. A few players offered suggestions for Black (the player to move). "Is the best move ____," students would ask. My reply, "I do not know." At the appointed time, we went through the first eighteen moves of the game leading to the position on the demonstration board.

Steinitz,William -- Paulsen,Louis [C25]
Baden-Baden 30.07.1870

1.e4 e5 2.Nc3 Nc6 3.f4 exf4 4.d4

White opts for what came to be known as the Steinitz Gambit. Subjected to checks, his king takes a walk. We should expect Black to gain an advantage, but aside from the first check, what does Black gain from so many queen moves?

"Do not try this at home. Steinitz was a trained professional," I told the students regarding the march of the White king to the center of the board in the opening.

4.Nf3 would have been safe and sensible.

4...Qh4+ 5.Ke2 d6 6.Nf3

Attacking the queen.

6...Bg4

Defending the queen with a pin.

White to move

7.Bxf4 0–0–0 8.Ke3

Breaking the pin on the knight.

8...Qh5 9.Be2 

Black to move

9...Qa5?

In 1987, Arthur Bisguier found the correct move: 9...f5 striking at White's center while the king is vulnerable. Bisguier went on to win his game.

10.a3 Bxf3

Black should have played 10...Nf6=

11.Kxf3±

11.Bxf3? allows 11...g5 exploiting the weakness of d4 12.Bg3 Bg7

11...Qh5+ 12.Ke3 Qh4 13.b4?

13.g3 is better 13...Qe7 14.Kf2±

Black to move

13...g5?

Here also, 13...f5 is the correct move 14.g3 Qe7=

14.Bg3 Qh6 15.b5 Nce7 16.Rf1 Nf6

16...f5 is still worth playing

17.Kf2 Ng6 18.Kg1+-

Black to move

We reach the position that confronted the students at the start. White has a clear advantage. White's king took a stroll into danger, but Black made as as many queen moves as White did king moves. Checks and threats with the queen proved insufficient. Black needed to rip open White's center while the king was there.

Now, the plans for both sides are clear: White will continue to advance the queenside pawns and use his pieces in attack against the Black king. Black will try to advance on White's king with his queen and knights.

White's pieces are better coordinated for the attack, and consequently create problems for Black's monarch much faster than Black's efforts at counterplay.

Next week, we will look at Steinitz's combination at the end of this game.