20 December 2021

More Notes on Berger

Johann Berger, Theorie und Praxis der Endspiele (1890) systematically examines practical chess endings in a manner that ushered in the modern theory of the endgame. The book's availability has been enhanced by Google Books.

During my reading yesterday, some underpromotion exercises captured my interest. Berger credits Carl Ferdinand von Jaenisch as the composer. I played them out against Stockfish on my iPad and found the second one required some calculation to get the knight to its proper posting.

White to move
1.Rxg5+ Rxg5 2.fxg5 h2 3.g6 Kh3 4.g7 h4

White to move
White must underpromote to a bishop or knight to avoid stalemate. In this instance, a bishop is the better choice, but a knight can win.

Berger's second exercise from Jaenisch differs in the placement of two pawns.

White to move
1.Rxg5+ Rxg5 2.fxg5 h2 3.g6 Kh3 4.g7 h4

Now, while a bishop does not stalemate, it also cannot win. White must play 5.g8N.

5...Kg4

White to move
Berger's solution continues with 6.Nf6+. I played 6.Ne7, and the tablebases favor 6.Kxh2.

Preceding these studies, Berger offers a brief explanation of the square of the pawn. Following these, is a section on the opposition with several illustrative positions, culminating in this important one from Giambattista Lolli, published in 1763.

White/Black to move
White to move wins; Black to move draws. For some reason, I found the draw hard to believe, but I've practiced the position against students many times since learning it more than ten years ago. Winning with White to move is one one of my requirements for the Bishop Award in my Scholastic Chess Awards.

19 December 2021

Notes on Berger

David Hooper states that Johann Berger, Theorie und Praxis der Endspiele (1890) is "the first comprehensive book in modern times devoted wholly to the practical endgame" (Golombek's Encyclopedia of Chess [1977], 101). In 2009, Google digitized a copy from Harvard Library, making it readily accessible to those interested in the history of the theory of the endgame. Although Hooper states Berger's text, "would not today be regarded as adequate for practical use", I am finding much that is instructive and interesting as I have been reading through it this morning.

Berger makes a point in the first pages to distinguish endgame theory from studies. The endgame, he asserts, "comprises only the battle of a few chess pieces against correspondingly low defensive forces" (2). Compositions leading to checkmate, stalemate, or a draw must be distinguished from endgame theory because, "the chess pieces have a completely different meaning and are used differently than in actual endgames" (2). He presents some illustrations of studies that are not endgames, beginning with a composition by Bernhard Horwitz.

White to move
Horwitz 1884 
White checkmates in six moves. Berger points out that the play of the pieces resembles the middlegame, and also that White's rook is superfluous. In the endgame, "the best possible use of the power of each individual piece should be expressed" (3), Berger opines. He offers:

White to move
1.Kc4 c1Q

Or 1...Ka1 2.Qd2 (to avoid an underpromotion threat)

2.Kb3 and checkmate in a few moves.

Berger's eighth example highlights two ways that a theoretical draw of rook vs. bishop is reached from the following position.

White to move
1.f7 Bd5 2.f8Q Rg8

Or 

1.Rc1+ Kh2 2.f7 Bd5 3.f8Q Rg8

Following this clarification of endgame theory as distinct from studies, Berger shows elementary checkmates--queen, rook, two rooks, two bishops, and then no less than five positions from which checkmate by bishop and knight can be executed.

Then he turns to the knight. Two knights, as we know, can only stalemate. What about three knights? Berger presents a composition of his that was published in Osterreichische Lesehalle (1889).

White to move
When I played this position against the computer, it opted for a line given by Berger as a variation. I was able to coordinate my pieces and win easily.

1.Rxe7 Qd4+

1...Qxe7 leads to 2.c8N+ winning the queen and leading to checkmate. Berger finds a mate 15 moves from the diagram.


17 December 2021

Seeking Understanding

Five years ago, I posted "Two Endgame Compositions", giving only the solution to the second. This week I was asked to provide the solution to the first, an 1888 composition by Johann Berger that was first published in Columbia Chess Chronicle. The past two mornings, I have been studying the solution with an aim to understand every move. Although the maneuvers appear complex, they are based on some simple ideas.

White to move
J. Berger, 1888
1.Qb8

The only winning move, according to the tablebases. It forces the light-squared bishop to move because of the checkmate threat Qh2#.

1...Bc4

Threatens Be6+, followed by Bf2+ (or Bh2+).

Other moves lose more quickly.

1...Be2 2.Qf4 (see at move 4 below)
1...Bd3 2.Qf4
1...Bb5 2.Qxb5 Ba7 3.Qd5
1...Ba6 2.Qg8 Bb7 3.Qh7 Bc8+ (3...Bf2 4.Qxb7) 4.Kg3+

2.Qe5

Prevents the check while keeping the dark-squared bishop immobile.

2.Qd6 is one move slower. This move is presented as a "cook" in Harold van der Heijden's Endgame Study Database with a line leading to underpromotion of Black's pawn. It is an instructive alternative.

2...Ba6

Threatens Bc8+

2...Bd3 3.Qg5 threatens Qxg2#. 3...Be4 4.Qh4 Bf5+ (4...Bf2 5.Qxe4) 5.Kg3+
2...Be2 3.Qxe2
2...Bb5 3.Qxb5

3.Qc7

Prevents the check while keeping alive the Qh2 threat.

3.Qe1 is one move slower according to tablebases.

3...Bd3

3...Bb5 allows 4.Qg7
(4.Qc1 Is given ! in Genrikh Moiseyevich Kasparian, 888 Miniature Studies [2010]. Pins the dark-squared bishop so a check can be met by Kg3 and then Qh6+ 4...Bf1 5.Qf4 Ba6 6.Qg4; 4.Qb7)
4...Bc6 5.Qh6 Bd7+ (5...Bf2 6.Qxc6; 5...Be3 6.Qxc6) 6.Kg3+
3...Be2 is second best 4.Qg7 Bf3 5.Qa1 Be2 6.Kg3

4.Qf4

Threatening to move to g4 where checks along the c8-h3 diagonal are blocked and Qxg2 is threatened. This move forces the light-squared bishop onto the a8-h1 diagonal.

Black to move

4...Bb5 5.Qg4

Shields the king from check and threatens Qxg2#

5...Bc6

Defends g2

6.Qd1

Pins the dark-squared bishop and prepares Kg3

6...Be4

White to move

7.Kg3

Threatens Qh5+. The complex battle between White's queen and Black's light-squared bishop has concluded. Now, White threatens checks on the h-file, which Black can delay briefly.

7...Bg6

Guards h5

8.Qc1

Threatens Qh6+

8...Bh5

Prevents the check

9.Qa1

Forces the bishop off the h-file.

Black to move

The rest is easy.

9...Be2 10.Qh8+ Bh5 11.Qxh5+ Bh2+ 12.Qxh2#

05 December 2021

Knowledge

When does a player refuse a draw offer in a dead drawn position? If time is a factor, such a refusal could make sense. Often a draw offer is refused because a player does not know the position is a draw, or suspects that the opponent does not have the requisite knowledge to hold the position.

I had Black in this position this morning.

White to move
49.b7??

After this error, the game is a dead draw. White should have played 49.g4, or started moving the king towards the b-pawn. I offered a draw after a dozen moves, having reached this position.

White to move
Instead of accepting the draw, my opponent played another 20+ moves, eventually setting a trap with 84.Rh8?? (White's king was on e4). I could take the pawn, stepping into a skewer. Or, I could take the free rook. After I took the rook, White resigned.

I have played similar endgames before in all sorts of time controls (see one example at "Winning" [2016]). I am guided in the knowledge that my king must remain on the seventh rank and the g- or h-file. With the pawn on g6, the king cannot move. I recall reading about this technique in a book that included a discussion of the resulting skewer tactic if the defending king strays.

However, looking through my endgame books, I could not find the remembered passage. Even so several books contain examples that are close enough that an attentive reader can easily derive the relevant knowledge.

The Books


Nikolay Minev, A Practical Guide to Rook Endgames (2004) shows a stalemate trap when the stronger side has a useful f-pawn, but prematurely sets up the skewer (21-22). From Khiut -- Alalin, USSR 1952.

White to move
1.Kf4 Kf7 2.Rh8??

White sets up the skewer.

2...Rxa7 3.Rh7+ Kf6 4.Rxa7 stalemate.

Yuri Averbakh, Chess Endings: Essential Knowledge (1996) shows an interesting drawing idea from Johann Berger (67).

White to move
1.Kf7

Black cannot get to the seventh rank fast enough, but can avoid checks using the Black king as a shield.

1...Kf5 2.Ke7 Ke5 3.Kd7 Kd5 4.Kc7 Kc5 5.Kb7 Rb1+ forcing Black's king back to the c-file.

Although it was fixed in my memory that I learned the technique employed this morning from Averbakh, it is not in Chess Endings: Essential Knowledge. I did find the idea expressed clearly in Edmar Mednis, Practical Rook Endings (1982), but I've known the technique far longer than I've owned this book. Mednis explains, "the stronger side wants to avoid the following two potential problems: immobilizing his Rook and depriving his King of shelter" (22). Both problems exist in the illustrative diagram. My opponent created the first with 49.b7. Pushing the g-pawn forward introduced the second, but there was no way to dislodge my rook from the c-file.

White to move
In his illustrative diagram, Mednis explains both Black's need to keep the king on g7 or h7, and the rook remains on the c-file, leaving only to check White's king when it gets near its pawn.

Two books that I have had for several years and have spent some time reading explain the ideas, too. One of the critically important blue diagrams in Dvoretsky's Endgame Manual (2003) shows the winning idea missed in Minev's example when the stronger side has an f-pawn (152).

White to move
White wins with 1.f6+ because taking the pawn leads to 2.Rf6+ followed by a8Q, while moving in front allows White to set up the skewer with 2.Rh8. Dvoretsky points out that a pawn on the g- or h-file, however, does not present problems for Black. Although Dvoretsky's description of the skewer does not match my recollection, it may be the book from which I learned this idea.

Jeremy Silman, Silman's Complete Endgame Course (2007) offers three pages of analysis with three diagrams with the white pawn on a7, and three more pages and diagrams with the pawn on a6. These are in the endgames for Class A. I recall that I read about that far within days of buying the book when it first came out. His "A key tactical idea" underneath the diagram below comes close to what I recall studying. Black attempted a "queenside trek" (230).

Black to move
So, I may have learned the idea from Dvoretsky, and certainly encountered it in Silman. It may also be in some other endgame books on my shelf. The simple idea appears in many books. My opponent either lacked this knowledge, or suspected that I did. In the end, he set up a skewer threat that was shocking enough I could have fallen for it on impulse. However, I took a few seconds to assess and grabbed the free rook.


24 November 2021

Bishop takes Pawn with Check!

Two positions were presented to my elementary students at the after school chess club yesterday. The first occurred in my shortest game in a weekend Swiss. The second position did not occur in Nepomniachtchi,I. -- Carlsen,M., Halkidiki 2003. Cyrus Lakdawala explains in Nepomniachtchi: Move by Move (2021), which was just published, that Carlsen, "even as a newborn infant, wouldn't fall for 8...dxe3??" I explained to the students that Carlsen was not born knowing this tactic, but learned it, just as they can.

My short loss:

Rodriguez,Luis (2211) -- Stripes,James (1472) [B21]
Collyer Memorial Spokane (1), 21.02.1998

1.e4 c5 2.d4 cxd4 3.c3 dxc3 4.Nxc3 d6

Remembering the game incorrectly, I presented my move as 4...Nc6, which is probably a more accurate move order.

5.Bc4 a6?

A waste of time. 5...Nc6 should be played. After 5...Nc6, it is still possible to fail the way I did in the game. For instance, 6.Nf3 Nf6 7.e5 Nxe5?? 8.Nxe5 dxe5. This was the position shown to the students because I was presenting the tactic from a faulty memory.

6.Nf3 Bg4??

Utter foolishness.

7.Ne5+- dxe5

White to move
8.Bxf7+ 1-0

I resigned because I had far better things to do than watching how easily a master would checkmate me from such a horrid position.

Ian Nepomniachtchi (2447) -- Magnus Carlsen (2450) [B06]
Wch U14 Halkidiki GRE, 2003
1.e4 c5 2.c3 d5 3.exd5 Qxd5 4.d4 g6 5.Nf3 Bg7 6.Na3 cxd4 7.Bc4 Qe4+ 8.Be3

The game continued 8...Nh6

For the children, however, the error that Magnus Carlsen could see through is worth examining.

After dxe3??

White to move

9.Bxf7+ wins the queen.

9...Kxf7 allows 10.Ng5+ forking king and queen.

9...Kf8 delays the fork one move. 10.Qd8+ Kxf7.

The World Chess Championship between Champion Magnus Carlsen and Challenger Ian Nepomniatchchi begins at 16:30 Friday afternoon in Dubai. That's 3:30 am in my time zone. I may not watch the beginning of the game live, needing some sleep. But, I will check on the progress as soon as I awake.


18 November 2021

Learning Checkmate (Or Teaching It)

Youth chess has had a profound impact on my thinking about the game. In countless youth events, I have watched children playing out rook and king vs. lone king. Often one of them tells the other, "I think this is a draw." Sometimes they look at me for confirmation. When the stronger side has a queen, they know it should be a win, but often cannot find it. Check, check, check, ... but never checkmate.

Having observed such scenes several times in my first few youth events as a coach more than twenty years ago, I made it a point to teach elementary checkmates to my students. I have spent hundreds of hours teaching checkmate with queen and rook, or coordinating one of them with the king against a lone king. The first eleven endgames in Bruce Pandolfini, Pandolfini's Endgame Course (1988) became a valuable resource for teaching.

Some books on checkmate
I have added to Pandolfini's basic positions a great many others, some composed, some from games where a player executed a checkmate well, or where someone failed. Other books have expanded my resources. William Lewis, Elements of Chess (1819) is a neglected gem. It contains very few diagrams, so it is not always easy to appreciate at a glance the sorts of positions he offers for training new players. Last month's post "Elementary" shows one that I find useful.

Several posts here on Chess Skills have outlined how I teach elementary checkmates with few pieces to children. Both Pandolfini and Lewis are mentioned in "Teaching Elementary Checkmates" (2014). Both "Cutting Off" (2015) and "Playing with Rooks" (2016) offer additional examples as they document lessons as I use them in after school clubs.

Older Beginners


Not all beginners are children, of course. Chess is enjoying growth in popularity at the present. Some adults are returning to the game after many years away. Others are taking it up for the first time. Chess groups on Facebook and forums on several chess sites are inundated with requests for advice for those starting out.

My standard refrain is to point these seekers to "Advice for Beginners", which I wrote last January. At the core of that advice is Jose Capablanca, Chess Fundamentals (1921). I have adopted Capablanca's sequence from this book in my own teaching. He starts with simple checkmates, and appears to suggest a pattern that starts at the end of the game and works towards the beginning.

Chess Fundamentals and the companion volume A Primer of Chess (1935) offer instruction in basic checkmates with few pieces, as well as some middlegame combinations where checkmate is possible, or where a checkmate threat forces concessions. Something more is needed to address some of the failures I have observed in games after game of beginning players, young and old.

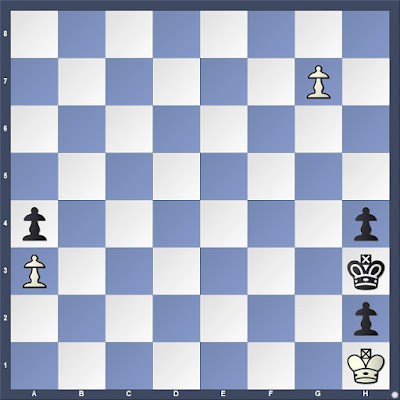
The position below arose in a game between two beginners. One has been playing chess less than three months, but the other has been playing at least seven years. Naturally, there are a great many errors in the game that could be highlighted. 
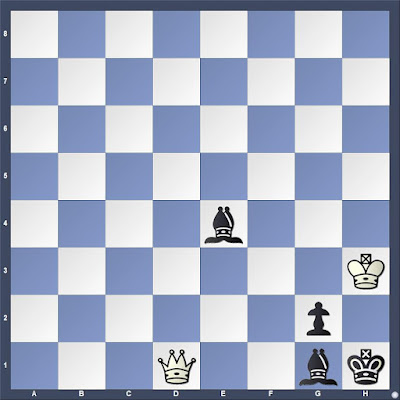
Black to move
When I reached this position while playing through the game, I instantly saw an unforced checkmate in two. Consequently, calculation begins with 26...Qh3+ 27.Kg1 (Ke2 walks into checkmate). It does not take long to see a sequence involving bishop and queen that can be found in dozens of exercises in books and online.

For instance, Georges Renaud and Victor Kahn, The Art of the Checkmate offer Mate No. 12C.

White to move

They opine, "Nine times out of ten, the beginner will play QxP ch, and be surprised afterward to find that the king is able to escape after all" (140). In the 2015 Batsford translation, these words are rendered, "The novice has a tendency to play 1. Qxh7+ and it is quite a surprise to see that the attacked king manages to take flight."

The mating sequence is 1.Bxh7+ Kh8 2.Bg6+ Kg8 3.Qxh7 Kf8 4.Qxf7#.

In the game, the experienced beginner played 26...Qh1+ and lost ten moves later when the newer beginner found a mate in one.

White to move

Diagnosing Failure


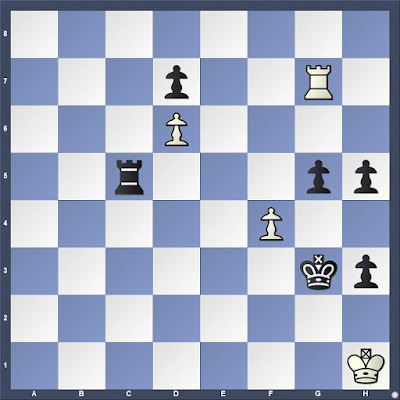
In the game above, Black had 46 seconds remaining (of an initial five minutes) when this position was reached.

Black to move
25...Qxh2+ was played. Three seconds were spent on this move. Does the player feel rushed when under one minute? Is the player oblivious to the presence of the bishop? If so, he may have feared that the queen could be captured. The queen was left en prise later in the game. In fact, Black had six seconds remaining when 34...Qxf2 was played instead of 34...Qxa7. That error led to the checkmate. Both queens were en prise on move 34.

The player of the Black pieces has played more than 1400 blitz and rapid games on chess.com. In the past 500 games, 140 have ended with checkmate by the queen. In many cases, the queen has been supported by a bishop, but more often by a knight or rook.

This one is typical.


My impression from looking through all 140 queen checkmates in these 500 games leads me to the belief that the player in question knows a few checkmate patterns, but could benefit from learning more.

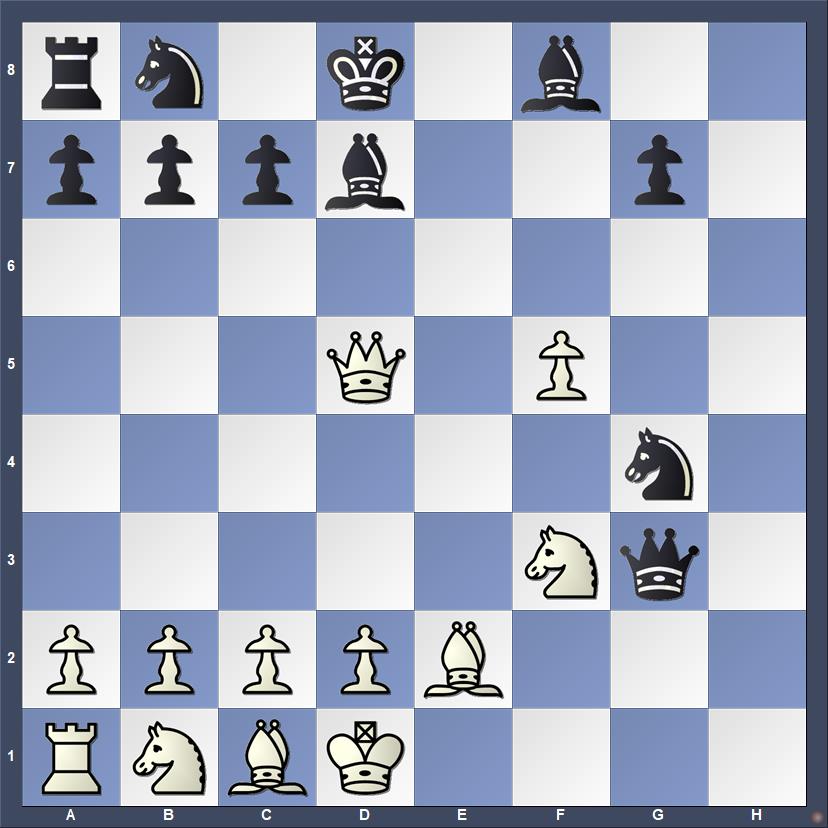
Another game illustrates our experienced beginner in pursuit of a checkmate with bishop and queen that he has executed in several prior games.

Black to move
24...Bb3

24...Qxd3 was far better. In fact, it is the only move that maintains the advantage. It threatens Qb1# and Ne2#. I suspect that Black had ambitions of playing Qxd3 next with the idea to play Qc2#. That pattern appears several times in the player's games.

25.Rde1 Qxd3 26.Nd4

Now White has c2 defended.

26...Nf5

Black hopes to remove the knight.

27.Bxb7

27.Be4 wins simply, but White gets credit for opening the g-file in a way that allows Black to continue with a plan that is too slow.

27...Nxd4 28.Qxg7#

Black's pursuit of a plan was performed without recognition of White's threats.

The Remedy


Resources are abundant for a beginner or even intermediate player who wishes to improve their understanding of checkmate patterns. The popular playing site, Lichess offers a series of lessons where certain named patterns can be played against a chess engine. Navigate to Learn > Practice from the menu.


Books offer greater depth.

When David Weinstock, whom I had just met, recommended to me Renaud and Kahn, The Art of the Checkmate, I recall thinking to myself that he was underestimating my chess skill. I believed that checkmate was a skill I had developed well. I was a C Class player in the USCF rating system who had recently returned to active chess after more than a decade of only occasional casual games. Two decades earlier in high school, I invested many hours practicing checkmates with heavy pieces and even the bishop pair. While playing through master games, I often continued them beyond the resignation to work out the checkmate possibilities.

Despite my attitude that I was beyond the need for such study, I examined the book carefully when I saw it in Auntie's, Spokane's independent bookstore. It did not take long to realize that it offered a little more depth than I had imagined when David mentioned it. I bought the book and started working through it. New checkmate patterns began to appear in my games.

The Art of the Checkmate has become one of the books that I recommend more often than most others. Few other books offer the quality of instruction on a matter of such foundational importance to developing chess skills. The authors offer 23 basic patterns. Most have several variations. They illustrate each one with the essential pattern of the pieces and the moves making up the mating sequence. These patterns are followed by illustrations from composed studies, game fragments, and whole games. Quiz sets follow each of the five sections.

Other Books


A few years ago, another group of books for teaching and learning checkmate patterns were brought to my attention. Someone suggested that I take a look at Mikhail Tal and Victor Khenkin, Tal's Winning Chess Combinations (1979). This book, which I found used at a reasonable price, takes each piece separately, examining how it is typically used to effect checkmate. Each piece, excluding the king, is given a chapter. Eight additional chapters treat two pieces in concert, such as queen and bishop or queen and knight. The last chapter considers several combinations of three pieces.

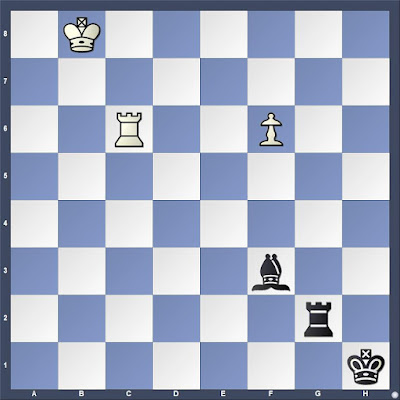
This position illustrates a back rank checkmate threat that leads to winning material.

Black to move

1.Qb2

Victor Henkin, 1000 Checkmate Combinations (2011) is a newer translation of the same Russian text, according to Vladimir Barsky, it is titled The Last Check. Both books are out of print, hard to find, and consequently expensive, except that the newer text has been available in Kindle format. It is scheduled to be released again in paperback in February 2022. Barsky, A Modern Guide to Checkmating Patterns (2020) adopts Khenkin's methodology, drawing only from games played in the twenty-first century. I discussed these three books in greater detail in "Checkmating Patterns" (2020).

I am less enthusiastic about Murray Chandler, How to Beat Your Dad at Chess (1998). This book offers excellent illustrations of basic patterns with abundant diagrams, and adds a few tactical motifs for breaking through the opponent's defenses. It is probably an excellent choice for children, while being suitable for adults as well. My lack of enthusiasm for the book stems from its lack of depth. It offers fewer examples and far less instructive discussion than The Art of the Checkmate and also found in Khenkin's text. Several of the "50 Deadly Checkmates" promised by the book are tactics that win material that seem to have been included to reach that magic number 50. 

Victor Vukovic, The Art of Attack in Chess has a chapter presenting checkmate patterns. Improve Your Chess Now by Jonathan Tisdall lists common checkmate patterns in an appendix. I used these two, as well as Chandler, and Renaud and Kahn while creating a list of 37 patterns that I organized into groups: corridors, diagonals, intersections, knights, queens, and combinations. I created seven sets of worksheets with instructive material for my students and printed a few copies of the whole manuscript, also offering for sale a PDF version under the title "A Checklist of Checkmates". My list appears at "Checkmate Patterns" (2017). This work contains errors that I would like to correct (see "Pillsbury's Mate").

Antonio Gude, Fundamental Checkmates (2016) deserves more attention. I have had this book for a few years, but it sits on my shelf untouched while I keep returning to those I know better. The instructive portion combines the approach of Renaud and Kahn with that of Victor Khenkin and then extends both with nearly 100 pages devoted to sacrifices, organized by the piece giving itself up. Three sets of exercises total 317 problems with solutions.

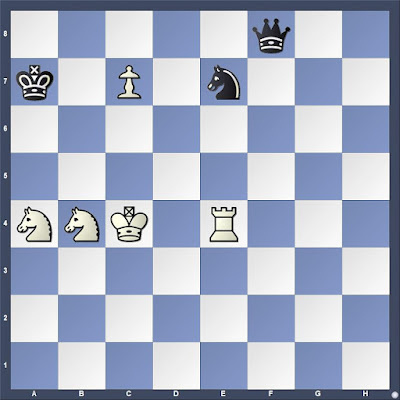
The well-known combination sacrificing a queen to deliver smother mate with a knight is often called Philidor's Legacy, although many others credit Gioachino Greco because of this combination.

Black to move

15...Nf2+ 16.Ke1 Nd3+ 17.Kd1 Qe1+ 18.Nxe1 Nf2#.

Gude credits the historian Joaquin Perez de Arriga with pointing out that the combination appears in Luis Ramírez de Lucena, Repeticion de Amores e Arte de Axedrez (1496).

White to move
Gude even points out that Lucena, "specifies that the solution must not include the capture of any black piece" (19). Fundamental Checkmates is far more comprehensive than the books I usually recommend. Moreover, as a historian I must acknowledge that Renaud and Kahn perpetuate errors, while Gude seeks to dispel misunderstanding.

Having opined in the Chess Book Collectors" group on Facebook that The Art of the Checkmate and 1000 Checkmate Combinations were far superior to other book on the subject, I was exposed to alternative views. Gude was mentioned right away. Later in the thread, someone mentioned a text that I did not know about, but that now occupies space on my bookshelf. George Koltanowski and Milton Finkelstein, Checkmate!: The Patterns of the Winning Mating Attacks and How to Achieve Them (1978) will not find a place among those I recommend to beginners who will not take the time to learn English descriptive notation, nor benefit particularly from tracking down a now rare book that could be quite expensive. However, as I make time to read through it, it likely will present me with some new lessons for my students.

For most chess players willing to put in a little work, Renaud and Kahn remains a excellent choice. Soon, Henkin, 1000 Checkmate Combinations will be available, too. For those looking to work less, or seeking something easier for children, How to Beat Your Dad at Chess is worthy of attention. For those of who teach checkmate, Gude, Fundamental Checkmates is a valuable resource.


17 November 2021

Textbook Coordination

Black has a problem in this position, which could appear as part of the position in a game.

Black to move
White threatens Qxh7#

White's four pieces are well-coordinated for the final assault on the king. A position like this one could arise with additional defensive resources that would tip the balance in Black's favor. Without them, Black is near lost.

I put this position on the demonstration board at the start of the lesson for my after school chess club on Tuesday, noting that White's light-squared bishop could be anywhere along the diagonal from a2 to d5. We looked at several possibilities for Black's defense and White's attack, most leading to either checkmate or the loss of Black's queen.

Then, I showed the students two games. The first appears in several of Gioachino Greco's manuscripts, and is well-known from its inclusion in the usual databases. David Levy and Kevin O'Connell, Oxford Encyclopedia of Chess Games, Volume 1 1485-1866 (1981) has this as Greco 11 (2).

Greco,Gioacchino -- NN [C53]
Greco Europe, 1620*

1.e4 e5 2.Nf3 Nc6 3.Bc4 Bc5 4.c3 d6 5.d4 exd4 6.cxd4 Bb4+ 7.Nc3 Nf6 8.0-0 Bxc3 9.bxc3 Nxe4 10.Re1 d5 11.Rxe4+ dxe4 12.Ng5 0-0 13.Qh5

Black to move
13...h6 14.Nxf7 Qf6

We also looked at 14...Rxf7, which is a better defense. This move and the subsequent 15.Bxf7 precede Greco, appearing in the Regole MS, which some scholars have credited to Giulio Cesare Polerio and dated to the late sixteenth century (see Peter J. Monté, The Classical Era of Modern Chess [2014], 158-160, 465.)

15.Nxh6+ Kh8

15...Kf8 was also examined by Greco, but is not so credited in the ChessBase database. The line appears as an annotation in Levy and O'Connell, as three variations appear in Professor Hoffman, The Games of Greco (1900). This line merits a separate post. It was not part of the lesson at the youth chess club.

16.Nf7+ Kg8 17.Qh8# 1-0

The second game had been played that morning.

Stripes,J -- Internet Opponent [C70]
Live Chess Chess.com, 16.11.2021

1.e4 e5 2.Nf3 Nc6 3.Bb5 a6 4.Ba4 b5 5.Bb3 Bb7 6.c3

Inaccurate?

6.0-0 Nf6 7.c3 Nxe4 8.d4 Na5 9.Bc2 is normal.

6...Bc5 

Probably a mistake.

7.0-0 Nf6 8.d4

Black to move
8...exd4

This move accelerates White's attack.

8...Bb6 9.Re1 d6 10.a4 0-0 has appeared in a game between masters.
8...Bd6 9.Bg5 is an engine suggestion.

9.cxd4 Bb6 10.e5 Nd5

Simply giving away the knight. Black's position is near hopeless already in any case.

10...Ng8 11.d5+-

11.Bxd5 0-0 12.Ng5 Bxd4

12...h6 may be the last chance.

13.Qh5

We arrive at the basic pattern from Greco and his predecessors.

Black to move

13...h6 14.Nxf7 1-0

My opponent resigned here.

The game might have continued 14...Rxf7 (14...Qe7 15.Nxh6+ Kh7 16.Nf5#) 15.Bxf7+ Kh8 16.Bxh6 and the engine points out that 16...Qg8 is the only move.


*The game appears in Greco's Godolphin manuscript, an undated MS from the London sojourn, so should be dated 1623. It also appears in several MSS 1624-1625 produced in France.

01 November 2021

Cultivating Error

Fast chess rewards weakness. Playing for cheap traps and succeeding stifles progress. Having spent many hours studying the games of Gioachino Greco, I have succeeded numerous times in replicating his best known miniature. This morning against a player with a Lichess rating near 2200, I found my opponent unprepared to meet the transparent threats offered in the not quite sound Greco Attack.

After this victory, and my postgame analysis, I decided that I have had enough. If I am to continue playing the Greco Attack, I must shift to the Aitken variation. Below is the game.

Stripes,J (2096) -- Internet Opponent (2153) [C54]
Rated Rapid game lichess.org, 01.11.2021
[Stripes,James]

1.e4 e5 2.Nf3 Nc6 3.Bc4 Bc5 4.c3 Nf6 5.d4 exd4 6.cxd4

6.e5 is better, according to William Lewis, Gioachino Greco on the Game of Chess (1819), which Lewis presents as a translation of a French collection of Greco's games.

6...Bb4+ 7.Nc3?!

7.Bd2 Nxe4 8.Bxb4 Nxb4 9.Bxf7+ Kxf7 10.Qb3+ is in the Ordini manuscript (1594) from the Polerio-complex. See "Greco Attack Before Greco".

7...Nxe4=/+ 8.0-0

Black to move
8...Nxc3

8...Bxc3 9.d5 is in Greco's Mountstephen manuscript (1623). It is the better move.

9.bxc3 Bxc3

The equalizing 9...d5 does not seem to appear among late-sixteenth century or seventeenth century manuscripts. It was played by Moller in 1902, according to ChessBase Mega 2020.

10.cxb4 dxc4 11.Re1+ Ne7 with equal chances: 0-1 (48) Piotrowski,O-Moller,J Hannover 1902.

White to move
10.Qb3?

I play this move because I get away with it. I have even told students, erroneously, that White is now winning.

10.Ba3 is Aitken's suggestion 10...d5 11.Bb5 Bxa1 12.Re1+ Be6 13.Qc2 Qd7 14.Ne5+-. See also Corte -- Bolbochán 1946 (2016).

10...Bxa1??

Now Black is lost. Black is also lost after 10...Bxd4, which also appears in Greco.

10...d5 11.Bxd5 0-0+/= (11...Bxa1?? 12.Bxf7+ Kf8 13.Ba3+ Ne7 14.Re1+- is credited to Don Antonio in the Doazan manuscript, which precedes Greco. Greco may have seen this manuscript.)

11.Bxf7+ Kf8 12.Bg5 Ne7 13.Ne5!

Greco's innovation, building on the work of Polerio and his associates.

Black to move

Greco analyzes several variations from this point. This game follows one of them.

13...Bxd4 14.Bg6 d5 15.Qf3+ Bf5 16.Bxf5 Bxe5 17.Be6+ Bf6 18.Bxf6 Qe8N

Black's move is the first new one.

White to move
19.Be5+ 

My last move misses checkmate in three. Nonetheless, Black resigned.

19.Bg5+ (or Bh4+) 19... Nf5 20.Qxf5+ Qf7 21.Qxf7#

I won because my opponent missed several well-known opportunities. 10.Ba3 avoids some of these.

25 October 2021

Youth Chess in Spokane

Some schools have returned to in-person after school chess clubs. Saint George's School, where I coach, is one of these. The large number of new players is overwhelming. After school chess clubs are filled with students eager to play, but who need instruction. 

Under ideal conditions, I would work with a small number of beginners and teach them the rudiments of the game with an emphasis on contacts (see "Lesson One"), as Momir Radovic advocates. In practice, however, when a large influx of students who have never played chess, or have recently learned the moves of the game, accommodating student needs and interests requires flexibility. Experience has taught me that students familiar with the game usually teach the others. It falls on me to teach some principles of tactics and strategy.

Our first meeting the first week of October, I took students through the geography of the chessboard, emphasizing ranks, files, diagonals, and the center. This first lesson concluded with an elementary checkmate demonstration based on one in José Raúl Capablanca, Chess Fundamentals (1921).

White to move

White wins quickest by first confining the Black king to the eighth rank. 

1.Ra7

Then White's king moves up, staying on the same file as Black's king until time to move to the sixth rank.

1...Kg8 2.Kg2 Kf8 3.Kf3 Ke8 4.Ke4 Kd8 5.Kd5 Kc8

White to move
6.Kd6 Kb8

If 6...Kd8, 7.Ra8# is checkmate.

7.Rc7 Ka8 8.Kc6 Kb8 9.Kb6 Ka8 10.Rc8#.

The second week featured another elementary checkmate.

White to move

From this position, checkmate can be forced in as few as fifteen moves. I did not display such efficiency while teaching this. Rather, I modeled thinking through the moves to 1) confine the king to a small area with the bishops controlling two parallel diagonals, 2) move White's king close, and 3) calculate the last few moves.

This morning, playing against Stockfish, I aimed for efficiency.

1.Bg5 Kf7 2.Bh3 Kg6 3.Bd8 Kf7 4.Ke2 Kg6 5.Kf3 Kf7 6.Kf4 Kg6 7.Be6 Kg7 8.Kg5 Kh7 9.Be7 Kg7 10.Bd6 Kh7 11.Bf8 Kh8 12.Kf6 Kh7 13.Kf7 Kh8 14.Bg7+ Kh7 15.Bf5# 1-0

Some miniatures (very short games) were shown illustrating quick checkmates because a player had weakened the short diagonal leading to the king. This unusual game, which appears as the first in Irving Chernev, The 1000 Best Short Games of Chess (1955), was followed by one from an online blitz game I had played.

Gibauld -- Lazard [A45]
Paris, 1924

1.d4 Nf6 2.Nd2 e5 3.dxe5 Ng4 4.h3 Ne3

White to move

White resigned as saving the queen with 5.fxe3, leads to 5...Qh4+ 6.g3 Qxg3#.

Internet Opponent -- Stripes,J [A45]
Live Chess Chess.com, 07.10.2021

1.d4 Nf6 2.Nd2 e5 3.dxe5 Ng4 4.Ngf3 d6 5.exd6 Bxd6 6.h3

Black to move
6...Ne3 7.fxe3 Bg3#

Guiding theme of the lessons are few pieces, emphasizing the power of one of them, or short games with few moves. Efforts are made to explain the rules, including how each piece moves, checkmate, and stalemate. One of the short games provoked questions about castling.

A problem composed by Gioachino Greco about 1620 was shown to highlight two themes--forcing moves and a bishop on the wrong color squares.

Black to move

Black forces a draw via 1...Ra1+ 2.Rf1 Rxf1+ 3.Kxf1 Bh3

White to move
White can capture the bishop, and have two h-pawns or let the Black play 4...Bxg2. In either case, Black's king will find refuge on h8, moving between this square and either g8 or h7, depending on White's efforts. The h-pawn will never promote and White cannot win. Some time was expended demonstrating efforts White can make and how many lead to stalemate.

During another session, an older composition was employed to highlight forcing moves and the power of pawns. This problem comes from a manuscript connected to Giulio Cesare Polerio, whose works influenced Greco.

White to move
1.Ng6+ hxg6 2.hxg6+ Nh6 3.Rxh6+ gxh6 4.g7+ Kh7 5.g6#

All of Black's moves were forced.

The next lesson will feature another instructive exercise from manuscripts that are part of what historians call the Polerio-complex.

White to move

Themes include a partial stalemate (king cannot move, but there is a legal move). en passant, pawn promotion, and a checkmate pattern.