Showing posts with label Philidor position. Show all posts

21 April 2024

Kling and Horwitz Defense

Questions arose while going over Ending 56 in Jesus de la Villa, 100 Endgames You Must Know: Vital Lessons for Every Chess Player, 4th ed. (2015), 129-132. Although de la Villa indicated that moving the king to the long side is an error while defending against a center pawn, his analysis showed that Black could hold. In one case, Black's king was on the long side while Black's rook harassed White's king from the short side. De la Villa was quick to point out that this plan fails against a c- or f-pawn, although it works against a center pawn. The technique, according to de la Villa is called the Kling and Horwitz defensive technique.

Curious, I dug into the newest endgame book on my shelf: Bernhard Horwitz and Josef Kling, Chess Studies and Endgames, updated and ed. by Carsten Hansen (2024). Quite a few endgame books were pulled from my shelf over the next few days as I studied the positions, analysis, and terminology.

First, I sought the original position in Kling and Horwitz. It was not a simple matter to find a position with any of the technique that de la Villa showed in 100 Endgames. I looked elsewhere for some clues to why the technique is dubbed "Kling and Horwitz".

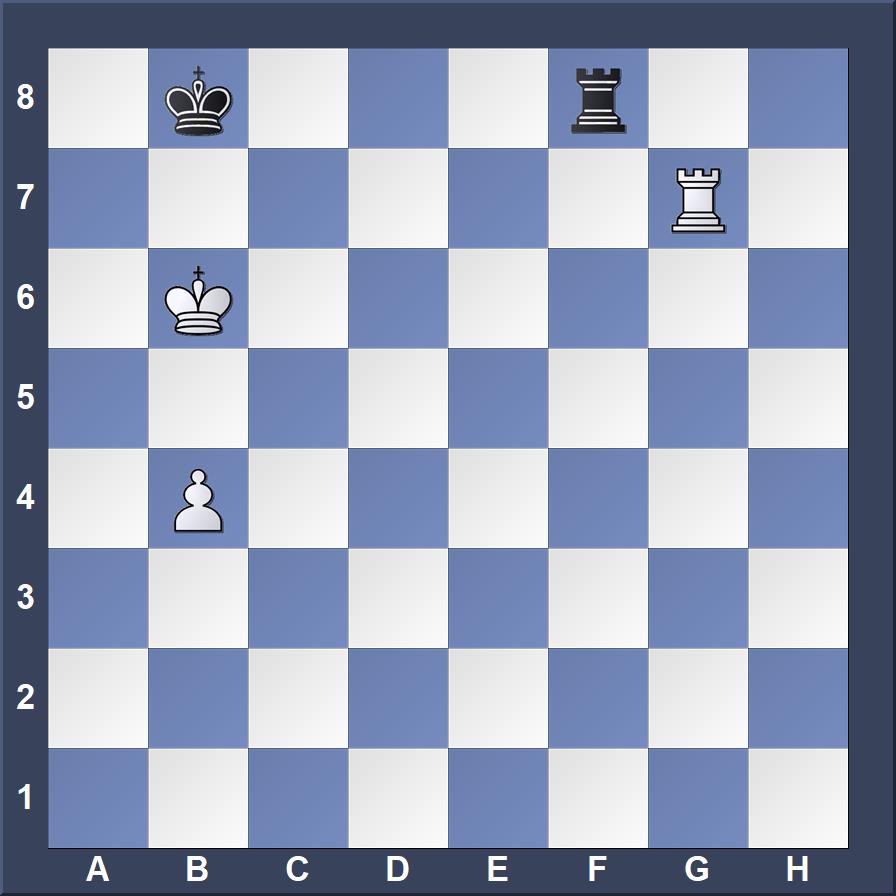
Grigory Levenfish and Vasily Smyslov, Rook Endings, trans. Philip J. Booth (1971) credit Josef Kling and Bernhard Horwitz with the following position that is a win with White to move, but a draw if Black has the move.
Aleksandar Matanovic, Encyclopedia of Chess Endings, vol. 2 offers the same position flipped with Black's king on f7 and the other pieces on the d-file. It also is credited to Kling and Horwitz. Searching for the position in Kling and Horwitz, Chess Studies, or Endings of Games (1851) is a futile quest. The position appears no where in that book. Nor does Horwitz and Kling, Chess Studies and End-games (1889) offer it.

Sam Shankland, Theoretical Rook Endgames (2023) favors the term "long and short side defense", but does indicate it is also known as the Kling and Horwitz defense (27). Shankland also deploys the term, “botched Philidor defense” (27).

The position in Levenfish and Smyslov differs from one reached in analysis by Francois-Andre Philidor only in the significant placement of the defending king on the long-side of White's pieces. Philidor's analysis intended to show the pitfalls of the weaker side failing to maintain the rook on the sixth rank.

White to move
Philidor, Analyse de jeu des Echecs (1777)
1.e5 Rb6

Philidor asserts that if Black deserts the sixth rank with the rook before White pushes the pawn to the sixth rank, then White wins. In a variation, he attempts to show the necessity of the sixth-rank defense beginning with 1...Ra1. Philidor's variation bears some attention because, as has been shown by several writers, 1...Ra1 is not the error that Philidor thought. While the sixth-rank defense in his main line in simple and unbeatable, the positions in the variation have practical significance. It frequently occurs in play that a textbook Philidor position cannot be reached, and yet there are still ways to draw.

2.Kf6

Black to move
A position similar to this one is often presented in discussions of the Philidor position when it is the stronger side's turn to move. Black can no longer achieve a third- or sixth-rank defense because the pawn will block the check with an unstoppable mate threat.

However, Black can check from the rear. Philidor asserts that this defense fails if the stronger side plays it correctly.

2...Rf1+ 3.Ke6 Kf8

3...Kd8 does indeed lose.

4.Rh8 Kg7 5.Re8

According to Philidor, this is the only move that assures the win. In fact, as engines now confirm, the position has remained drawn the whole time.

5...Re1 6.Kd7

Black to move
6...Kf7??

No less than seven alternatives would have held the draw: Kg6, Re2, Re3, Re4, Rd1+, Rb1, Ra1.

7.e6+ Kg7

Philidor also offers 7...Kf6 8.Rf8+

8.Ke7??

After this error, Black can again hold the position. White’s rook needed to move from in front of the pawn to d8, c8, b8, or a8. The last seems most principled as it denies Black access to the a-file.

8...Re2??

From this point on, Philidor's analysis correctly shows how White wins.

8....Ra1 was necessary. With the king on the short side and the rook on the long side, Black is able to hold the draw either checking the king from the side or repositioning the rook behind the pawn to prevent its advance.

Jesus de la Villa explains the technique well using a position that he apparently composed.

Black to move
There may be worse places for Black's rook, but perhaps no worse ones where a draw is still possible. De la Villa writes, "I have deliberately chosen an unfortunate position for the black rook in order to illustrate all the problems that may arise" (129-130). He emphasizes that with a center pawn, placing the rook behind the pawn can hold a draw, "even if the defending king is forced to the long side" (129). In his analysis, Black's king is not forced to the long side, but rather moves there deliberately so that de la Villa can best illustrate the drawing technique even when there are difficulties.

Nine moves into his analysis, the position in Levenfish and Smyslov is reached.

1...Rf1 (Rf2, f3, and f4 all work, too) 2.Kd6 Re1

"This is the K&H 'trademark'. The rook stands behind the pawn to prevent its advance", according to de la Villa (130).

3.Ke6 Kd8 (Kf8 is the correct way to proceed, but this "error" is not critical).

4.Rh8+ Kc7 5.Kf6 Kd7

This important move was missed by an online opponent of mine a few months ago, allowing me to show my handling of the Lucena position.

6.Rh7+ Ke8

Returning to the promotion square should always be part of the weaker side's defensive strategy.

7.Ke6 Kd8 8.Rh8+ Kc7 9.Re8

"The only serious attempt to make progress" (De la Villa, 131). The position is similar to the one where Philidor wrote, "This is the only move which can assure you the game" (Analysis of the Game of Chess, 1777, 279).

Black to move
9...Rh1

Black prepares side checks from the short side.

10.Rf8 Re1

The rook returns to behind the pawn.

De la Villa's analysis ends here. Levenfish and Smyslov carry it one move further.

11.Rf2 Kd8

The position in Levenfish and Smyslov and after the ninth move in de la Villa appears in a variation in Dvoretsky's Endgame Manual (2003). Missing from Dvoretsky is credit to Kling and Horwitz. In fact, Dvoretsky gives the ideas without crediting any endgame theorists or composers from the past. With the 5th edition (2020), however, credit is given to Max Karstedt. I have not confirmed that the 3rd and 4th editions do not credit Karstedt because I do not have them at hand, but my hunch is that this bit of information represents Karsten Mūller's editorial contribution.

The Karstedt Maneuver 


Ilya Rabinovich, The Russian Endgame Handbook, published in the Soviet Union in 1938 credits Karstedt and does not mention Kling and Horwitz. Yuri Averbakh, Comprehensive Chess Endings, vol. 5 Rook Endings was first published in 1984 in Russian, then in 1987 in English translation. Averbakh writes about this position:

Black to move
"Philidor thought that ... Black could draw only by 1...Rb6, and that any attempt to attack from the rear--1...Rb1 would lose. But Karstedt showed that this is not so, and later analysis by Berger, Cheron and Rabinovich basically confirmed his conclusions" (123). Having spent some time studying Rabinovich's analysis before I found this statement by Averbakh, I created with some help from Stockfish the analysis of Philidor's discussion that I present above.

Inasmuch as Kling and Horwitz's work is readily available both the originals digitized and accessible through Google Books and through Carsten Hansen's new republication of the later text, which wholly absorbs the 1851 text, I am satisfied that the term, "Kling and Horwitz technique", is an error.

If I could locate Max Karstedt's original analysis, I could be certain that the "Karstedt maneuver" is the correct term. However, Kartsedt left us no books. He did compose about 150 studies. None of those available in Harold van der Heijden's Endgame Study Database show this technique. Karstedt is not well-known. There is a Wikipedia article about him that offers a references to a secondary publication: Siegbert Tarrasch's book on the 1906 Nuremburg tournament. A few copies are available, but not at a price I'm willing to pay. This secondary reference is Wikipedia’s source for an article by Karstedt that is said to have his appeared in "German Weekly Chess" (presumably Deutsches Wochenschach).*

A date of 1897 is given for Karstedt’s correction of Philidor in several texts, but reference to an original source appear in none of the chess books I checked. My best clue as to where to look comes from Siegfried Hornecker, "The Unknown Soldiers I", ChessBase News (30 May 2020). Hornecker cites Die Schwalbe (February 2018), where Günter Büsing states that Karstedt wrote for Deutsches Wochenschach and Deutsche Schachblätter. This makes the Wikipedia reference possibly accurate. Although some issues of both of these periodicals can be found online, the 1897 edition of Deutsches Wochenschach is not available, and the other periodical began in 1906. With access to the 1897 issue of Deutsches Wochenschach, I would expect to be able to locate an article by Karstedt. It would be an interesting read.

Lacking appropriate primary sources, I might choose to trust Rabinovich, Averbakh, and Müller. Alternately, I might consider the term Karstedt maneuver speculative.

Whatever name is employed, it is worth learning. For that, Jesus de la Villa and Sam Shankland both offer exceptional in-depth analysis.


*Wikipedia shuns any work that appears to be “original research”, and hence has a built-in preference for a secondary work that mentions Karstedt, such as Tarrasch, over anything Karstedt may have written. I’m not certain whether there is a preference for translated names of publications, or whether this is simply sloppy editing.


23 April 2023

Fails

It seems that I pick up The Manual of Chess Combinations, vol. 2 by Sergey Ivashchenko once every other week to work a page of exercises. A few days ago, half a page occupied part of my morning. I solved three successfully. This morning, the fourth one on the page did not present difficulty, but the last two did. I also managed to err in the sixth exercise on each of the the next two pages.

Exercise 144 struck me as a study in corresponding squares on first glance, but I gave too little attention to the simplicity of Black's ability to gain and maintain the opposition. Had I considered the possibility of a sacrificial breakthrough, I might have more quickly perceived the floating square idea. I spent some time teaching the floating square to a couple of students last week and should have seen it.

White to move
1.Kf2 (or any other king move) fails. 1...gxh4 2.gxh4 Kg6 3.Ke3 Kf5 4.Kf3 Ke5 and Black can shuffle the king back and forth.

Instead, 1.g4! wins 1...hxg4 2.h5 (also 2.d6). 

Before that one, I thought I had correctly solved number 143, but had also overlooked something simple.

White to move
I tried 1.Kg5, overlooking that I had nothing after 1...e6 2.Kf6 Ke8 3.Kg7 Ke7 and somehow I had hallucinated there being possible an outflanking maneuver. After 1.Kg7 Ke8 2.e6! fxe6 3.Kg8 Kd8 4.Kf8 Kd7 5.Kf7 Kd6 6.Ke8, White has successfully outflanked the Black king.

Number 150 was familiar and I instantly knew the correct answer, but could not perceive the reason the rook had to move to d2 instead of d1, so I tried Rd1 against Stockfush. Again, simple opposition gives Black a draw.

White to move
1.Rd2! wins 1...d4 2.Rd1! Kd5 3.Kd7 Ke4 4.Kc6 d3 5.Kc5 Ke3 6.Kc4 d2 7.Kc3 and the rook captures the pawn on the next move. After 1.Rd1 d4 2.Kd7 Kd5, White can try 3.Rd2 Kc4 4.Ke6 Kc3 5.Rd1 d3 6.Ke5 Kc2 and the rook must be given up for the pawn.

My error in number 156 stemmed from failing to recognize the possibility of Black achieving a Philidor position.

White to move
Black got a Philidor-type position after 1.Kc4 Rg8 2.Kc5 Rg1 3.dxe6 Rc1+.

White wins easily either with 1.dxe6 fxe6 2.Ra7 Rf8 3.Ra8+ Kd7 4.Rxf8 or with 1.Ra7 straight away.


11 April 2018

Winning Advantage?

Stockfish and other engines give White an advantage of 1.7 to 2.3 pawns, but cannot suggest an approach superior to that played in the game.

White to move

52.Rh7 Kb6 53.Kb3 Ka6 54.Rc7 Rg8 55.Ka4 Kb6 56.Rg7 Rf8 57.Rg6+

Black to move

57...Kxa7 58.Ka5 Kb7 59.Rg7+ Kb8 60.Kb6

Black to move

Black saw that he had reached a Philidor Position and easily held the draw with mere seconds remaining on the clock.

Did White have another means for securing a win that the engines might suggest if allowed to "think" longer?

09 April 2018

Finishing

During Inland Chess Academy's Spring Break Chess Camp last week, I presented four sessions. My topics were weakness, patterns, coordination, and finishing. The following is an outline of the fourth, finishing. Click on the links for some of my previous posts that expound upon some of these techniques.

Finishing


To score well consistently in chess competition, you need to have the skill to convert an advantage into a win. Often, also, you need to hold a draw when you have a slight disadvantage.

To develop this skill, learn (in approximately this sequence):

• Checkmate with heavy pieces—two rooks or rook and queen
• Checkmate with one heavy piece
• Winning and drawing positions and techniques when one side has a single pawn (opposition and outflanking)

Black to move
Black draws with best play
• Winning techniques when one player has a pawn majority on one flank and an equal number of pawns on the other flank
• Use of opposition and outflanking to secure the win or hold the draw when both sides have the same number of pawns
• Some stalemate ideas when kings and pawns are all that remain
• Checkmate with two bishops
• Holding the draw with Philidor’s idea in rook and pawn against rook
• Winning from the so-called Lucena position (building a bridge)
• Queen versus advanced pawn—winning techniques and positions, drawn positions and techniques
• Tactical tricks in rook endings (and the corresponding drawing ideas)
• Checkmate with knight and bishop*
• Queen versus rook—elementary winning positions and ideas

Of course, these skills are only a beginning, but they are a very important beginning. These skills are called fundamental because they are the foundation upon which you can build lasting skill. Without this foundation, your success in the opening and middle game will often crumble in disappointment.


*Jeremy Silman does not agree that this skill is necessary

21 October 2016

Playing with Rooks

Lessons for both my beginners and advanced students focused on rooks this week. For the beginners, the lesson focused on an elementary checkmate. The advanced students learned the basic plans for defending the Philidor Position.

Checkmate with Rook and King

White to move

I showed the students two methods and then asked them to practice with a partner. As several of these children are still learning how to set up and move the pieces, mastery of this skill was not expected. We will revisit this skill again later this fall.

First Method:

Drive the enemy king to the last rank, using check when the two kings stand in opposition.

1.Rh4

Taking control of the fourth rank confines Black's king to half of the board.

1...Kf5 2.Ke2

White's king moves forward on the file adjacent to the Black's king's file.

2...Kg5 3.Ra4

When the rook is attacked, it runs to the other side of the board.

3...Kf5 4.Ke3 Ke5

White to move

The two kings stand with one square between them on the same file. We call this position opposition. Controlling the opposition is an important element in pawn endings (see "Opposition and Outflanking").

Here, it is time to move the rook forward, checking the king and driving him backwards towards the eighth rank.

5.Ra5+ Kd6 6.Ke4 Kc6 7.Kd4 Kb6 8.Rh5 Kc6

White to move

9.Rg5

Moving the rook one square presents Black with a choice: move closer to an edge or take the opposition and be driven back by a check.

9...Kd6 10.Rg6+ Ke7

White continues repeating the same patterned moves, slowly pushing the Black king backwards.

11.Kd5 Kf7 12.Ra6 Kg7 13.Ke5 Kh7 14.Kf5 Kg7 15.Rb6 Kh7 16.Kg5 Kg7 17.Rb7+ Kf8 18.Kg6 Ke8

White to move

19.Kf6 Kd8 20.Ke6 Kc8 21.Rh7 Kb8 22.Kd6 Ka8 23.Kc6 Kb8

White to move

24.Rg7 Ka8 25.Kb6 Kb8 26.Rg8# 1–0

The first method is neither efficient nor elegant, but it has the virtue of being easy to learn. At least some students find it easier to learn. Others might find the second method, the one that I usually teach, just as easy.

Second Method

Confine the enemy king to an ever-shrinking box. Use the rook and king in coordination. A distinctive element of this method is that it can be performed without checks until the final checkmate. The stronger side forces the weaker side back by controlling the desired escape squares.

1.Ke2

White's king moves closer. 1.Rf2 also works.

1...Kf5 2.Ke3 Ke5

White to move

3.Rd1

In the first method, White would play Rh5+ here. 3.Rd1 confines the Black king to a box bordered by the d-file and the fourth rank.

3...Kf5 4.Rd4

Securing the box.

Black to move

4...Ke5

Naturally, Black attempts to provoke an error. How can White make progress now?

5.Kd3

White's move does not change the principal feature of the position--the box maintained by the rook. Now, Black must move away from the rook.

5...Kf5

White to move

6.Re4

White makes the box smaller. Now the fourth rank and the e-file are the boundaries.

6...Kg5 7.Kd4 Kf5 8.Kd5 Kf6 9.Re5

Black to move

Compare Black's confinement to nine squares after nine moves to the other method where Black still has eighteen squares after the same number of moves.

9...Kf7 10.Re6 Kg7 11.Ke5 Kf7 12.Kf5 Kg7

White to move

13.Rf6

Black's king is confined to four squares.

13...Kh7 14.Rg6

And now Black is confined to two squares. Do not confine the king to only one, however, for that would be stalemate.

14...Kh8 15.Kf6 Kh7 16.Kf7 Kh8

White to move

17.Rh6# 1–0


Philidor Position

The defensive technique known as the Philidor position was described in François-André Danican Philidor, Analysis of the Game of Chess (1777). See "Philidor Position: Historical Note" for his analysis.

For my students, I found two games played by chess masters more than a century ago where a Philidor Position arose and was played correctly. Naturally, the stronger side will play many moves in the hope that the other player goes astray due to boredom or time pressure.

My students are accustomed to coming into chess club to find a position on the demo board. They inquire as to who has the move, and then begin suggesting the move they think is best.

I insisten that they needed not a move, but a plan. First, they must ask whether White's position is better, equal, or inferior. Once they determine that it is inferior, they know that a draw would be a good result.

The plan: White occupies the third rank with his rook and maintains it until Black advances the pawn. Then White's rook goes to the eighth rank to endlessly check the enemy king.

Marco,Georg -- Albin,Adolf 
Monte Carlo (11), 1902

White to move

52.Rc3

One student may have suggested this move instantly, but it is acceptable only after the plan has been articulated. A chess engine can suggest several moves that lead to a draw. With brute force calculation, the position is not yet critical. Humans need less calculation when they understand the plan.

52...Ra5 53.Rb3 Ra2 54.Rc3 Rd2 55.Rb3 Re2

White to move

Black tries to create complications by contesting the third rank.

56.Kf1

The other element of the plan is to keep the king in front of the pawn. In order to play rook endings properly, a player must understand the fundamentals of pawn endings. White could lose here via 56.Ra3 Re3 57.Rxe3?? fxe3 58.Kf1 Kf3-+

56...Rh2 57.Kg1 Rh5 58.Ra3 Rd5 59.Rb3 Kf5 

White to move

60.Kf2 Kg4 61.Ra3 Rd2+ 62.Kf1 Rb2 63.Rc3 Rb4 64.Kg2 Rb2+ 65.Kf1 Kf5 66.Ra3 Rh2 67.Ra5+

Black to move

White is happy to check endlessly from the long side of the pawn. It is worth noting that checks from the short side do not work.

67...Kg4

Black returns his king to refuge from checks.

68.Ra3 

White returns to the third rank.

68...Rd2 69.Rb3 Kf5 70.Ke1 Rd4 71.Ke2 Ke4 72.Ra3 Rb4 73.Kf1 Kf5

White to move

74.Kf2 Kg4 75.Rc3 f3

Having tried a few tricks that failed, Black advances the pawn.

76.Rc8 Rb2+ 77.Kf1 ½–½

Black saw no reason to continue. It had become clear that Marco was a student of Philidor, as all chess players should be.

The second example contains fewer moves.

Winawer,Szymon -- Weiss,Miksa
Vienna (32), 19.06.1882

Black to move

128...Rg6

Knowing the plan, students quickly suggested and explained this move.

129.Rh5 Kc7 130.Rh7+ Kc8 131.c5 Rf6 132.Rh5 Rg6

Just shuffle the rook back and forth on the sixth rank as far from the enemy king as possible.

133.Kc4 Kc7 134.Kd5 Rf6 135.Re5 Rh6 136.Re7+ Kc8 137.Ra7 Rg6 138.Kc4 Rh6 139.Kb4 Rg6 140.Rf7 Rh6 141.Rf5 Kc7 142.c6 Rh1 ½–½

30 September 2015

Child's Play

A two pawn advantage in a rook ending should be decisive. Indeed, I won easily with such an advantage last night in a three minute blitz game. The win seemed child's play.

A few minutes of postgame analysis this morning revealed another story. I made a fatal blunder and won because my opponent missed a critical opportunity.

Black to move
After 46.Ke2
46...g5 47.Kf3 gxf4

47...Kg6 is better. 48.Rxg2 Rxg2 49.Kxg2 g4 and the pawn ending is an elementary win for Black.

48.exf4 e5 49.fxe5+ Kxe5 50.Re1

Black to move

50...Kf6??

It was necessary to move the king to the d-file. 50...Kd4 was best.

51.Rg1??

51.Kf2 Rg5 (51...f4 52.Rg1=) 52.Rb1 Rg8 and the computer thinks that Black has a slight edge. Accurate play by White should hold the draw.

White to move
Analysis Diagram after 52...Rg8

The Drawing Method

From the analysis diagram, I played out the position against Stockfish. Perhaps the drawing method is not as simple as the win became in the game, but it requires only application of some elementary techniques.

Stripes,James -- Stockfish 6 64

53.Ra1 Ke5 54.Ra5+

Side checks are the key drawing method until White's king gets too close to the rook, then either restraining the advance of the f-pawn or rear-checks become necessary. Although not a textbook Philidor position, the drawing method follows the same idea.

54...Kd6 55.Ra1 Rg7 56.Ra6+ Kc5 57.Ra5+ Kb4 58.Ra1 Kc3

White to move

59.Kg1

59.Ra3+ fails to Kb2.
59.Rg1 fails to Kd2.
59.Rd1 fails to f4.

59...f4 60.Ra4 Rg4 

60...f3 is met by 61.Rf4

61.Ra3+ Kd4 62.Ra4+ Kc5 63.Ra5+ Kb4

White to move

64.Rf5

White now prevents f3.

64...Ka3 65.Rf8 Kb3 66.Rf7 Kc2 67.Rf8 Kd3 

White to move

68.Rd8+

With the White king able to support f3, he must be harassed endlessly with checks from the rear.

68...Ke2 69.Re8+ Kd1 70.Rd8+ Ke1 71.Re8+ Kd2 72.Rd8+ Ke3 73.Re8+ Kf3

White to move

74.Ra8

Preparing to resume checks from the side.

74...Ke4 75.Ra4+ Kf5 76.Ra5+ Ke6 77.Ra6+ Kd5 78.Ra5+ Kc6 79.Rf5

Again restraining the f-pawn.

79...Kd6 80.Rf8 Ke6 81.Re8+ Kf6 82.Rf8+ Kg7 

White to move

83.Rf5 Kg6 84.Rf8 f3 

The computer gives up.

85.Rxf3 Kh6 86.Rf2 Rg5 87.Rxg2 Rc5 88.Rf2 Ra5 ½–½


The Actual Game

After 51.Rg1?? in the game, we reached this position.

Black to move

51...Kg5

This was Black's only winning move, but is was simple to find and I played it automatically.

52.Kf2 f4 53.Kf3 Rg3+ 54.Kf2 Kg4 55.Re1

Black to move

Now, it is time to convert the rook ending into an elementary pawn ending.

55...g1Q+ 56.Rxg1 Rxg1 57.Kxg1 Kg3 58.Kf1 Kf3 59.Ke1 Kg2 and White resigned.

07 August 2015

Blitz Hinders Skill

Speed kills. Chess players are prone to error when they are under time pressure. In blitz, the time pressure begins with the first move. Games start in the normal fashion as players make moves they have made many times before. Some games may go twenty moves or more without either player being forced to confront an unfamiliar position. Some endgames, too, can be played very rapidly with little error.

In complex middlegames, however, blitz is groping in the dark. There is no time for analyzing the position. There is only time for reacting to concrete threats or for playing generic principled moves without concrete analysis of the nuances that are unique to the position on the board. Often there are familiar patterns in the position, of course. Strong players see more of these patterns and consequently make fewer errors.

Weak players reinforce the bad habits that make them weak. Improving players stagnate.

Blitz can help players improve. In one of the many chess forums discussions on the merits of blitz, a strong internet player offered a succinct statement on the principal benefits:
Blitz is good for getting a sample of what to expect against your opening repertoire. It also helps with exploring your intuitive tactical vision to see where you need work.
FirebrandX, "Does Blitz Actually Help Your Chess?" Chess.com
If you play enough blitz, you should encounter every likely response to your opening repertoire. That can be a useful addition to one's training regimen. To benefit, however, it would seem that a player needs more than just the experience of playing against every likely response. Playing the best moves in reply would be useful experience. To gain this experience, it is helpful to save blitz games into a database and review them. Check the lines against opening monographs and encyclopedias. Check these lines against a database. Check key moves with an engine from time to time. Play through master games in those lines.

Post-game analysis of blitz games helps to reinforce any lessons available from the opening. Such analysis seems even more critical for determining areas of one's intuition that need work. Here, too, a database can be a useful tool. During post-game analysis, if you see you failed to account for a bishop tucked away on a7, you can search your games to see if this problem is a recurring one.


15 July 2015

Side Checks

Even when down to a few seconds on the clock, I have drawn many rook endgames a pawn down. Because I teach the Philidor Position to young chess players, executing it in play is a simple matter. But sometimes checks from the rear fail and yet a similar idea succeeds.

White can draw this position.

White to move

I played 47.Rb8? and my opponent demonstrated that my king would never get to the pawn with 47...Rd4. I resigned a few moves later.

I could have played 47.Kc3 and after 47...Rh1 48.Rb5+ Kf4 49.Kd2 h4 50.Ke2 and it becomes clear that my king is close enough.

An even simpler draw was possible via 47.Rb5+ Kf4 48.Rb4+ Kg3 49.Rb5 (only move) Rh1

White to move

Here side checks save the game.

White has three possible moves that draw:

a) 50.Ka3

b) 50.Ka2

c) 50.Rc5

In each case, the point is that Black's king has no refuge from side checks except 50...Rf1, which drops the pawn.

I should have known this technique as well as I do checks from the rear. This blitz loss reveals that some practice may help reinforce the point.


23 October 2014

Lesson of the Week

Essentials of Rook Endings

My primary chess club had been divided into groups meeting on different days by age in years past. This year the division was changed to one based on skill. Consequently, my beginning* group on Tuesdays receives different instruction than the advanced group on Thursdays. Members of my in-school chess class and those who have contracted with me for individual lessons will get one or another of these lessons when appropriate.

The beginning group this week is working on recognizing checkmate. Interested parents may contact me to recieve a copy of the Checkmate in One exercise they will be working through over the next several weeks. I created a set of 48 positions from actual play. In every position, there is a possible checkmate on the move. My beginning group worked through the first six this week.

The advanced group is working through developing plans and correctly evaluating a series of positions that arose, or could have arisen, in one of my online games. My game ended in a textbook draw that my opponent insisted upon playing out. Along the way, we both missed clear winning chances during the course of a rook ending.

The first position occured near the end of the game. White recognizes that the position has reached the textbook Philidor Position that he had been aiming at for the past few moves.

White to move

White draws by occupying the third rank with his rook. The game continued 67.Ra3+ Kd4 68.Ke1 e3. Now that Black has advanced the pawn, White resorts to checks from the rear. Black cannot escape these checks and also maintain the pawn.

69.Ra8 Ke4 70.Re8+ and the game went on another twelve moves with White continuously checking the Black king.

The second instructive position comes from the moment when Black missed a win.

Black to move

After 54.Ra4+, Black played 54...Kd5. 54...Kd3! on the other hand would have facilitated the advance of the e-pawn and victory.

In the third instructive position for this week, White missed a chance for a clear advantage.

White to move

Black has just played 42...f5? White played 43.c4 and later let the game slip further away. However, he might have played 43.h4!

After 43.h4, Black's best chance requires the sacrifice of a pawn. 43...f4 44.Rxf4 Rb5+ 45.Kc4 and White has a clear advantage, albeit not necessarily a winning advantage.

There are many interesting positions that arise after 43.h4! Kd7?

One that is part of my lesson plan arises after the continuation 44.Rf4 Kc6 45.a4 Kd6 46.c4 Kc6 47.a5! b5

White to move

White's best move appears to be 48.d5! A possible line is 48...exd5 49.cxb5+ axb5 50.a6!

Either the a-pawn will promote, or all of both sides' pawns on the a- through e-files will be liquidated and the White king will march over to nab the trapped rook.


*Beginning and advanced are fuzzy terms in the chess world. From the perspective of a super-Grandmaster, everyone under 2000 Elo is a beginner. That definition includes me. For purposes of my after school chess club for elementary age children, advanced players are those who have qualified for the Washington State Elementary Chess Championship. Qualification each year requires scoring 3/5 or better in a qualifying tournament.

13 May 2014

Transition to Philidor

The position below arose in Bologan -- Erdos, Sibenik 2011. The opening and early middle game appears in Chess Informant 113/113 stopping at a point where White, a pawn ahead, has only one move to avoid checkmate. Informant gives the evaluation that Black has compensation for the material.

Black to move

My analysis engine favors 40...exd5, which my eye likes because the White king appears cut off from the passed d-pawn. Even so, White's pawn majority should lure the Black rook to the a- or b-file.

Stockfish DD offers: 40...exd5 41.Kg3 Kxf6 42.b4 d4 43.a4 h5 44.Rb1 Ke5 45.b5

Black to move
Analysis Diagram
45...axb5 leads to a drawn queen ending. The engine favors 45...d3. That, too, leads to a draw although it is less elementary.

In the game, Viktor Erdos opted for 40...Rxd5.

The game continued 41.Re4 Kxf6 42.Ra4 a5 43.b4 axb4 44.Rxb4 Rd2+ 45.Kg3 Rxa2

White to move

White has only one move that holds the draw.

46.Rf4+

Can the Black king find shelter from the checks? Erdos sought refuge on e8, but h8 was also possible. Best play appears to lead to a draw in either case.

46...Kg6 47.Rg4+ Kf7 48.Rf4+ Ke8

White to move

49.Rf6! Ra3+ 50.Kg2 Ke7 51.Rh6 Kd6 52.Rxh7 Kd5 53.Kf2 e5

White to move

White has achieved a Philidor Position with the Black pieces one rank further back.

54.Rh4 e4 55.Rh8 1/2-1/2