08 December 2014

Problem in the French

The Exchange variation of the French is reputed to give Black easy equality, but it remains a popular choice among amateur players. In a recent online game played at fifteen minutes for the whole game, I quickly found myself in trouble because I was fixing breakfast rather than attending to the game.

Internet Opponent -- Stripes,J [C01]

1.e4 e6 2.d4 d5 3.exd5

The Exchange variation

3...exd5 4.Nf3 Nc6 5.Be2

An unusual move. White's best chance for advantage in the Exchange variation results from vigorous play. This seemingly natural developing move seems too slow.

5.Bb5 and 5.c4 both seem better. Despite my seeming disdain for the Exchange variation, I play it with some frequency. 5.c4 is nearly always my choice here. (See "French Perfume" for harsh criticism of the Exchange variation.)

5...Bd6

Black proceeds with his normal approach to the Exchange variation.

6.0–0 Nge7 7.c4!?

Black to move

This forcing move appears in a mere nine games in the ChessBase database. I have faced it four times in online play. My only loss came as a result of an elementary blunder in the endgame.

7...dxc4

Although nothing else makes any sense, I played 7...Bxh2+ in a blitz game once.

8.Bxc4

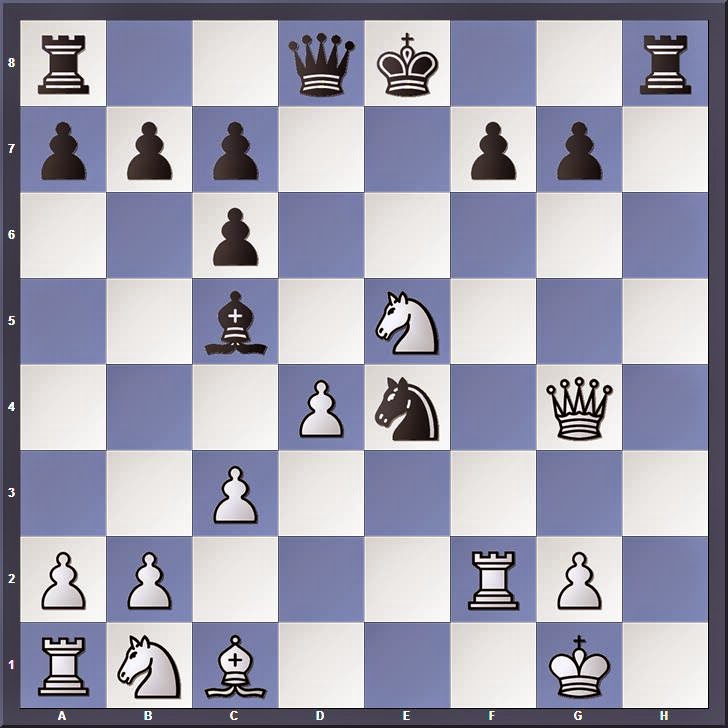
Black to move

Black has an important decision to make here.

8...Bg4??

Playing by rote, I blundered.

8...0–0 seems best 9.Nc3 Bg4 10.Be3 Nf5 11.h3 Bxf3 12.Qxf3 Nfxd4 13.Bxd4 Nxd4 14.Qxb7 Rb8 15.Qd5 c6 16.Qe4 (16.Qxd4 Bh2+ 17.Kxh2 Qxd4) 16...Rxb2 with a slight advantage for Black 0–1 Antonov,A (2055) -- Akhmetov,A (2373) Izhevsk 2014 (Black won in 27 moves)

8...Bf5 9.Nc3 a6 10.Re1 b5 11.Bd3 0–0 with a slight advantage for White 0–1 Cook,M (2039) -- Scott,D (2017) England 2013 (Black won in 44 moves)

8...h6 9.h3 0–0 10.Nc3 Ng6 11.Qc2 Nh4 12.Nxh4 Qxh4 13.Qe4 Qxe4 14.Nxe4 and it seems that both players have equal chances 1–0 Kharakhinov,A (2024) -- Radnaev,A (2052) Ulan Ude 2011 (White won in 47 moves)

9.Bxf7++- Kf8

9...Kxf7 loses quickly 10.Ng5+

Black to move
Analysis Diagram

a) 10...Ke8 11.Qxg4 Nxd4 12.Be3+-

b) 10...Kf8 11.Qxg4 Qe8 (11...Nd5 12.Ne6+) 12.Qf3+ Kg8 13.Qb3+ Kf8 14.Ne6+ Kg8 15.Nxc7+ Qf7 16.Nxa8+-

c) 10...Kg8 11.Qb3+ Nd5 12.Qxd5+ Be6 13.Qxe6+ Kf8 14.Qf7#

10.Bb3

White has a clear advantage that should prove decisive. I suffered many moves before my opponent finally offered me chances through a blunder.

06 December 2014

Sacrificial Attack

In keeping with the theme of the name of the tournament, today's Solstice Sacrifice youth chess tournament has a problem solving contest concerning a sacrificial attack. In this case, all six positions are theoretical positions that might have occurred, but did not, in Mayet -- Anderssen, 1851.

Black has a winning sequence from each position.

1.

2.

3.

4.

5.

6.

05 December 2014

Analyzing Variations

Lesson of the Week

My chess students range from beginners struggling to remember how all the pieces move to several of the top local scholastic competitors. In a club for beginners this week, I worked with most of the students individually on checkmate with queen and king against a lone king (see "Teaching Elementary Checkmates").

My other students--both those receiving individual lessons and those in groups--were presented with a variety of positions that might have occurred in actual games. A few were also shown a portion of a game from the 1969 World Championship between challenger Boris Spassky and Tigran Petrosian.

Many students saw two positions that might have resulted in the first match game between Louis Charles de la Bourdonnais and Alexander McDonnell (see "Three Fighting Draws" for the whole game).

Black to move
After 46.Nxe7
Could White have preserved the draw after 46.Nxe7 instead of the move he played in the game?

This variation might have led to the following position.

White to move

Can White prevent Black's pawn from becoming a queen?

Several students were shown the entire game Mayet -- Anderssen, London 1851.*

1.e4 e5 2.Nf3 Nc6 3.Bb5 Bc4 4.c3 Nf6 5.Bxc6 dxc6 6.O-O Bg4 7.h3 h5 8.hxg4 hxg4 9.Nxe5 g3 10.d4 Nxe4 11.Qg4 Bxd4 12.Qxe4 Bxf2+

The game may have ended here, or been played one move longer, or even all the way until checkmate.

White to move
After 12...Bxf2+

Those who were shown this game went through it repeatedly, looking for improvements. First, efforts were made to find where White's position became hopelessly lost and to suggest alternatives. Then, efforts were also made to find improvements for Black.

One group and several individuals were shown the final portion of Spassky -- Petrosian 1969.

Spassky,Boris V -- Petrosian,Tigran V [D41]
World Championship 27th Moscow (5), 23.04.1969

1.c4 Nf6 2.Nc3 e6 3.Nf3 d5 4.d4 c5 5.cxd5 Nxd5 6.e4 Nxc3 7.bxc3 cxd4 8.cxd4 Bb4+ 9.Bd2 Bxd2+ 10.Qxd2 0–0 11.Bc4 Nc6 12.0–0 b6 13.Rad1 Bb7 14.Rfe1 Rc8 15.d5 exd5 16.Bxd5 Na5 17.Qf4 Qc7 18.Qf5 Bxd5 19.exd5 Qc2

White to move

The most important element in this position is White's passed d-pawn. In Chess.com's Chess Mentor, this position is presented with guidelines for handling such pawn. I communicated these ideas to the students.

1) control the square in front of the pawn
2) trade off minor pieces
3) keep the queens on the board to prevent the defending king's activity
4) keep at least one rook

The player defending against such a pawn, of course, hopes to trade queens, blockade the pawn with a minor piece, and activate the king. The Chess Mentor lesson focuses on White's side of things in this struggle and does not elucidate the defensive ideas.

20.Qf4 Qxa2 21.d6 Rcd8 22.d7 Qc4 23.Qf5 h6 24.Rc1 Qa6 25.Rc7 b5 26.Nd4 Qb6 27.Rc8

The Chess Mentor lesson ends here.

27...Nb7 28.Nc6 Nd6 29.Nxd8 Nxf5 30.Nc6 1–0


*The Oxford Encyclopedia of Chess Games (1981) presents this game as Berlin 1859 with the source as The Chess Monthly (1882). In that publication, however, it is stated that the game was played during the International Chess Tournament, London 1851. Mayet and Anderssen did not play each other in that tournament, but all of the participants played many non-tournament games with one another during the course of the event.

03 December 2014

Teaching Elementary Checkmates

Lesson of the Week

How do you teach to young children the elementary checkmate of queen and king versus a lone king? Is it important to stress coordination of the two pieces working in harmony? Does each piece do its work in succession?

In teaching this skill, chess coaches must balance simplicity with efficiency. The best technique may vary from one student to another. When a young player has mastered the technique, self-confidence will develop. Pawn endings become more meaningful.

The simplest way might be to confine the enemy king with a queen until reduced to two or three squares, then bring up the king. On the other hand, this method is cumbersome and inefficient. Many more moves must be played to complete the job. Checkmating in fewer moves requires active coordination of queen and king.

Teaching young players to coordinate their pieces will produce benefits beyond development of this elementary skill. Moreover, coordination is necessary for rook and king versus lone king.

In my beginning chess club yesterday afternoon, I worked with young students one-on-one teaching this elementary checkmate. As preparation, I surveyed several books and other resources to gain a better understanding of the varied approaches to teaching this skill.

Although some chess players learn this checkmate almost as soon as they master the movement of the pieces, others play for years before the absence of this skill is exposed. Every youth tournament that I have directed has produced evidence--draws that should be wins--that the skill is not universal among scholastic chess players.

The basic elements of this checkmate are:
patterns of checkmate
restricting the king ("the box", "the knight's move")
coordinating king and queen
avoiding stalemate

A Lesson in Efficiency

José R. Capablanca, Chess Fundamentals (1921) begins with simple checkmates, including our present concern. His explanation, including diagram, occupies a little more than one page. Coordination and efficiency are highlighted. Capablanca states that the checkmate, "should always be accomplished in under ten moves" (8).*

Capablanca's Starting Position
Capablanca does not make the observation that reducing the king's mobility is accomplished by moving the queen a knight's move from the defending king. Nonetheless, his moves do follow that pattern. In his solution, checkmate is accomplished from the diagram above in eight moves.

His starting move is 1.Qc6, placing the defending king between the attacking queen and king. On the second turn, the king moves. Capablanca's solution: 1.Qc6 Kd4 2.Kd2 Ke5 3.Ke3 Kf5 4.Qd6 Kg5 [4...Kg4 5.Qg6+] 5.Qe6 Kh4 [5...Kh5 6.Kf4] 6.Qg6 Kh3 7.Kf3 and checkmate next move.

A Lesson in Simplicity

ChessKid.com's curriculum contrasts with Capablanca's in several ways. The instruction fills two standard printer sheets. The starting position of the queen differs but the kings are on the same squares as Capablanca's illustration.

ChessKid.com's Starting Position
The website breaks the solution into three discrete steps. 1) Driving the enemy king near a corner with the queen, 2) bringing up the king, and 3) finishing the job with the king and queen working as a team.

ChessKid.com's solution (step one): 1.Qd3 Ke6 2.Qd4 Kf7 3.Qe5 Kf8 4.Qe6 Kg7 5.Qf5 Kg8 6.Qf6 Kh7 7.Qg5.

The best elements of this three-part solution is the accompanying vocabulary. In step one, the queen builds a box that confines the king. The weakness is that neither side makes optimal moves. Particularly galling is that Black moves to the edge before being forced there, and White does not then confine the enemy king on the edge.

The Rockford, Illinois Chess Club's one page handout follows a process akin to that on ChessKid.com, but adds the note that a defending king on the edge should be instantly confined by placing the queen on the adjacent rank or file. Had that advice been heeded in ChessKid.com's approach, 3...Kf8 would have been met with 4.Qc7. Step two could then begin.

Mastering the Skill

Jeremy Silman, Silman's Complete Endgame Course (2007) bring's together the best elements of these two contrasting approaches. He begins the section with a discussion of "the box" with examples from both queen and from rook checkmates.

Trapped in a Box
The diagram illustrating the box is found in Silman's solution after White's first move.

Silman's Starting Position
Silman's solution: 1.Qe3 Kc4 2.Kg2 Kd5 3.Kf3 Kc4 4.Ke4 Kb4 5.Kd5 Kb5 6.Qb3+ Ka6 7.Kc6 Ka5 8.Qb5#.

After confining the king to a box, Silman brings up the king. His solution offers a good example of the two pieces working together.

Techniques for the Teacher

I have found that it is useful to teach young players how to confine the enemy king without checks. Often I use only two pieces on the board: a white queen and black king. The queen constantly moves a knight's move from the king, shrinking the box until the king is confined to two squares. Then, I place the white king in the far corner. See "Lesson of the Week" (8 November 2011) for illustrations.

When students are older, or stronger, or have mastered this simple exercise, I work on teaching efficient checkmate through coordination of the pieces. In order to earn the Knight Award, players must reach this level.

Two books have proven helpful.

Bruce Pandolfini, Pandolfini's Endgame Course (1988) offers four diagrams for queen and king vs. king. In each one, checkmate is forced in no more than four moves. His verbal descriptions offer guidance useful for executing the checkmate from positions that require more moves. The king must be trapped on an outside row. The queen confines the enemy king by moving "a knight's jump" away. Pandolfini's Endgame 5 (the second with QK vs. K) highlights the stalemate danger when the queen is a knight's jump from a king in the corner. Of particular importance is Pandolfini's expression of the technique of the "cut-off" in this ending and in RK vs. K.

Elements of the Game of Chess (1822) by William Lewis was published without diagrams and using an early version of English descriptive notation. It has been digitized by Google Books, rendering it accessible, but no easier to use. Nonetheless, I find it of value. Lewis presents a series of nine starting positions. The first several are checkmate in one or two.

Lewis's Starting Position
In Lewis's first starting position, White has three checkmates available. The second starting position is the same, but with Black to move.

After 1...Kd8, two checkmates are possible. 2.Qb8# is given by Lewis. This checkmate pattern is usually omitted from texts aimed at the beginner. However, it is an essential pattern for solving a problem that I created more than ten years ago, and that surprisingly has stymied many accomplished players.

There are three solutions to this problem.

White to move
Mate in Two (Stripes 2003)
The fourth position and solution given in Lewis offers the same instruction found in Pandolfini's "cut-off".

Lewis's Starting Position
Having shown this position and others very similar to hundreds of young players over the years, I have observed that a young player's first impulse is to move the white king towards the black. Checkmate is accomplished more quickly, however, by driving the defending king towards the hostile king.

1.Qh7 Ke8 2.Qg7 Kd8 3.Qf7 Kc8 and now checkmate is possible two ways: 4.Qc7# or 4.Qe8#.

Lewis seventh position is one that I have used with some frequency to teach coordination between king and queen.

Lewis's Starting  Position
Lewis's solution: 1.Qd5!

White's first move confines the defending king in a box by moving the queen a knight's jump away. In this case, however, the white king is also in this box. Such was also true in Capablanca's solution, although he does not mention the box.

Black has one legal move.

1...Kf4 2.Kf2

Again, the defending king has a single legal move.

2...Kg4 3.Qe5

Black now has two choices. 3...Kh3 leads to 4.Qg3#.

3...Kh4 4.Kf3 Kh3

And now there is a choice of checkmates.


Applying Lewis's method to the starting position employed by ChessKid.com, checkmate can be forced in seven moves. Silman offers useful advice: "Study this endgame carefully until you can easily checkmate your friends and your computer" (14).

I have played out this checkmate hundreds of times against the computer. Even under incredible time pressure, finishing this game is like breathing. It has become automatic.


*Several older texts express the view that nine moves is the most that should be required from any position. Computer generated endgame tablebases have demonstrated, however, that perfect play from the hardest position yields checkmate in ten. This position and the optimal solution is given in László Polgár, Chess Endgames (1999) and other sources.

02 December 2014

Defend Well

White has gained two pawns through Black's short-sighted plan. But, now Black's attack looks serious. How does White maintain maintain the advantage?

White to move

White played bxc4 and lost quickly.

30 November 2014

McDonnell -- De La Bourdonnais 1834: Index

I am working my way through all of the available games of Alexander McDonnell (1798-1835). Most of these were part of his six matches with Louis-Charles Mahé de La Bourdonnais (1795-1840). These matches were played at the Westminster Chess Club in London. William Greenwood Walker, club secretary, recorded the games and published them in A Selection of Games at Chess (London: 1836). Thanks to Walker, these matches became the first between chess masters for which we have a record of the moves.

The matches have come to be regarded as an unofficial World Championship and the beginning of modern chess history. Paul Morphy annotated some of the games for a chess column that he wrote for the New York Ledger in 1859-1860.

I annotated all 25 games of the first match without reference to engine analysis and with minimal reference to annotations by others. Now, I plan to work my way through the annotations of these games in Cary Utterberg, De la Bourdonnais versus McDonnell, 1835 (2005).

Utterberg offers a narrative of the historical milieu, a compendium of comments on the games by other chess writers, and his own analysis. Of particular interest, perhaps, is Utterberg's summation of the state of opening theory when the match took place. His analysis is deeper, more extensive, and better informed than mine.

This post offers links to my posts of the games in the matches between these two players..

McDonnell -- La Bourdonnais, First Match

Game 1: La Bourdonnais -- McDonnell 1/2-1/2
Game 2: La Bourdonnais -- McDonnell 1/2-1/2
Game 3: La Bourdonnais -- McDonnell 1/2-1/2
"Three Fighting Draws"

Game 4: La Bourdonnais -- McDonnell 1-0
"McDonnell Blunders"

Game 5: McDonnell -- La Bourdonnais 1-0
"McDonnell Strikes Back"

Game 6: La Bourdonnais -- McDonnell 0-1
"McDonnell Takes the Lead"

Game 7: McDonnell -- La Bourdonnais 0-1
"De La Bourdonnais Evens the Score"

Game 8: La Bourdonnais -- McDonnell 1-0
Game 9: McDonnell -- La Bourdonnais 0-1
"Two Losses"

Game 10: La Bourdonnais -- McDonnell 1-0
"Small Errors"

Game 11: McDonnell -- La Bourdonnais 0-1
"Losing Takes a Toll"

Game 12: La Bourdonnais -- McDonnell 1-0
"Weakened King"

Game 13: McDonnell -- La Bourdonnais 1/2-1/2
"Morning Coffee"

Game 14: McDonnell -- La Bourdonnais 0-1
"McDonnell -- La Bourdonnais 1834"

Game 15: La Bourdonnais -- McDonnell 1-0
"That Pin of f7"

Game 16: McDonnell -- La Bourdonnais 0-1
"Strong Knights"

Game 17: La Bourdonnais -- McDonnell 1-0
"Mating Attack"

Game 18: McDonnell -- La Bourdonnais 0-1
"Attack and Counterattack"

Game 19: La Bourdonnais -- McDonnell 0-1
"After a Long Drought ..."

Game 20: McDonnell -- La Bourdonnais 0-1
"Materialism"

Game 21: La Bourdonnais -- McDonnell 0-1
"McDonnell's Cavalry"

Game 22: McDonnell -- La Bourdonnais 0-1
"La Bourdonnais's Infantry"

Game 23: La Bourdonnais -- McDonnell 0-1
"Pawn Structure Chess"

Game 24: McDonnell -- La Bourdonnais 0-1
"An Opening Disaster"

Game 25: La Bourdonnais -- McDonnell 1-0
"A Powerful Pawn"


This post will be updated ...

29 November 2014

A Powerful Pawn

McDonnell -- La Bourdonnais 1834

Five months ago I began posting analysis of the games of the first match between Alexander McDonnell (1798-1835) and Louis-Charles Mahé de La Bourdonnais (1795-1840). My analysis is unaided by computer analysis. The first post was "Three Fighting Draws," and each post contains a link to the next.

Today's post concerns game 25, the final game in the first of six matches between these two players. My analysis of game 24 was posted in "An Opening Disaster".

The match was played in the Westminster Chess Club, London. William Greenwood Walker, club secretary, recorded the games. This match is the earliest between masters for which the games are available. The match marks an early moment in the development of modern chess.

Although the games are uneven in quality and La Bourdonnais dominated the match, they remain instructive. Many are balanced struggles.

In game 25, La Bourdonnais played a version of the Bird Opening (that name would come later) that offers White minimal prospects. Nonetheless, a few small errors by McDonnell put him on the defensive. He then miscalculated the consequences of a series of exchanges. La Bourdonnais was able to grind out the technical win.

De Labourdonnais,Louis Charles Mahe -- McDonnell,Alexander [A03]
London m1 London (25), 1834

1.f4 d5 2.d4 c5 3.e3 e6 4.Nf3 Nc6 5.c4

5.c3 is a better move. White's pawn structure would make it difficult for Black's pieces to find activity.

5...cxd4 6.exd4 dxc4 7.Bxc4

Black to move 

White's isolated queen pawn is a potential target, but also gives White temporary control of e5 and threatens the advance d4-d5. It is not easy for Black the exploit the open dark squares leading to White's king. A few checks are possible, but where do they lead?

7...Nf6 8.Nc3 Be7 9.0–0 0–0

Black's position is solid without weaknesses. White has more space. White's dark-squared bishop and Black's light-squared are restricted by their own pawns.

10.Kh1 a6 11.Be3

Overprotecting the weakened isolani.

11...b5 12.Bd3 Bb7

A nice square for the bishop.

13.Ne5

Black to move

13...Kh8 

I'm not sure that I like this move. Was Bxh7+ a credible threat? Was there another reason for the king to step aside?

13...Nd5 seems a reasonable alternative.

a) 14.Bd2 Ncb4

b) 14.Nxd5 Qxd5 15.Qf3 Nxe5 16.Qxd5 Bxd5 17.dxe5=

c) 14.Bxh7+? Kxh7 15.Qh5+ Kg8 16.Nxd5 Qxd5 17.Rf3 f6–+

d) 14.Qe2 Ncb4

14.Bc2 Nb4 15.Bb3 Nbd5 16.Nxd5 Nxd5 17.Qe2

Black to move

17...f6

Although this move drives the knight off its outpost, it also weakens the e6 square. This move may have been a critical error. McDonnell must defend a difficult position for the rest of the game, although he is able to generate some threats.

17...Bh4 may have been worth considering. 18.Bxd5 Qxd5 19.Qf3 Qxf3 20.Nxf3.

18.Nf3 Qe8 19.Rae1

Building up pressure on e6.

19...Bd6 20.Bd2 Nxf4 21.Bxf4 Bxf4

White to move

22.Bxe6

Now the isolani is a passed pawn.

22.Qxe6 does not seem as strong. 22...Qh5 23.Qe2 Rae8 24.Qf2 Bxf3 25.gxf3.

22...Qh5

Black has threats against h2

23.g4

23.d5? Bxd5 24.Bxd5 Qxd5 leaves Black a pawn ahead.

23...Qh6 24.d5 Rae8

24...Bd6 25.Nd4 g6.

25.Qg2

25.a3 passing loses. 25...Bxd5-+.

25...Re7 26.Nd4 g6

26...Bc8 27.Nf5.

27.Nc6 Rc7 28.Re4

Black to move

28...g5

I want to blockade the pawn 28...Bd6 29.Qf2

Here 29.g5 seems to offer Black a draw 29...fxg5 30.Rxf8+ Qxf8 31.Qxg5 Qf1+ 32.Qg1 Qf3+ 33.Qg2 Qd1+.

29.Nd4 Rd8

Everything hinges upon the isolated, passed pawn.

30.Nf5 Qf8 31.Rd1 Rc5 32.Red4 Be5 33.R4d2 Rc4 34.Ne3 Rc7 35.Qf3 Bf4 36.Rd3 Qd6

36...Bd6 still looks good to me. 37.Nf5 Rc2 38.R3d2.

37.Nf5

Black to move

37...Qxe6?

A miscalculation

37...Qb6 might hold.

38.dxe6 Bxf3+ 39.Kg1

Black is ahead a piece temporarily, which must have been McDonnell's idea, but La Bourdonnais calculated deeper.

39...Rxd3 40.Rxd3 Rc8

Preventing checkmate

41.e7 Re8 42.Rxf3

Black to move


White's isolated pawn now restrains Black's rook.

42...Kg8

Material is equal, but cannot remain so.

43.Ra3

The a-pawn is a target.

43...Kf7 44.Rxa6 Rc8 45.b3 Be5 46.h3 b4

White to move

47.Kg2

White's king must join the action. Black has everything secure and prevents the advance of the e-pawn. But, Black's pieces cannot stray far. The bishop must guard d6, the rook must prevent White's rook from occupying the eighth rank.

47...Bf4 48.Kf3 Be5 49.Ke4 Bf4 50.Ra7

Freeing the knight for action.

50...Be5 51.Ng7!

Black to move

51...Re8

51...Kxg7 52.e8Q+ Kh6 53.Qxc8.
51...Bf4 52.e8Q#.

52.Nxe8 Kxe8 53.Kf5 Kf7 54.Rb7 1-0

The bishop cannot guard b4 and f6.

La Bourdonnais wins the first match with 16 wins, 5 losses, and 4 draws.

28 November 2014

Forcing Checkmate

White to move

It is checkmate in five from this position. My opponent missed a delaying move, so I was able to mate in four.