13 October 2015

Cutting Off

Beginning chess players prefer direct attacks. In order to become adept at finishing a game with an advantage of overwhelming force, players need to learn to restrict the opponent's choices. Instead of endless checking, which leads nowhere, a beginning player must learn to first cut off the escape.

My beginning students this week were presented with a worksheet that has six diagrams. I asked them to set up each position on a chessboard and find the checkmate that required the fewest moves. After they had spent ten minutes on the worksheet, we went over all of the correct solutions on the demonstration board.

For readers needing to develop these skills, several of my previous posts my be helpful: "Checkmate with Heavy Pieces" links to a video that I made; "Lesson of the Week" (November 2011) and "Teaching Elementary Checkmates" offer instruction with static diagrams.


09 October 2015

Lesson of the Week

Chess students are divided into two groups: beginners and advanced. Beginners range from those who do not know how to move the the pieces, but want to learn, to those who have been playing chess a year or more, but have not yet played in tournaments. Advanced players competed in scholastic tournaments last year. Most qualified for and played in the Washington State Elementary Chess Tournament. Some of these students won trophies at state.

The lesson of the week differs for these different groups.

Beginners

We began by understanding the chessboard as ranks, files, and diagonals. Each square has a name. The students learned these names. We then discussed two pieces: king and rook. Even those who had never played chess before should now know how the king and rook move. They should understand check and checkmate. We looked at checkmate from two positions. Some of the students will need additional work.

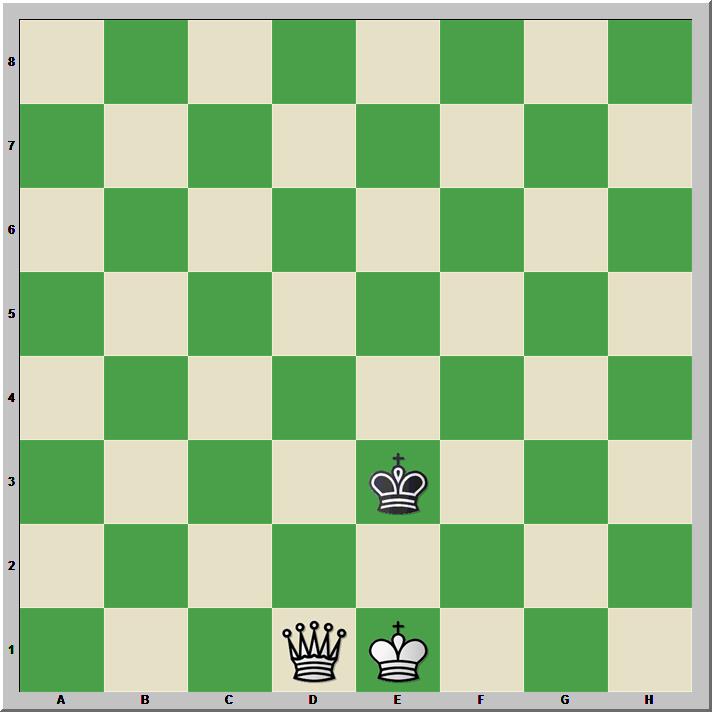
Cutting off the defending king's escape is essential to finishing the game from both positions.

White to move

White's is able to checkmate Black in two moves. First, one of the rooks moves to the seventh rank, cutting off the Black king's escape from the edge. After Black moves the king to one side of the other, the other rook moves to the eighth rank with checkmate.

White to move

Moves that put Black in check delay the end of the game. For example, 1.Rf8+ forces the defending king off the edge of the board, which is what Black wants. Cutting off the king's escape, on the other hand, ends the game quickly.

1.Rc5 Ke8

Black had only one legal move.

2.Rc8#.

Checkmate.

Advanced

Advanced students were presented with a position from a game between masters, Skembris -- Gouloutis, Anogia 2015. The core of the lesson comes from a variation that might have been played. This variation is presented in the notes to the game in Chess Informant 125, which was published last week.

Black to move

The first lesson from this position is understanding that despite superficial appearances, Black's b-pawn is not protected. The a-pawn is pinned because White's queen and a1 rook both eye the rook on a8. The rook on b8 also fails to protect b4 because moving the rook would leave the a8 rook unprotected.

In the game, Black played 26...e5. The game concluded 27.Nxb4 exd4 28.Nc6 Rf8 29.Ne7+ Kh8 30.Re4 Nf6 31.Rh4+ Nh7 32.Qe4 Qc5 33.Ng6+ and Black resigned.

Although we looked at the game's actual moves, we concentrated upon the variation in the notes by Spyridon Skembris, the game's winner.

26...a4 27.Nxb4 Ra7 28.Nc6 Rxb3

White to move

How should White respond to the threat upon his queen?

The in-between move is best. This concept of an in-between move--doing something else that is forcing before taking necessary action against an opponent's threat--is often expressed by chess players with the terms zwischenzug (German) or intermezzo (Italian). This concept is the second lesson for advanced players.

We see the in-between move Ne7+ in the actual game, as well as in the variation. In the variation, however, this tactic and the multiple pins do not give White a decisive advantage as they do in the game.

The variation continues:

29.Ne7+ Kf8

We also looked at the consequences of 29...Kh8, which is not discussed in the notes, to wit, 30.Re4 Rxf3 31.Rh4#.

30.Nxg6+ Kg8 31.Qe2 Qb7+ 32.d5 Nf6 and Black has counterplay that balances against White's attack.

07 October 2015

Converting an Advantage

My copy of Chess Informant 125 arrived on Monday and is already proving challenging. As a long devotee of the French Defense who occasionally adopts the Rubinstein, my attention fell quickly upon Alexander Morozevich's "Midnight in Moscow".  I will devote considerable time to this article in the coming weeks.

Then, there is an abundance of games from the Sinquefield Cup annotated by Aleksandar Colovic, Sarunas Sulskis, and Michael Roiz. The English language content goes on through more than half of the volume, and includes the second installment of "The New Romantics" by Pentala Harikrishna. Mihail Marin's "One Golden Rule -- Development" is the latest installment of his "Old Wine in New Bottles," a column I always make a point of reading.

Turning to the traditional games section in Informant codes, the first game offers a challenging study. White's opening faltered and Black gained the advantage. The annotator offers suggested alternatives for more than half of both players' moves. Black blundered from the position in the first diagram and White turned the tide.

Black to move

How would you play this position? How would I? I am mulling over the position while I consume my morning coffee.

05 October 2015

Tunnel Vision

It seemed to me that playing a thematic attack against the King's Indian Defense gave me a straightforward victory. However, post-game analysis reveals several errors in my game. My tunnel vision in pursuit of one idea led to missing a checkmate in one, another checkmate in two, and several better moves throughout. Had my opponent been more alert in defense, he could have recovered from the early error that gave me an attack. Even when I had the victory thoroughly in hand, I missed several opportunities to close the deal.

The battle was a three minute blitz game at 3:00 am. I was awake due to eating an excess of refried beans and rice at dinner.

Stripes, J (1846) -- Internet Opponent (1855) [E90]
Live Chess Chess.com, 05.10.2015

1.d4 Nf6 2.c4 g6 3.Nf3 Bg7 4.Nc3 d6 5.e4 0–0 6.Be3

I prefer 6.Be2 when I'm awake.

6...e5

6...Ng4 points out the flaw in 6.Be3.

7.d5

7.dxe5 is better.

7...Nbd7 8.Bg5

It is interesting that the only master games that have reached this position, and a majority of the amateur games, have done so with White to move. The difference is due to White's poorly timed Be3 followed by the subsequent 8.Bg5. White has already squandered his opening advantage.

8...b6N

Black might have played 8...h6, provoking the wayward bishop to move again.

9.Be2 h6 10.Be3 a6 11.Qc1

Black to move

11...Kh7

11...Nc5! The h-pawn is less vital than White's e-pawn. 12.Bxh6 Ncxe4.

12.h4 Ng4?

This error gave me a lasting initiative, almost. It should have done so. I maintained the initiative, however, because my opponent missed every opportunity to capitalize on the errors in my myopic attack.

13.Ng5+! hxg5 14.Bxg4?

14.hxg5+ Kg8 15.Bxg4 with clear advantage.

14...gxh4 15.Bg5

Black to move

15...f6

15...Bf6 refutes White's move order error.

16.Rxh4+ Kg8 17.Bh6

17.Be6+ Rf7 18.Bh6.

17...Rf7 18.Be6

18.Bxg7 Rxg7 19.Be6+ Kf8 (19...Rf7 20.Qh6) 20.Qh6.

18...Nc5

White to move

19.Bxf7+

19.Bxg7! Nxe6 20.Rh8+ Kxg7 21.Qh6#.

19...Kxf7 20.Bxg7 Kxg7 21.Qh6+ Kf7 22.Qh7+ Ke8

White to move

23.Qh8+

23.Qxg6+ Kd7 24.Qf5+ Ke7 25.Rh7+ Ke8 26.Qh5+ Kf8 27.Qf7#.

23...Kd7 24.Qg7+ Qe7 25.Qxg6 Nd3+ 26.Ke2 Nf4+

White to move

27.Rxf4

Box, as they say. Only move.

27...exf4 28.Rh1 Qe5 29.Rh7+ Kd8 30.Qg8+ Qe8 31.Qg7 Bf5

White to move

32.Rh8

I have been trying to pin my opponent's queen with my rook for seven moves. Now, finally, I get to do that. I might have chosen a better target: 32.Qxc7#.

32...Bxe4 33.Rxe8+ Kxe8 34.Nxe4 Rd8

34...f3+ 35.Kxf3 Kd8 36.Qf8+ Kd7 37.Nxf6#.

35.Nxf6# 1–0

It could have been a satisfying win if I had not taken the time to examine it. Instead, it is an instructive win that shed light on a mental error that sometimes plagues me in over the board play. Myopia produces an inflexible approach to the game. Instead of orchestrating an attack by always seeking the best moves, I charge in like a bull in a china shop. Sometimes that still gets the job done, but sometimes that gives the opponent counterplay.

02 October 2015

Expose the King!

In a recent correspondence game, I found a single reference game in which Black's play struck me as a bit timid.

Black to move

My database contains six games that reached this position, one with White to move. I only looked at those games played by masters (ratings above 2200). The highest rated Black player continued with 10...Ne5.

10...Bd6 was played in the other two games. White must address the threat to h2.

11.f4

My opponent threatened e5, following one of my reference games.

11.g3 was attempted in the other reference game. That did not go well for White. 11...Bxg3 12.hxg3 Qxg3 13.Kh1 Ne5 14.Nc5 Nfg4! 15.fxg4 Qh3+ 16.Kg1 Qxe3+ 17.Rf2 Qxc5 and White resigned after two more moves. Brynjarsson -- Bjornsson, Reykjavik 2009.

11...b4

I studied the remaining reference game, and noticed that Black gained an attack on the king. Black's attack faltered, but need not have done so. Initially, Black seems to sacrifice a knight but gains three pawns for the piece. Another sacrifice, however, this time for a single pawn fatally exposes the White king. This second sacrifice was not played in the reference game.

12.e5

The fork.

12...Nxe5

Beginning a tactical operation that exchanges a knight for three pawns and leaves the White king exposed.

13.fxe5 Bxe5 14.Nb1N

The reference game continued: 14.Na4 Bxh2+ 15.Kh1 Qg3 (15...Bxg2+! 16.Kxg2 Qg3+ 17.Kh1 Qh3 18.Rf2 Bf4+ 19.Kg1 Bxe3 and Black has recovered the material with interest.) 16.Bf3=  and the game was drawn in 42 moves. Toubale,T -- Villeneuve,A (2345), Cannes 1989.

14...Bxh2+ 15.Kh1 

Black to move

I had been aiming for this position.

15...Bxg2+! 

As seen in the reference above, 15...Qg3 gives White time to organize a defense.

16.Kxg2 Qg3+ 17.Kh1 Qh3

White to move

18.Rf3

18.Rf2 is better 18...Bf4+ 19.Kg1 Bxe3 20.Qf1 Qg3+ 21.Qg2 Bxf2+ 22.Kf1 Ne4–+.
18.Rxf6 fails. 18...Bg3+ 19.Kg1 Qh2+ 20.Kf1 Qh1+ 21.Bg1 Qh3#.

18...Bg3+ 19.Kg1 Qh2+ 20.Kf1 Qh1+ 21.Bg1 Qh3# 0–1

Finding the decisive blow was almost certainly helped by my having read earlier this summer several of Mihail Marin's recent columns for Chess Informant. In particular, for Informant 122 he wrote, "Is Chess a Matter of Memory? Lasker's Double Bishop Sacrifice."

30 September 2015

Child's Play

A two pawn advantage in a rook ending should be decisive. Indeed, I won easily with such an advantage last night in a three minute blitz game. The win seemed child's play.

A few minutes of postgame analysis this morning revealed another story. I made a fatal blunder and won because my opponent missed a critical opportunity.

Black to move
After 46.Ke2
46...g5 47.Kf3 gxf4

47...Kg6 is better. 48.Rxg2 Rxg2 49.Kxg2 g4 and the pawn ending is an elementary win for Black.

48.exf4 e5 49.fxe5+ Kxe5 50.Re1

Black to move

50...Kf6??

It was necessary to move the king to the d-file. 50...Kd4 was best.

51.Rg1??

51.Kf2 Rg5 (51...f4 52.Rg1=) 52.Rb1 Rg8 and the computer thinks that Black has a slight edge. Accurate play by White should hold the draw.

White to move
Analysis Diagram after 52...Rg8

The Drawing Method

From the analysis diagram, I played out the position against Stockfish. Perhaps the drawing method is not as simple as the win became in the game, but it requires only application of some elementary techniques.

Stripes,James -- Stockfish 6 64

53.Ra1 Ke5 54.Ra5+

Side checks are the key drawing method until White's king gets too close to the rook, then either restraining the advance of the f-pawn or rear-checks become necessary. Although not a textbook Philidor position, the drawing method follows the same idea.

54...Kd6 55.Ra1 Rg7 56.Ra6+ Kc5 57.Ra5+ Kb4 58.Ra1 Kc3

White to move

59.Kg1

59.Ra3+ fails to Kb2.
59.Rg1 fails to Kd2.
59.Rd1 fails to f4.

59...f4 60.Ra4 Rg4 

60...f3 is met by 61.Rf4

61.Ra3+ Kd4 62.Ra4+ Kc5 63.Ra5+ Kb4

White to move

64.Rf5

White now prevents f3.

64...Ka3 65.Rf8 Kb3 66.Rf7 Kc2 67.Rf8 Kd3 

White to move

68.Rd8+

With the White king able to support f3, he must be harassed endlessly with checks from the rear.

68...Ke2 69.Re8+ Kd1 70.Rd8+ Ke1 71.Re8+ Kd2 72.Rd8+ Ke3 73.Re8+ Kf3

White to move

74.Ra8

Preparing to resume checks from the side.

74...Ke4 75.Ra4+ Kf5 76.Ra5+ Ke6 77.Ra6+ Kd5 78.Ra5+ Kc6 79.Rf5

Again restraining the f-pawn.

79...Kd6 80.Rf8 Ke6 81.Re8+ Kf6 82.Rf8+ Kg7 

White to move

83.Rf5 Kg6 84.Rf8 f3 

The computer gives up.

85.Rxf3 Kh6 86.Rf2 Rg5 87.Rxg2 Rc5 88.Rf2 Ra5 ½–½


The Actual Game

After 51.Rg1?? in the game, we reached this position.

Black to move

51...Kg5

This was Black's only winning move, but is was simple to find and I played it automatically.

52.Kf2 f4 53.Kf3 Rg3+ 54.Kf2 Kg4 55.Re1

Black to move

Now, it is time to convert the rook ending into an elementary pawn ending.

55...g1Q+ 56.Rxg1 Rxg1 57.Kxg1 Kg3 58.Kf1 Kf3 59.Ke1 Kg2 and White resigned.

29 September 2015

Strategic Nuances

This position, which I came to via Karpov -- Timman, European Junior Championship, Groningen 1967-1968, has appeared on the board at least 119 times.

Black to move

Jan Timman played 5...Ba5.

Anatoly Karpov wrote:
The bishop is badly placed at a5, and the whole of White's subsequent play is built on exploiting this circumstance. I consider that Black should have taken the knight, and then played Nc6...d6...and e5.
Anatoly Karpov: Chess is My Life (1980), 28.
Karpov won this game and the championship. He had the Black side of this position against Victor Korchnoi in 1993 and played 5...Bxc3.

Timman's move has been more popular, having been played at least 86 times to 32 for 5...Bxc3. However, White's score against 5...Ba5 has been 67%, while White has scored 56% after 5...Bxc3.

Why is a5 such a poor spot for the bishop?

Karpov elucidates two resulting vulnerabilities in the ensuing comments. One, the presence of the bishop on a5 prevents Black from playing b6, and hence the c5 pawn is difficult to defend. Two, he offers some unplayed lines in which White either wins a piece through tactics, or White's central pawns become mobile at the cost of a pawn.

In the game itself, White's pieces became more active. Under the pressure of an inferior position, Timman blundered away a pawn.

28 September 2015

A Better Day

Taking Care of Business

After losing my round two game and taking my usual round three bye, I started Sunday morning with 1.5/3 in the Eastern Washington Open. My round four opponent is returning to chess after fifty years away and is much stronger than his rating suggests. Even so, he missed a tactical finesse that gave me an opportunity.

Black to move

In round five, I had my third Black in four games. I spent some time with the tournament director looking at the pairings, the logic, and the alternate possibilities. Due to a large number of byes and several upsets by the oldest and youngest players in the event, someone had to forego the usual color equalization. My opponent should not have three Blacks in a row, so he had White.

While I played something resembling the Czech Benoni in round four, I opted for a more normal Modern Benoni in round five. When my opponent played the thematic e4-e5 push, I spent nine minutes working out the best response. Prior to that I had averaged one minute per move.

Black to move

Would you play these two positions the way I did?

I finished the event with 3.5/5 and tied with a bunch of players in third place, sharing the A Class prize with two others. The only Expert went 5-0. All of the A Class players suffered a loss, some more than one. One of my students took out two A Class players on Saturday. The young woman who beat me on Saturday beat another A Class player in round five.